Experience Center
3rd-Party App Governance Policies
Policies enable you to easily and efficiently set and perform automatic actions such as classifying an app as sanctioned or unsanctioned, or take automated action such as revoke, ban, or review. They also enable you to set notifications for new applications that are added to the application inventory matching a rule (view).
Creating a New Policy
There are two ways to create a new policy. You can create a policy from the Inventory page or the Policies page. You must first define the rule or the view for which you want to apply the policy. To learn more, see Custom Views.
Creating a Policy from the Inventory Page
To create a new policy:
Click Inventory in the left-side navigation.
The Inventory page appears.
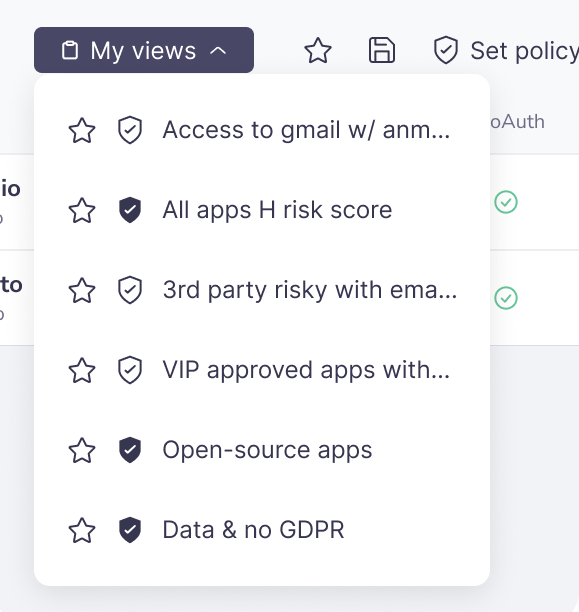
From the My Views drop-down menu, select the custom view for which you want to apply the policy. This means that the policy triggers every new app in that view. Only one custom view is supported per policy.
You should consider adding the App Status filter when creating custom views to be used in policies, so if an app is reinstalled, the policy will be triggered again.
Click Set Policy.
The Set Policy window appears.
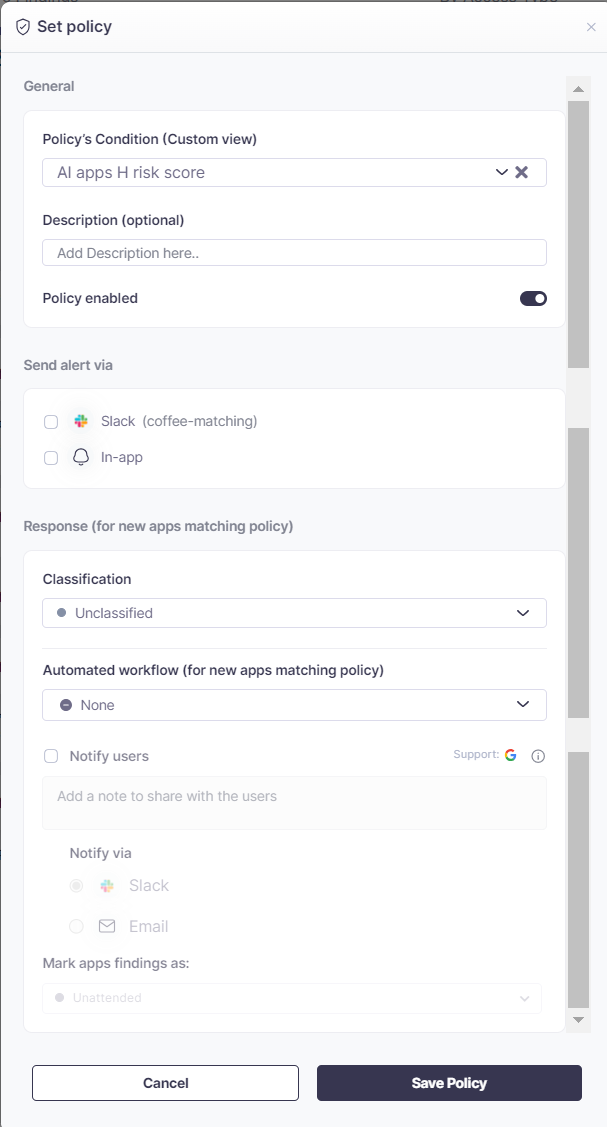
In the Set Policy window:
- Policy's Condition (Custom view): The currently selected custom view is automatically populated.
- Description (optional): Add a description for the policy. This can be anything you want to mention regarding the policy and its purpose.
- Policy enabled: Select whether this policy should be enabled or disabled.
- Send alert via: Define how you want to receive alerts for this policy (every time the policy is triggered). You can select one of the following options:
Slack: Notifications are sent to the selected Slack channel. You must configure Slack for receiving alerts. To learn more, see Adding Outbound Integrations.
Alerting via outbound integrations such as Slack is dependent on your license.
- In-app: Notifications are received within 3rd-Party App Governance and are accessible via the notification icon.
- Under Response (for new apps matching policy), select the actions you want to take when the policy is triggered.
- Classification: Select the desired classification value for the apps. To learn more, see Classifying Apps.
- Automated workflow (for new apps matching policy): Select the desired automated workflow. Automated workflow is supported on Google and partially on Microsoft and is dependent on your license. To learn more, see Configuring End User Review and Revoking and Banning Apps.
- End User Review: Select this option if you want to invoke an end user review for the app. Choose if you want the review done through Slack or email. You can also add a personalized message.
- Revoke/Ban: Select this option to revoke or ban apps.
- Mark apps findings as: From this drop-down menu, select how you want to handle any findings not resolved on these apps.
- After you define the policy, click Save Policy to save it.
Creating a Policy from the Policies Page
To create a new policy:
Click Policies in the left-side navigation.
The Policies page appears.
Click Create Policy.
The Set Policy window appears.
- In the Set Policy window, enter the relevant data as required. To learn more, see the Set Policy window configuration in Creating a Policy from the Inventory Page.
- After you define the policy, click Save Policy to save it.
Editing an Existing Policy
You can edit an existing policy from the Inventory page or the Policies page.
To edit an existing policy from the Inventory page:
Click Inventory in the left-side navigation.
The Inventory page appears.
Select the custom view for the policy and click Edit Policy.
The Edit Policy window appears.
- In the Edit Policy window, make changes to the policy as necessary.
- Click Save Policy.
To edit an existing policy from the Policies page:
Click Policies in the left-side navigation.
The Policies page appears.
- Edit the desired policy using one of the following methods:
- Inline Editing: Click and edit applicable attributes such as Notify Via, Classification, Automated Workflow, Enabled/Disabled, etc. Your changes are saved immediately.
- Edit Policy Window: Click on the policy name. The Edit Policy window appears, and you can make changes to the policy as necessary.
Editing an Out-of-the-Box Policy
3rd-Party App Governance supports a set of out-of-the-box policies such as new risky apps, app risk increased, new high/medium severity findings, etc. You can use these policies to get notified accordingly and to take relevant actions such as classification, etc.
To edit an out-of-the-box policy:
Click Policies in the left-side navigation.
The Policies page appears.
- Find the relevant policy. You can see which of the policies are out of the box in the Author column (they are marked as Zscaler).
- Make the desired changes to the policy using inline editing or the Edit Policy Window. To learn more, see Editing an Existing Policy.
Not all of the out-of-the-box policy attributes can be modified (i.e., you cannot change the condition for out-of-the-box policies).
Policies Examples
The following table lists the best practice policies widely adopted by our clients. Copy the view link to get the relevant view on 3rd-Party App Governance, then you can set a policy based on any of the following views.
| View | View Link | Suggested Policy |
| Apps with mail access | https://apptotal.zscaler.com/apps?page=1&access-type=broad+data+access&origin=3rd+party&service=gmail | Reviewing |
| High risk apps | https://apptotal.zscaler.com/apps?page=1&risk-score=high | Reviewing > Unsanctioned |
| GDPR violation | https://apptotal.zscaler.com/apps?page=1&access-type=broad+data+access&noncompliance=gdpr | Unsanctioned |
| Open Source Apps | https://apptotal.zscaler.com/apps?page=1&indicators=open-source+app | Reviewing |
| Gaming apps (by category) | https://apptotal.zscaler.com/apps?page=1&categories=gaming | Unsanctioned |


