Experience Center
Configuring User Portals
After you configure a user portal, a canonical name (CNAME) is generated and must be published in your public DNS. When a user's web browser resolves to the user portal URL, they will need to be authenticated against their identity provider (IdP). After authentication, the user portal is displayed along with all associated application links. The user will only be able to view links to applications they are allowed to access. To learn more, see About User Portal Links.
In order for an end-user to access a user portal, at least one SAML attribute needs to be configured for your IdP in Private Applications. To learn more, see About SAML Attributes and Configuring an IdP for Single Sign-On.
The Authentication Timeout for a user portal session is based on the Default Timeout Policy Rule. If you edit the Default Timeout Policy Rule, the change does not immediately impact any currently authenticated user portal sessions. When an end-user's session expires, the user portal might become unresponsive. If this occurs, they need to reauthenticate into the portal in order to continue accessing applications.
To add a user portal:
- Go to Policies > Access Control > Clientless > User Portals.
- Click Add User Portal.
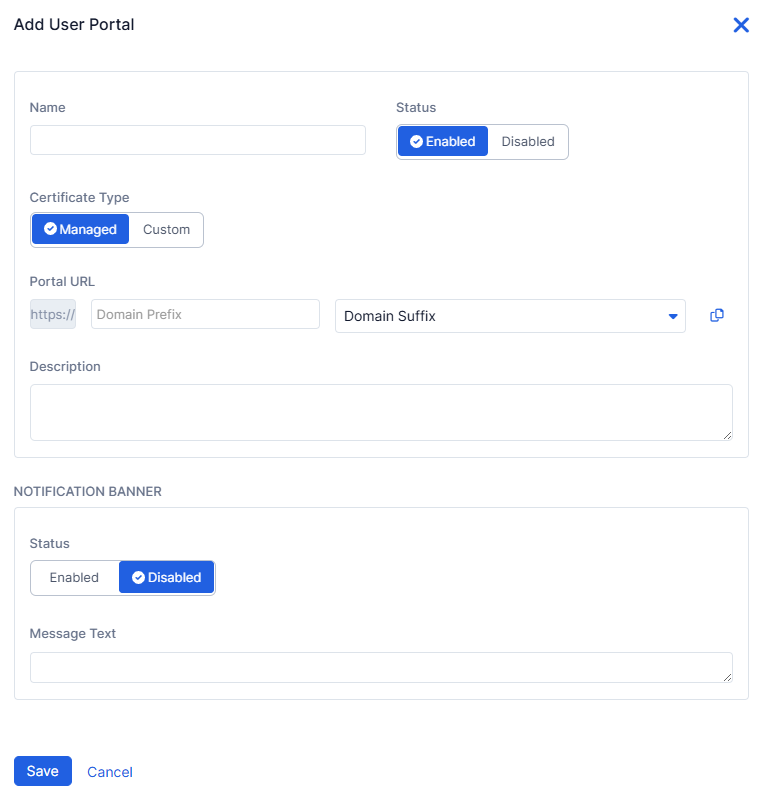
The Add User Portal window that appears
- In the Add User Portal window:
- Name: Enter a name for the portal. The name cannot contain special characters, with the exception of periods (.), hyphens (-), and underscores ( _ ).
- Status: Enable the portal. If Disabled, the portal will be inaccessible to users.
- Certificate Type: Select either Managed or Custom.
- If you select Managed, the portal certificate is managed by Zscaler. Complete the following steps.
- Enter the domain prefix.
- Select the domain suffix from the drop-down menu.
- Click the Copy icon to copy the URL.
- If you select Custom, then you select an existing certificate. Complete the following steps.
Enter the full URL for the portal. This is the URL that the users access to view the portal. The URL must use the HTTPS protocol and be a fully qualified domain name (FQDN).
A user portal's FQDN cannot be configured as an application within an application segment.
- Select a certificate from the Portal Server Certificate drop-down menu that is associated with the portal. Click Clear Selection to deselect the certificate. To learn more, see About (Web Server) Certificates.
- Description: (Optional) Enter a description for the portal.
- If you want to display a notification to your users at the top of the portal page, under Notification Banner:
- Status: Enable the notification banner.
- Message Text: Enter the notification text that you want displayed in the portal's banner.
- If you select Managed, the portal certificate is managed by Zscaler. Complete the following steps.

- Click Save.
For user portals with a custom certificate, complete the following steps:
- On the User Portals page, expand the row to view the portal details within the table, then click the Copy icon next to the Canonical Name (CNAME). You need this CNAME record for your public DNS.
- Add the CNAME information you just copied to your public DNS and verify that the FQDN for the user portal resolves to the record.
Zscaler automatically managed the public DNS for the FQDN of user portals with a Zscaler-managed certificate.

