Workflow Automation
Configuring the DLP Application Integration Using Amazon Web Services
To configure Workflow Automation, you need to deploy a Zscaler Incident Receiver (ZIR) Amazon Web Services (AWS) EC2 instance. Doing so enables your organization to receive Data Loss Prevention (DLP) incident metadata files and the evidence file from ZIR and upload them to your organization's AWS Simple Storage Service (S3) buckets. This article describes how to configure the DLP application integration using AWS.
You can also configure the DLP application integration using Azure. To learn more, see Configuring the DLP Application Integration Using Azure.
To configure the DLP application integration using AWS:
- 1. Create resources for AWS.
You can create AWS resources by creating a CloudFormation stack in AWS, or you can create them manually using the AWS console.
- Creating AWS Resources Using a CloudFormation Stack in AWS
- a. Download the Zscaler template file from the Workflow Automation Admin Portal.
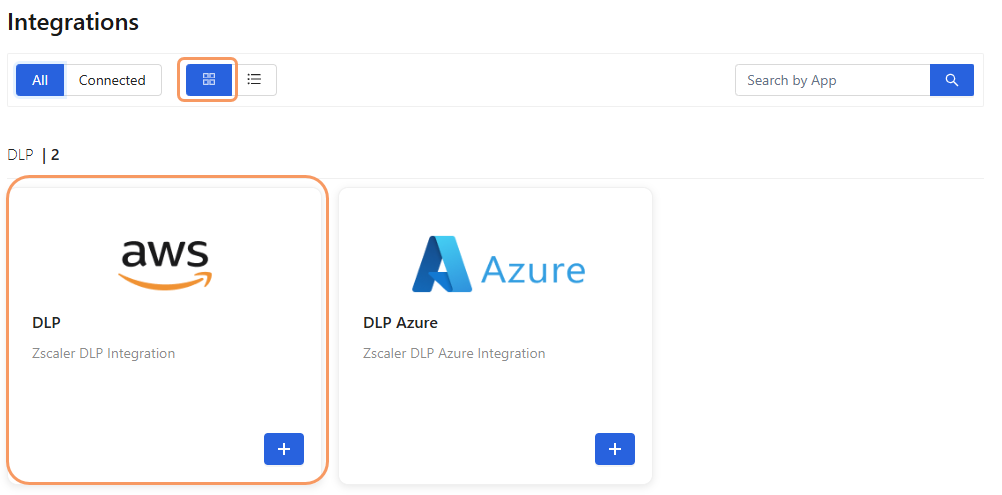
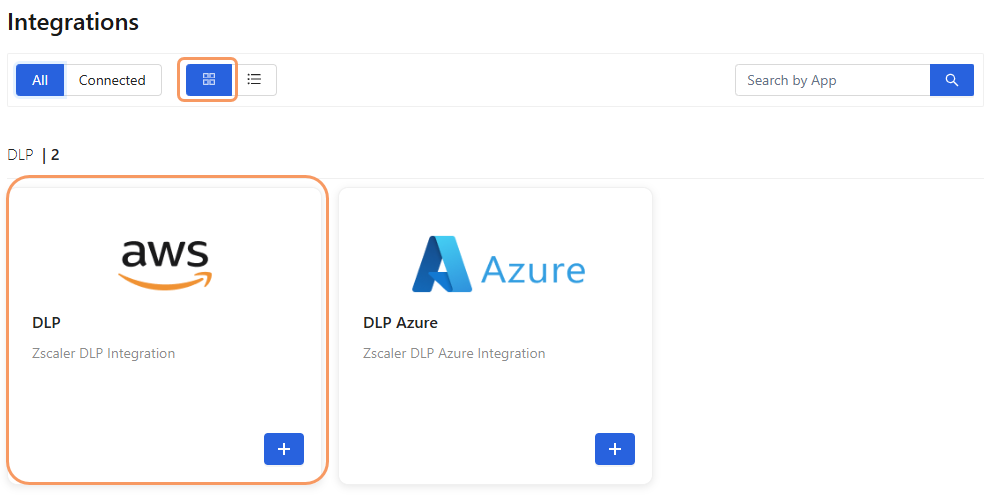
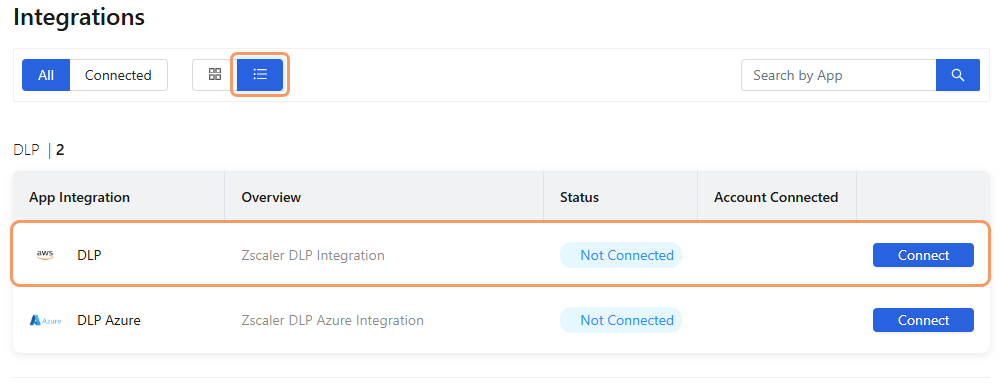
Go to Setup > Integrations. The Integrations dashboard appears, displaying a DLP application tile. The Tile View icon is selected by default.
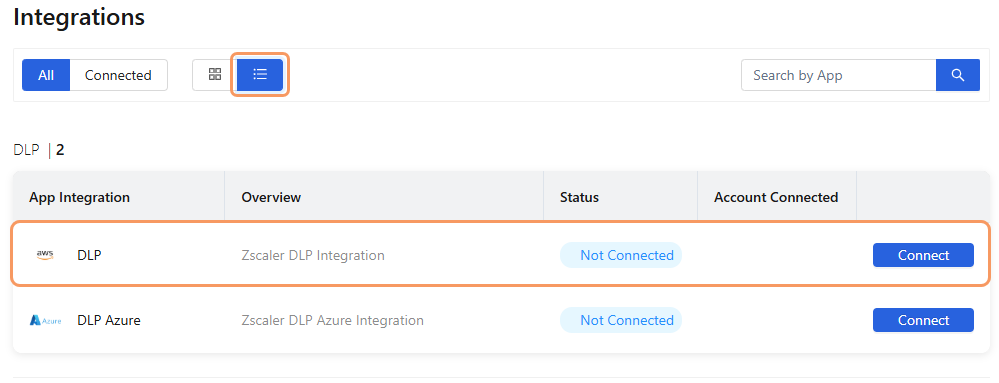
On the Integrations dashboard, at the top left of the dashboard, click the List View icon to change the format for the dashboard.
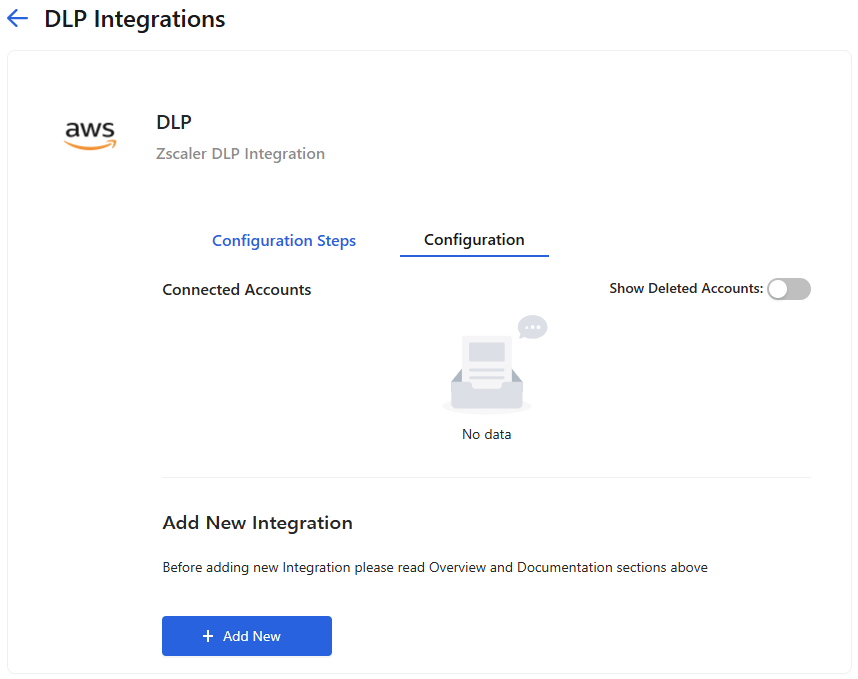
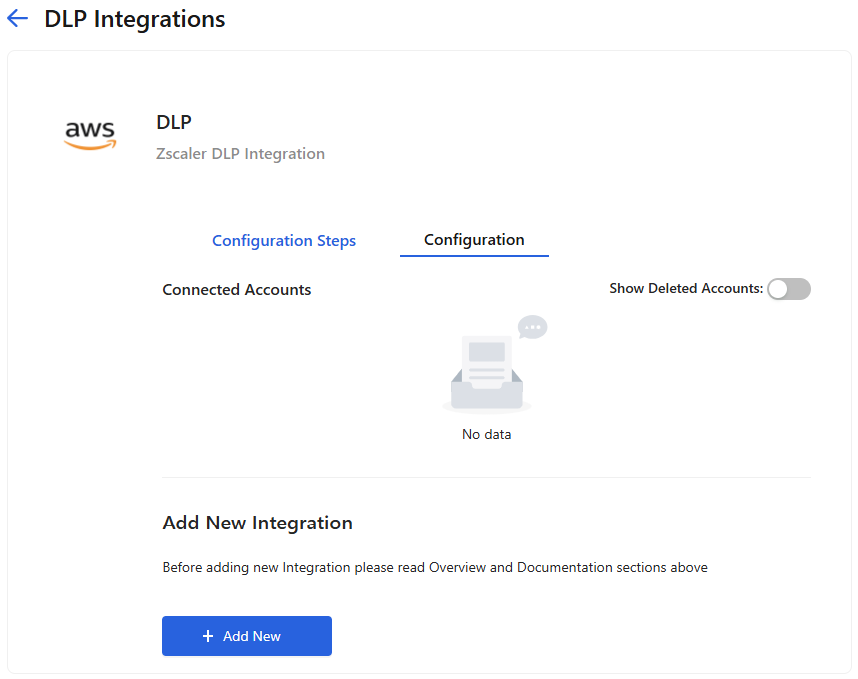
In the list view format, click Connect next to the DLP application integration. The Zscaler DLP Integration details page appears, displaying a Configuration Steps tab and a Configuration tab.
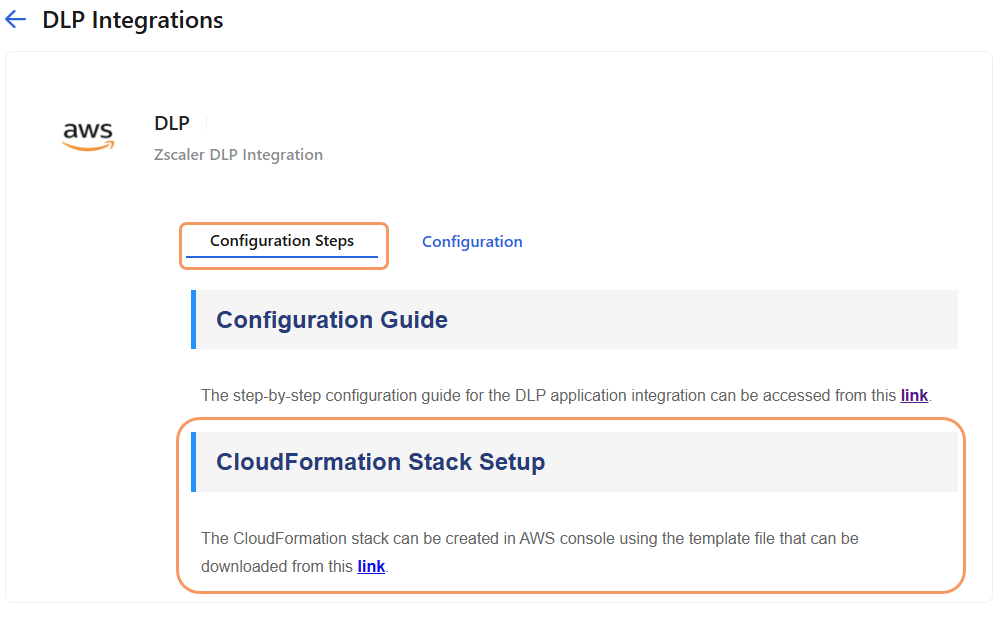
- Click the Configuration Steps tab.
On the Configuration Steps tab, under CloudFormation Stack Setup, click the template link to download the Zscaler template file.
- b. Create the CloudFormation stack in AWS using the template file provided by Zscaler.
You can create the CloudFormation stack on the AWS console using the template file you previously downloaded from the Workflow Automation Admin Portal.
Prerequisites
Make sure the following prerequisites are met:
Ensure you have the following list of permissions in AWS, at a minimum, to successfully create the CloudFormation stack:
Permissions AWS Resource Creation AmazonS3FullAccess To create the data and metadata bucket for uploading incidents and incident metadata. AWSKeyManagementServicePowerUser To create the Key Management Service (KMS) Key for encrypting the message in the Simple Notification Service (SNS) topic. IAMFullAccess or
Custom IAM Policy with permission to Create Role and Create Policy
To create a cross-account policy for accessing the S3 bucket.
To create a cross-account role and attach the cross-account policy.
To create the Trust Relationship between the Workflow Automation account and the cross-account role.AmazonSNSFullAccess To create an SNS topic.
To provide access for the S3 bucket to publish to the SNS topic.
To provide access to Workflow Automation, to subscribe the Simple Queue Service (SQS) to the SNS topic.- Choose the region where you want the S3 buckets to be created on the AWS console. On the AWS console, select the CloudFormation service and then, from the drop-down menu at the top of the console, select the region.
Creating the CloudFormation Stack
To create the CloudFormation stack:
- At the top left on the AWS console, click the Services icon.
- Go to Management & Governance > CloudFormation.
- Click Create Stack and from the drop-down menu, select With new resources (standard). The Create Stack page appears.
- On the Create stack page:
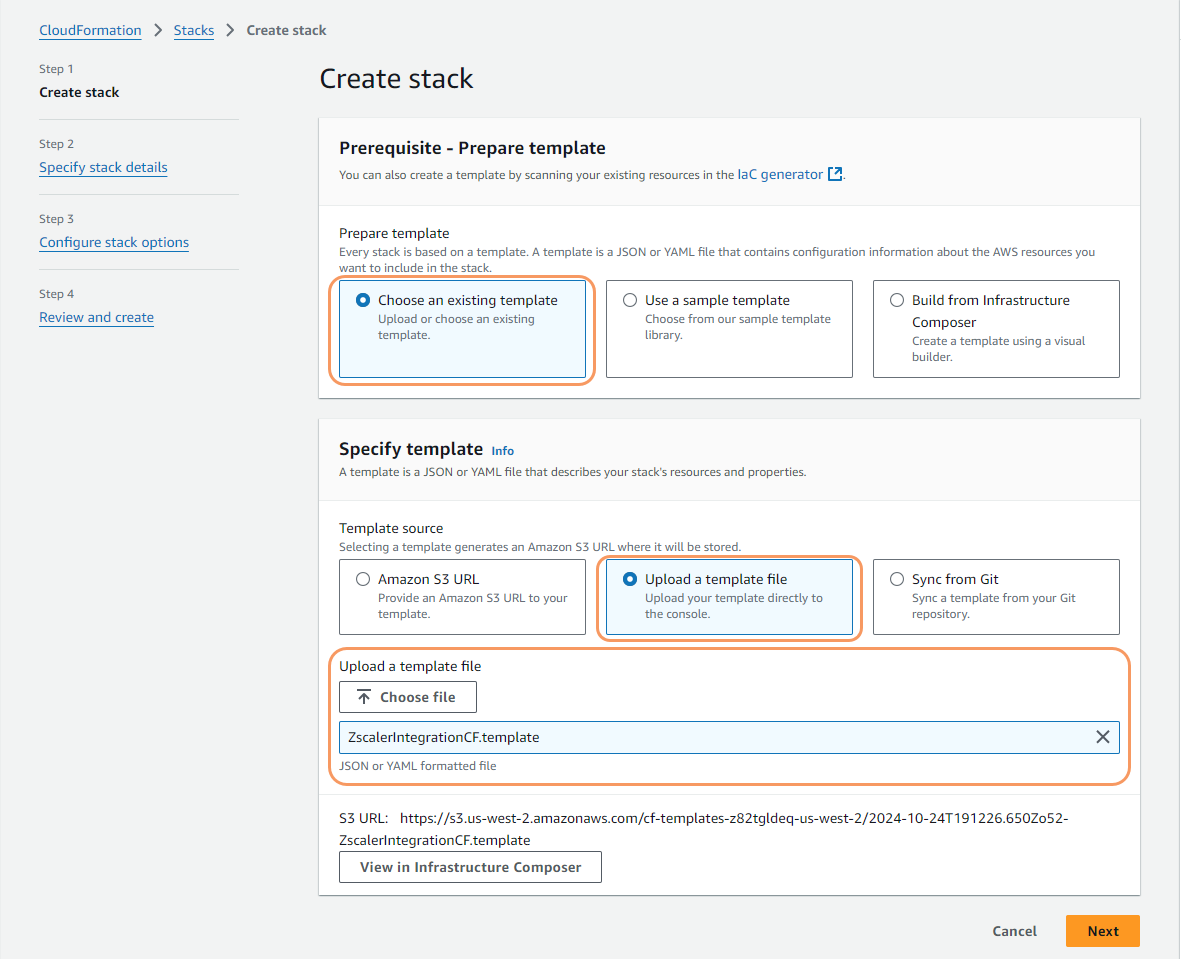
- In the Prerequisites - Prepare template section, select Choose an existing template.
In the Specify template section:
- Select Upload a template file.
- Click Choose file and upload the Zscaler template file that you downloaded.
Click Next. The Specify stack details page appears.
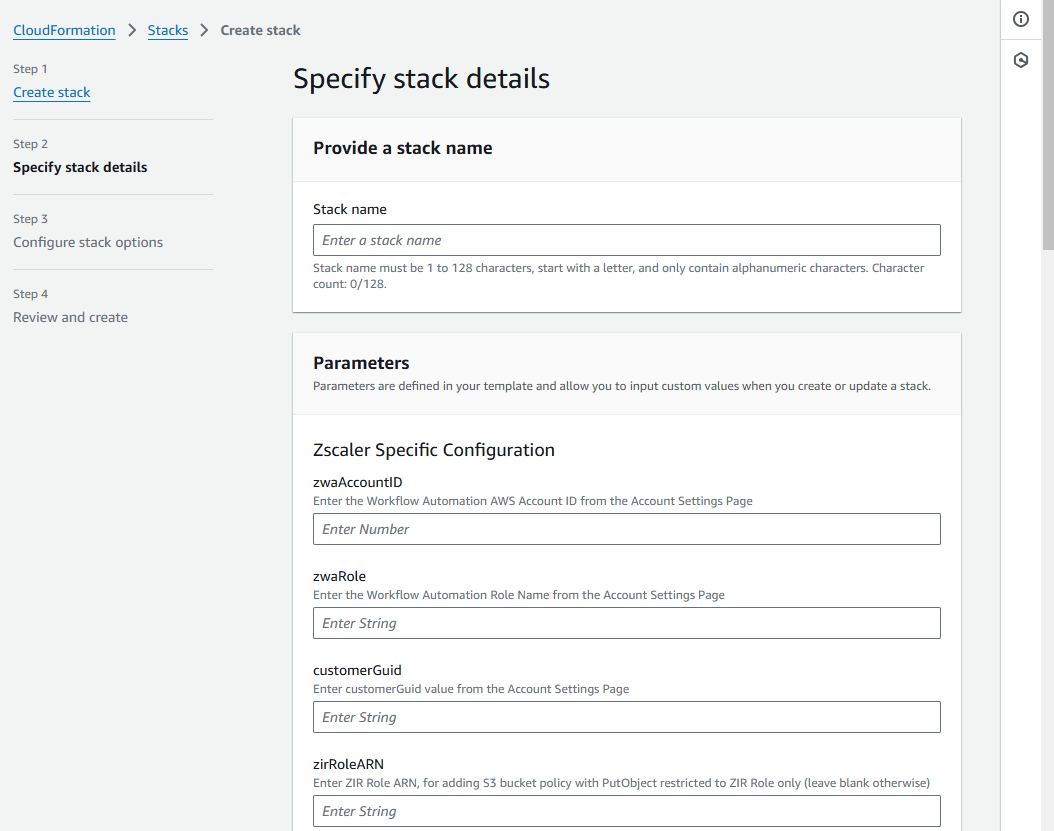
- On the Specify stack details page:
In the Provide a stack name section, enter a Stack name—for example,
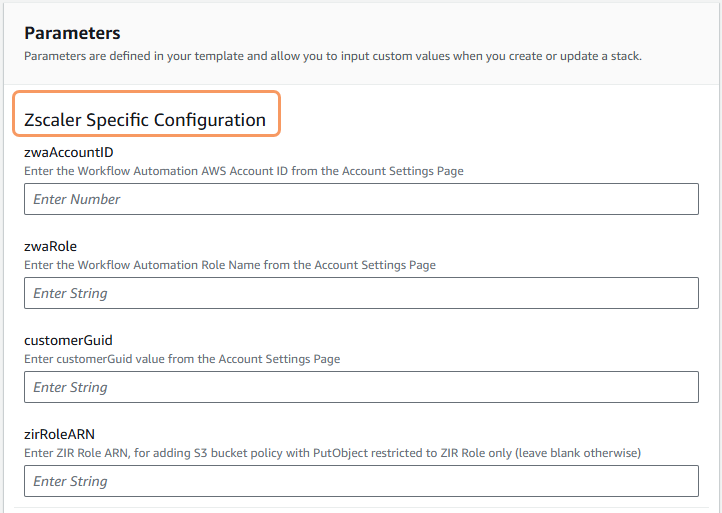
ZscalerIntegration.In the Zscaler Specific Configuration parameters section:
- zwaAccountID: Copy the AWS Account from the Account Settings page in the Workflow Automation Admin Portal and enter it here. This parameter is the Workflow Automation AWS account.
- zwaRole: Copy the Role Name from the Account Settings page in the Workflow Automation Admin Portal and enter it here. This enables the integration to be restricted to only this role in your Workflow Automation AWS account.
- customerGuid: Copy the Customer Globally Unique Identifier (GUID) from the Account Settings page in the Workflow Automation Admin Portal and enter it here.
- zirRoleARN: Enter the ZIR Role Amazon Resource Name (ARN), which is the only role allowed to write S3 objects for the S3 bucket policy. A zirRoleARN is a string of characters. You can find this ARN in the AWS account where the ZIR is hosted.
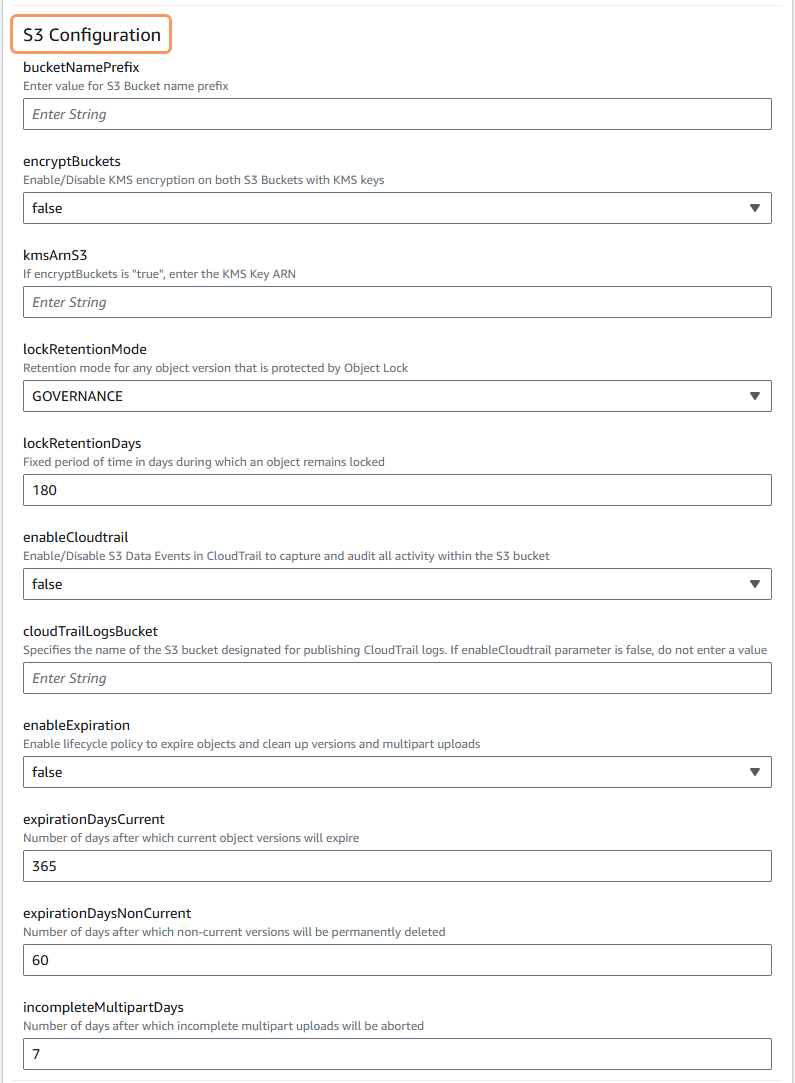
In the S3 Configuration parameters section:
- bucketNamePrefix: Enter an S3 bucket name prefix—for example,
corp.abc.com. The prefix can be up to 40 characters. - encryptBuckets: Select true to enable KMS encryption on both S3 buckets with KMS keys. By default, false appears.
- kmsArnS3: This parameter only applies if you select true for the encryptBuckets parameter in this section, and you select false in the allowKMSKeyCreate parameter in the KMS Encryption Configuration parameters section. Enter the KMS key ARN to be used for the encryption on the S3 buckets in your AWS account. A kmsArnS3 is a string of characters.
- lockRententionMode: From the drop-down menu, select the retention mode for any object version that is protected by Object Lock. Retention modes are Governance and Compliance. To learn more about retention modes, refer to the Amazon Simple Storage Service User Guide.
- lockRententionDays: Enter the number of days during which an object remains locked. By default, 180 appears.
- enableCloudtrail: Select true to enable S3 data events in CloudTrail to capture and audit all activity within the S3 bucket. By default, false appears.
- cloudTrailLogsBucket: This parameter only applies if you select true for the enableCloudtrail parameter in this section. Enter the name of the S3 bucket designated for publishing CloudTrail logs. To learn more about CloudTrail event logging, refer to the Amazon Simple Storage Service User Guide.
- enableExpiration: Select true to enable the lifecycle policy to expire objects and clean up versions and multipart uploads. By default, false appears. To learn more about expiring objects, refer to the Amazon Simple Storage Service User Guide.
- expirationDaysCurrent: Enter the number of days after which the current object versions expire. By default, 365 appears.
- expirationDaysNonCurrent: Enter the number of days after which the non-current versions are permanently deleted. By default, 60 appears.
- incompleteMultipartDays: Enter the number of days after which incomplete multipart uploads are aborted. By default, 7 appears.
- bucketNamePrefix: Enter an S3 bucket name prefix—for example,
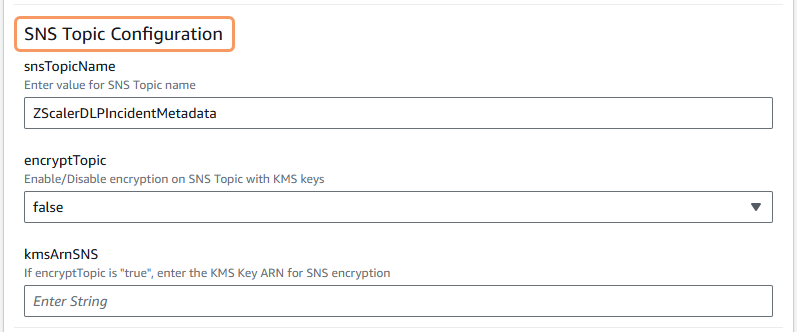
In the SNS Topic Configuration parameters section:
- snsTopicName: The default SNS topic name appears in the field. You can change the name of the SNS topic if you want. The CloudFormation stack script creates an SNS topic with this name.
- encryptTopic: Select true to enable KMS encryption on the SNS topic with KMS keys. By default, false appears.
- kmsArnSNS: This parameter only applies if you select true for the encryptTopic parameter in this section, and you select false in the allowKMSKeyCreate parameter in the KMS Encryption Configuration parameters section. Enter the KMS key ARN to be used for the encryption on the SNS topic in your AWS account. A kmsArnSNS is a string of characters.
In the KMS Encryption Configuration parameters section, in the allowKMSKeyCreate field, select true to enable the CloudFormation stack script to create a KMS key and link that key to the S3 buckets and the SNS topic for encryption. By default, false appears. This parameter only applies if you select true for the encryptBuckets parameter in the S3 Configuration parameters section and the encryptTopic parameter in the SNS Topic Configuration parameters section. If you don't enable this option, and you want to use encryption for the S3 buckets and the SNS topic, you must enter an already created KMS key ARN in the kmsArnS3 parameter in the S3 Configuration parameters section and the kmsArnSNS parameter in the SNS Top Configuration parameters section.
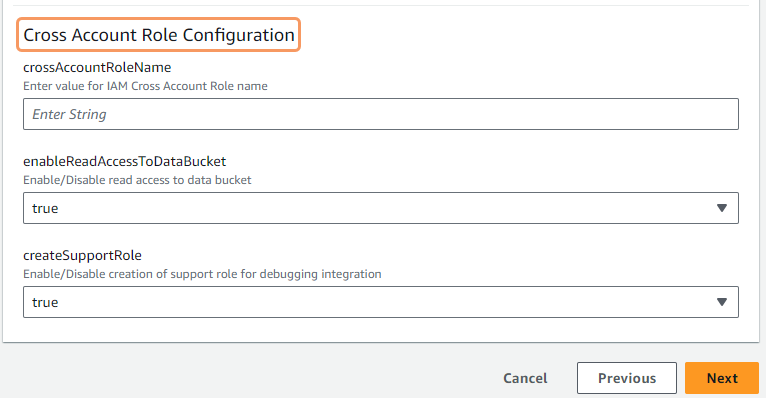
In the Cross Account Role Configuration parameters section:
- crossAccountRoleName: Enter an Identity and Access Management (IAM) cross-account role name—for example,
zscaler-cross-account-role. A role name is a string of characters. - enableReadAccessToDataBucket: Select true to enable the integration account to have read access to the data bucket. By default, true appears.
- createSupportRole: Select true to enable the CloudFormation stack script to create an additional support role for your account. After this role is created, Zscaler Support can assume this role and assist you with troubleshooting any integration configuration issues that you might have in your AWS account. This role is restricted and cannot access any of the incidents or the data associated with those incidents in your account. By default, true appears. Creating a support role is optional.
- crossAccountRoleName: Enter an Identity and Access Management (IAM) cross-account role name—for example,
Click Next. The Configure stack options page appears.
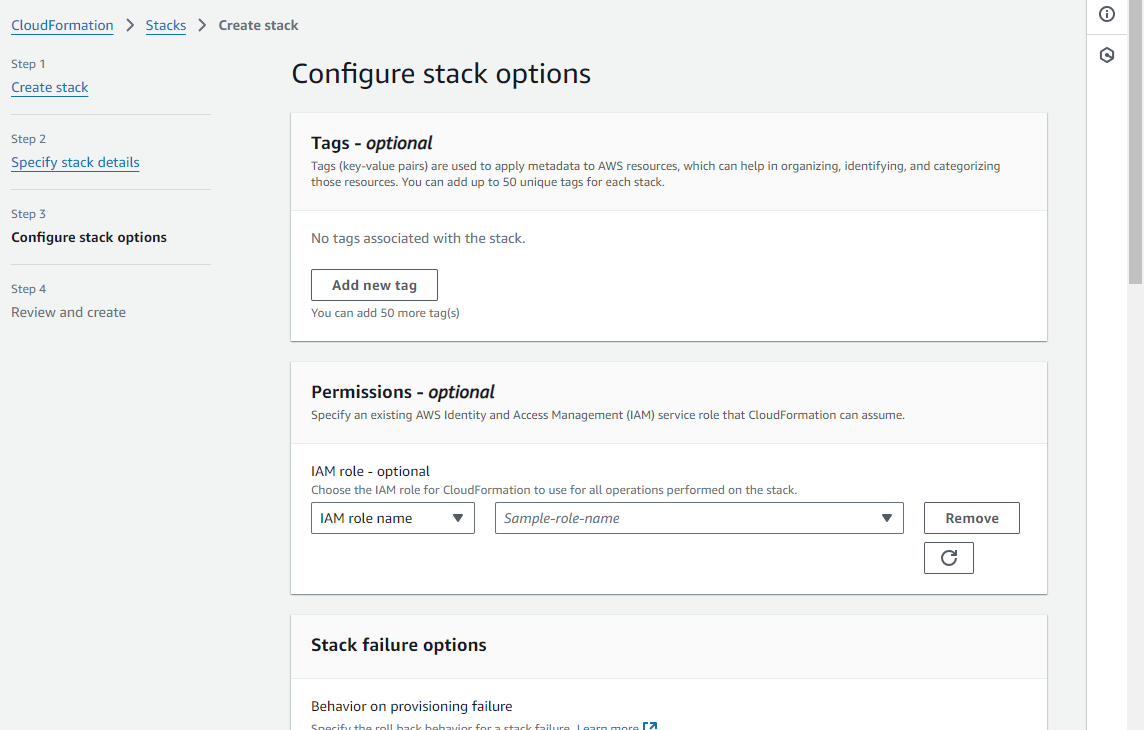
- On the Configure stack options page:
(Optional) In the Tags section, configure the tags that you want to apply to the resources that the stack creates.
(Optional) In the Permissions section, choose the IAM role for CloudFormation to use for all operations performed in the stack.
- In the next sections (Stack failure options and Advanced options) on the page, leave the default values.
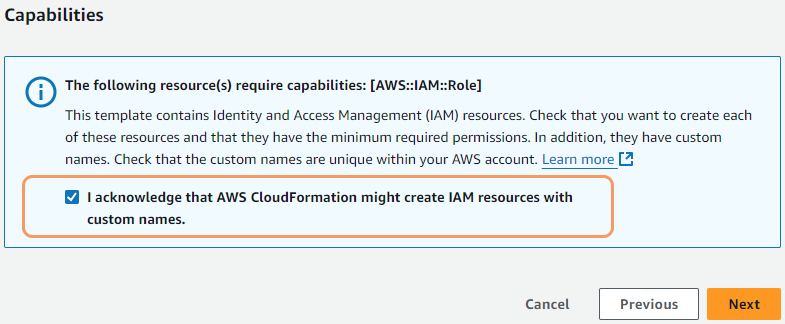
In the Capabilities section (bottom of page), select the I acknowledge that AWS CloudFormation might create IAM resources with custom names checkbox.
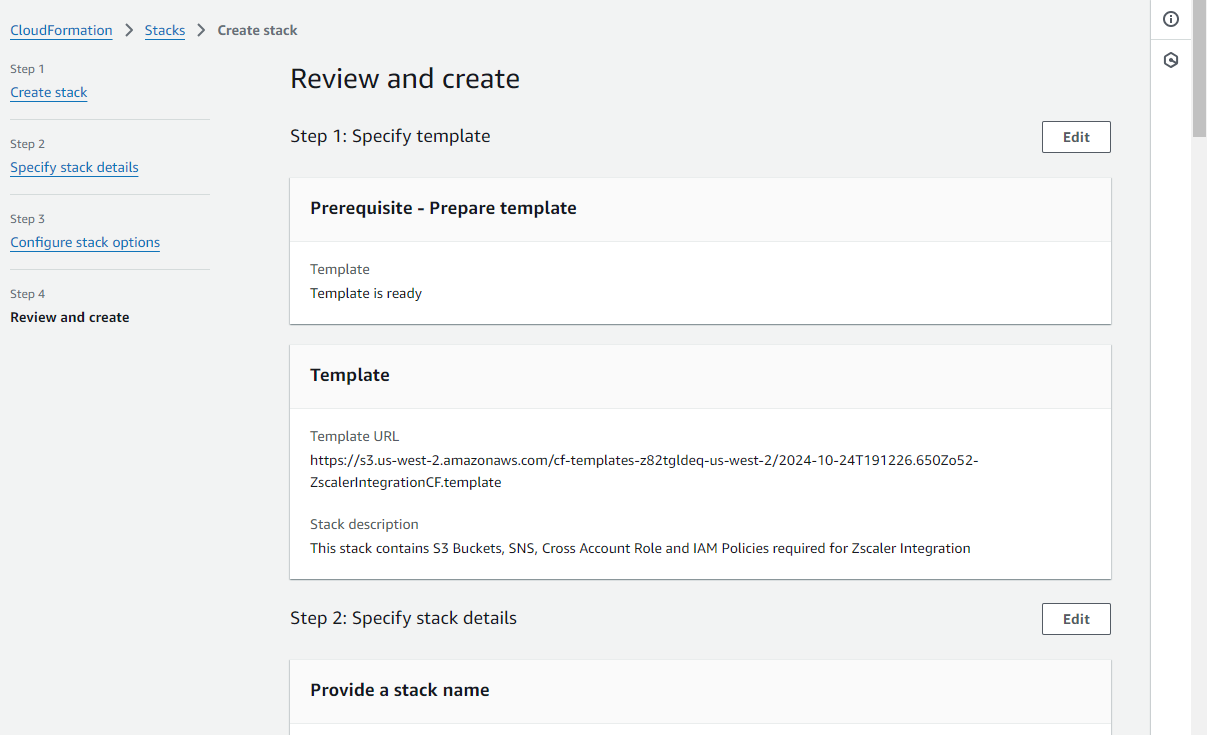
Click Next. The Review and create page appears.
On the Review and create page, review the configuration and then click Submit at the bottom of the page.
Wait for the stack creation to be completed. The stack creation process can take several minutes. Initially, the stack creation status is CREATE_IN_PROGRESS.
After the stack creation is completed, the status changes to CREATE_COMPLETE.
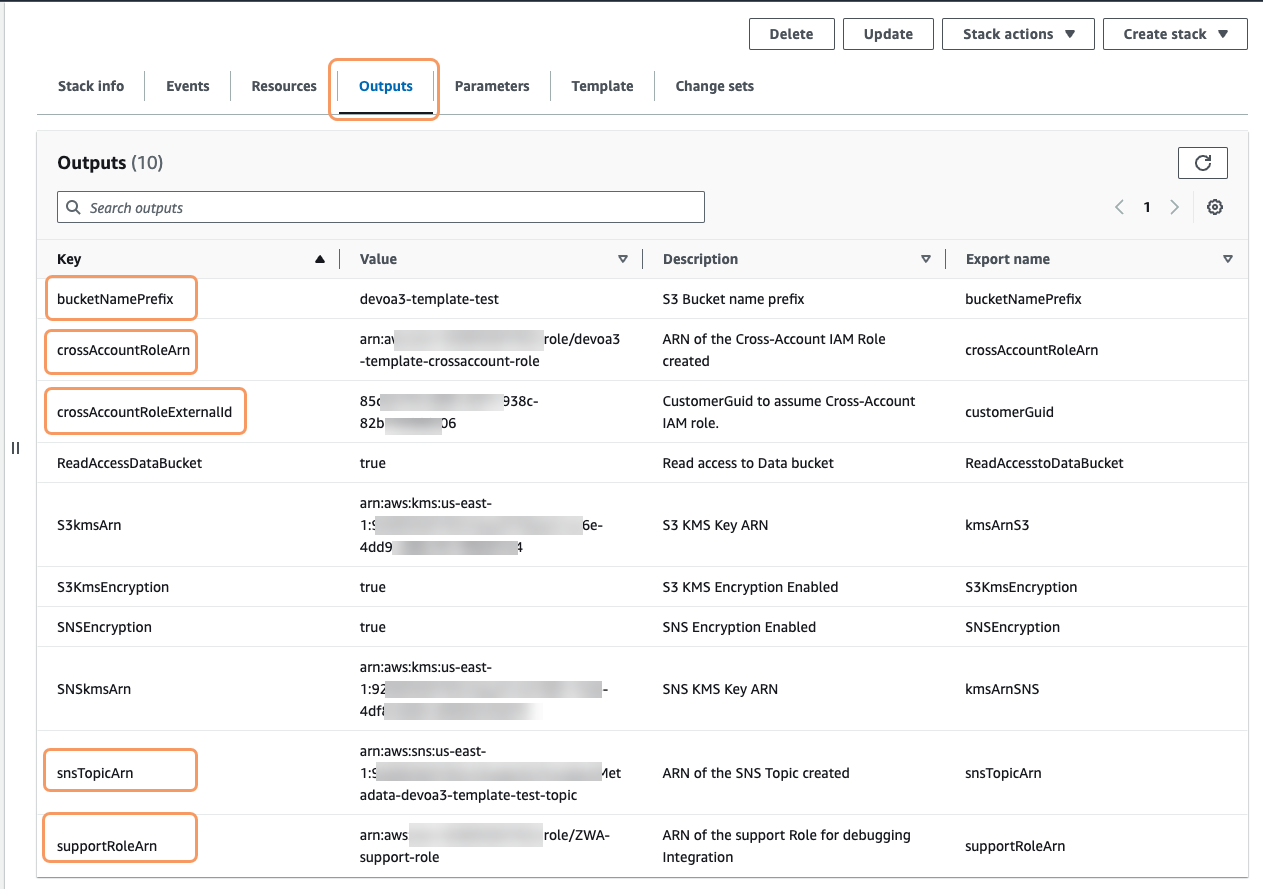
Click the Outputs tab to view the IAM cross-account role ARN and the external ID, SNS topic ARN, support role ARN (if created), and S3 bucket name prefix (copied from input) outputs. Copy these values. They are required when adding a DLP Application Integration in Workflow Automation.
Different S3 buckets that share a common name prefix are used for storing DLP incident data and metadata files. The names of the data and metadata bucket are set to
<bucketNamePrefix>.dataand<bucketNamePrefix>.metadata, respectively. The Zscaler DLP Incident Management service needs to read and store the incident metadata file (with trigger data stripped), but it never reads and stores the incident data files.To notify the service when new incidents are uploaded to S3, an SNS topic is created in the AWS account. The metadata S3 bucket is configured to publish ObjectCreated notifications to the SNS topic. The Zscaler service subscribes an SQS queue housed in the Zscaler AWS account to the SNS topic. When the Zscaler service receives a notification on the SQS queue, it needs to read the metadata file associated with the notification from S3. To do so, an IAM cross-account is created in the AWS account that grants Zscaler's AWS account permissions to read from the metadata S3 bucket and optionally the data S3 bucket. The read permission for the data S3 bucket is only required if you want users who respond to incidents to be able to view incident data files through short-lived presigned S3 URL links.
Close
- a. Download the Zscaler template file from the Workflow Automation Admin Portal.
- Creating AWS Resources Manually Using the AWS Console
- a. Create the AWS resources manually.
AWS integration requires three AWS resources:
- S3 Bucket: The S3 bucket names share a common prefix. The names of the data and metadata bucket are
<bucketNamePrefix>.dataand<bucketNamePrefix>.metadata, respectively. - SNS Topic: The metadata S3 bucket pushes notifications to the SNS topic which is subscribed to the Workflow Automation SQS Queue.
- IAM Cross-Account Role: The IAM cross-account role allows read-only access to the Workflow Automation AWS account to the data and metadata buckets.
You can also use encryption on S3 and SNS with Customer Managed Keys (CMK) through KMS.
Zscaler recommends that the metadata bucket and SNS topic are always in the same region. If you want to grant S3 data bucket access so that Workflow Automation can generate presigned links, the data buckets must also be in the same region.
Decide on the S3 bucket name prefix to use. The names of the S3 buckets are
<bucketNamePrefix>.dataand<bucketNamePrefix>.metadata.The bucket name prefix is also used as a property when adding a DLP Application Integration in Workflow Automation.
Find your Workflow Automation environment information (Workflow Automation AWS Account ID and Role Name) and customer GUID. Go to Setup > Account Settings in the Workflow Automation Admin Portal and expand the Customer Information section to see the AWS Account, Role Name, and Customer GUID. To learn more, see Managing Account Settings.
The AWS account, role name, and customer GUID are used when creating an IAM cross-account role that Workflow Automation uses to read DLP incidents. The AWS account is also used as the source owner when creating a standard SNS topic.
- On the Create topic page in the AWS console, create a standard SNS topic.
- Log in to the AWS console.
- In the AWS console, search for
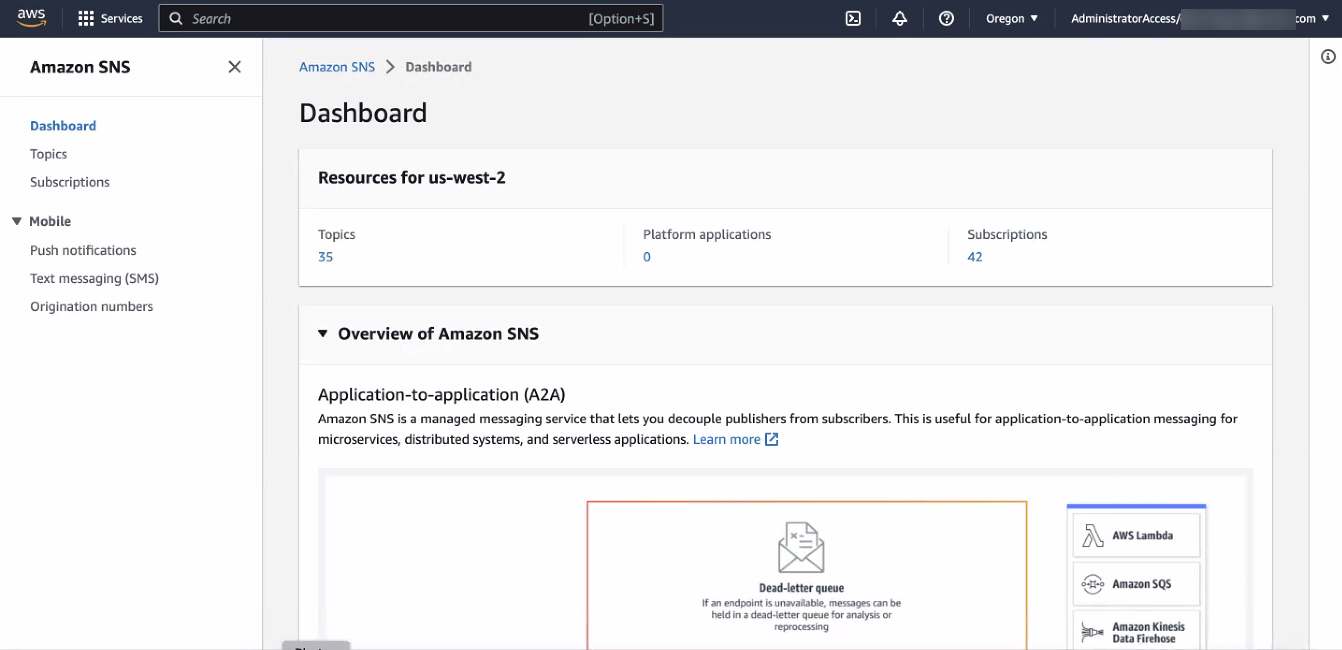
sns. - In the search results, select Simple Notification Service. The Amazon SNS dashboard appears.
On the Amazon SNS dashboard, in the left-side navigation, click Dashboard.
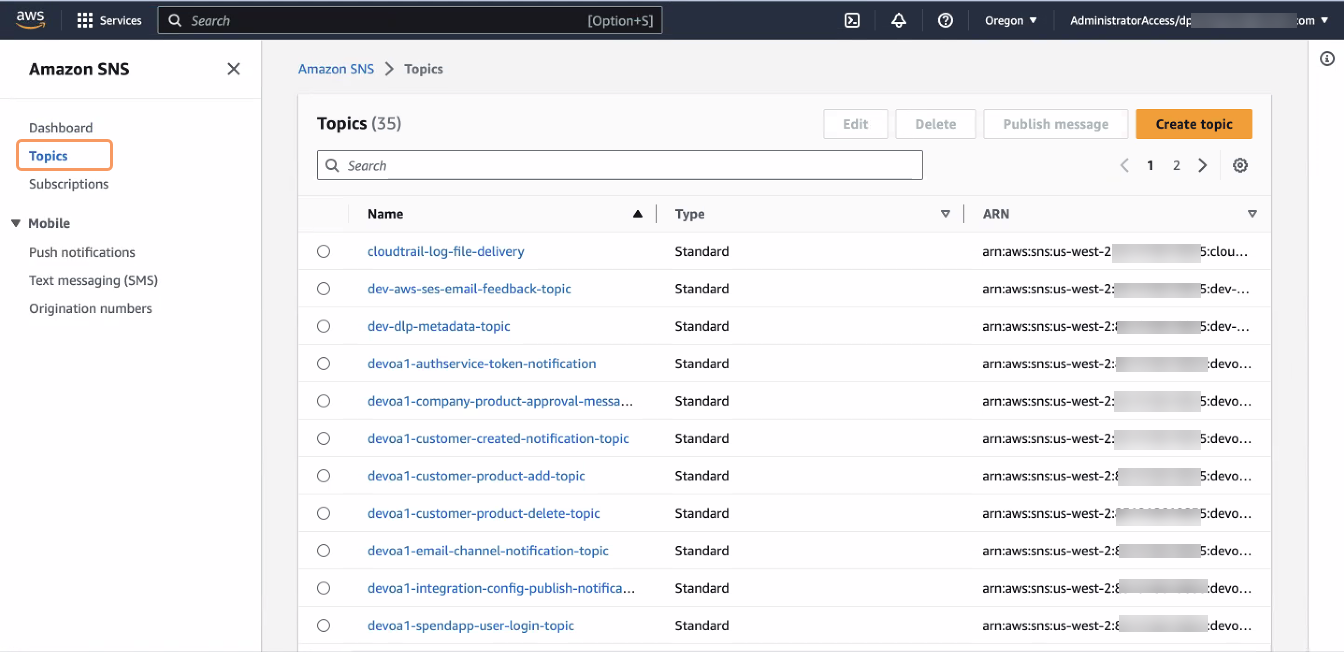
On the Dashboard page, in the left-side navigation, click Topics. The Topics page appears, listing all the topics.
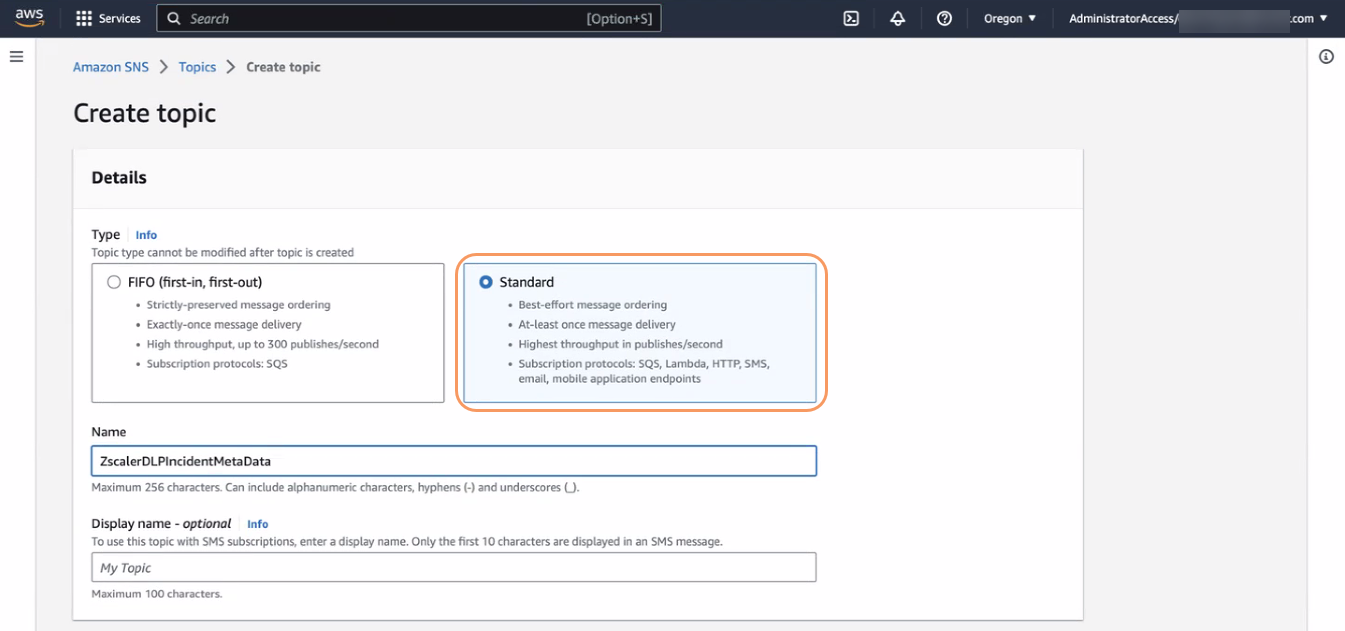
- On the Topics page, click Create Topic. The Create topic page appears.
On the Create topic page, in the Details section:
- Type: Select Standard.
- Name: Enter a name for the topic—for example,
ZscalerDLPIncidentMetadata. - Display name: (Optional) Enter a display name for the topic—for example,
ZscalerDLPIncidentMetadata.
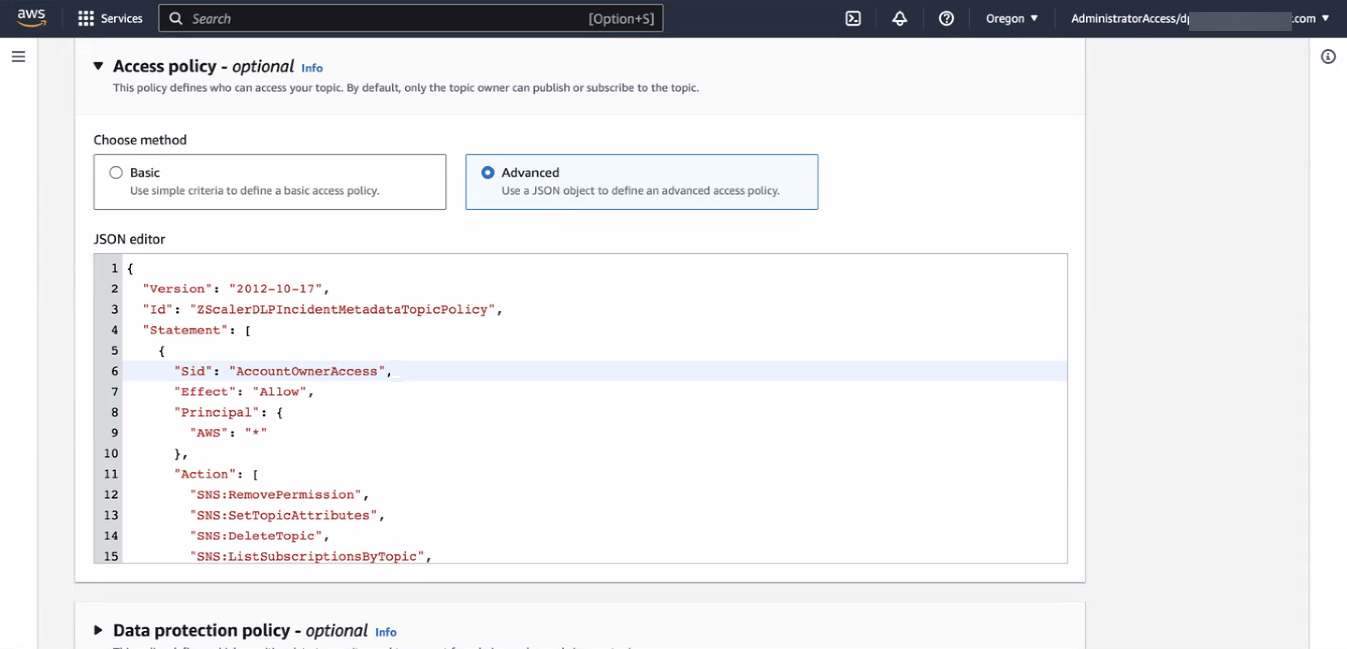
- In the Access policy section:
- Choose method: Select Advanced.
JSON editor: Add the following access policy for the SNS. The policy of the SNS topic allows only the metadata S3 bucket to publish to it and the Zscaler AWS account to subscribe to it. Your AWS account has all other permissions on the topic.
{
  "Version": "2012-10-17",
  "Id": "ZScalerDLPIncidentMetadataTopicPolicy",
  "Statement": [
    {
      "Sid": "AccountOwnerAccess",
      "Effect": "Allow",
      "Principal": {
        "AWS": "*"
      },
      "Action": [
        "SNS:RemovePermission",
        "SNS:SetTopicAttributes",
        "SNS:DeleteTopic",
        "SNS:ListSubscriptionsByTopic",
        "SNS:GetTopicAttributes",
        "SNS:AddPermission",
        "SNS:Subscribe",
        "SNS:Publish"
      ],
      "Resource": "arn:aws:sns:<AWS::Region>:<AWS::AccountId>:<snsTopicName>,
      "Condition": {
        "StringEquals": {
          "AWS:SourceOwner": "<zwaAccountID>"
        }
      }
    },
    {
      "Sid": "S3MetadataBucketPublish",
      "Effect": "Allow",
      "Principal": {
        "Service": "s3.amazonaws.com"
      },
      "Action": "SNS:Publish",
      "Resource": "arn:aws:sns:<AWS::Region>:<AWS::AccountId>:<snsTopicName>",
      "Condition": {
        "StringEquals": {
          "AWS:SourceAccount": "<AWS::AccountId>"
        },
        "ArnLike": {
          "AWS:SourceArn": "arn:aws:s3:::<bucketNamePrefix>.metadata"
        }
      }
    }
  ]
}
Replace the following variables in the policy with the values for your organization:
<AWS::Region>: AWS region used in your account<AWS::AccountId>: Your AWS Account ID<snsTopicName>: SNS topic name<zwaAccountID>: Workflow Automation AWS Account ID. Copy the AWS Account displayed on the Account Settings page in the Workflow Automation Admin Portal.
- At the bottom of the page, click Create topic. The Topics page reappears, listing all the topics.
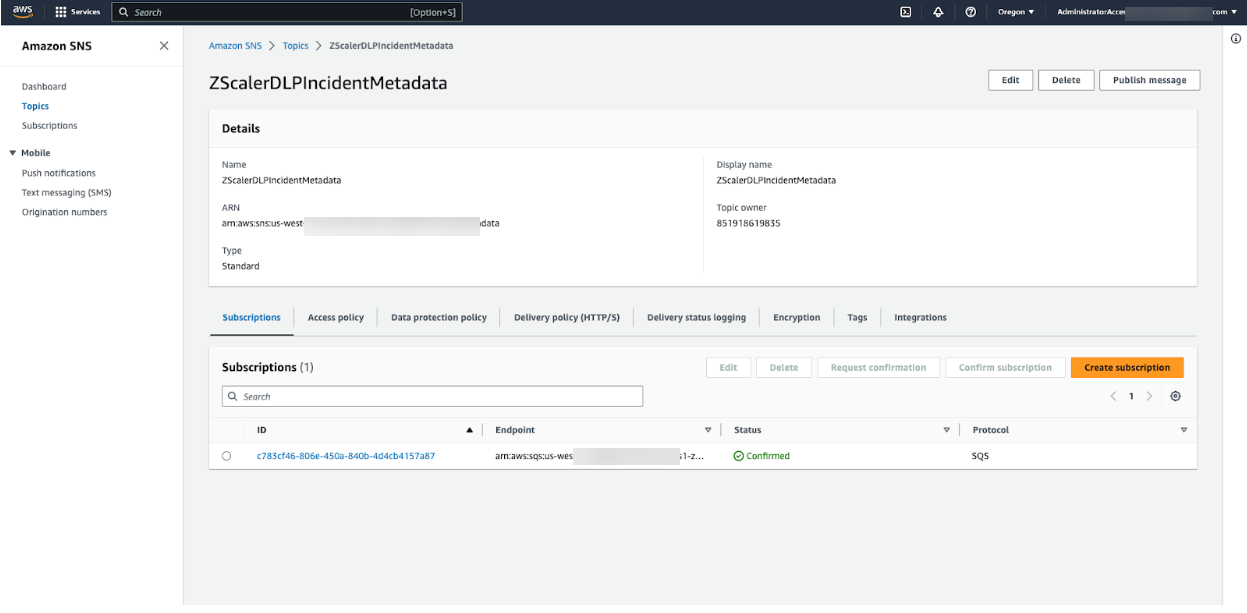
- On the Topics page, in the list of topics, select the topic name you just created. The topic overview page appears.
On the topic overview page, in the Details section, copy the ARN field value for the SNS topic. You use SNS Topic ARN as a property when adding a DLP Application Integration in Workflow Automation.
- On the Create bucket page in the AWS console, create an S3 bucket for the data bucket.
- In the AWS console, search for
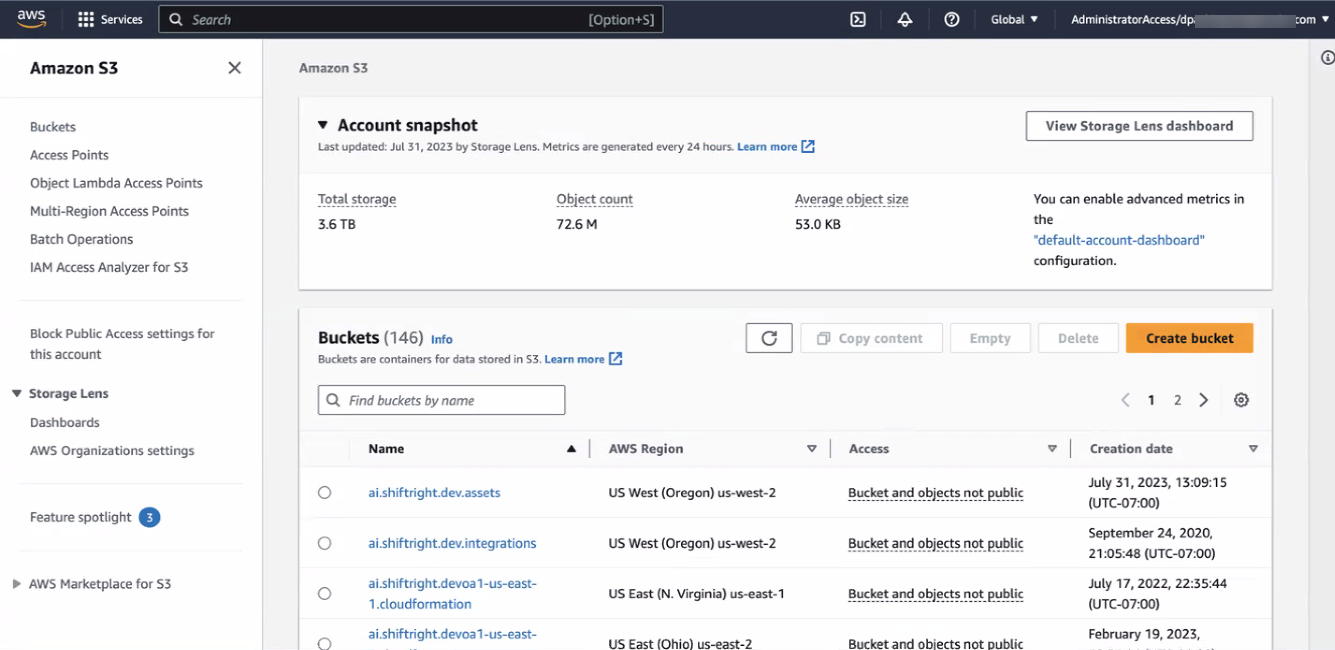
S3. In the search results, select S3. The Amazon S3 dashboard appears, displaying all the existing buckets.
- Click Create bucket. The Create bucket page appears.
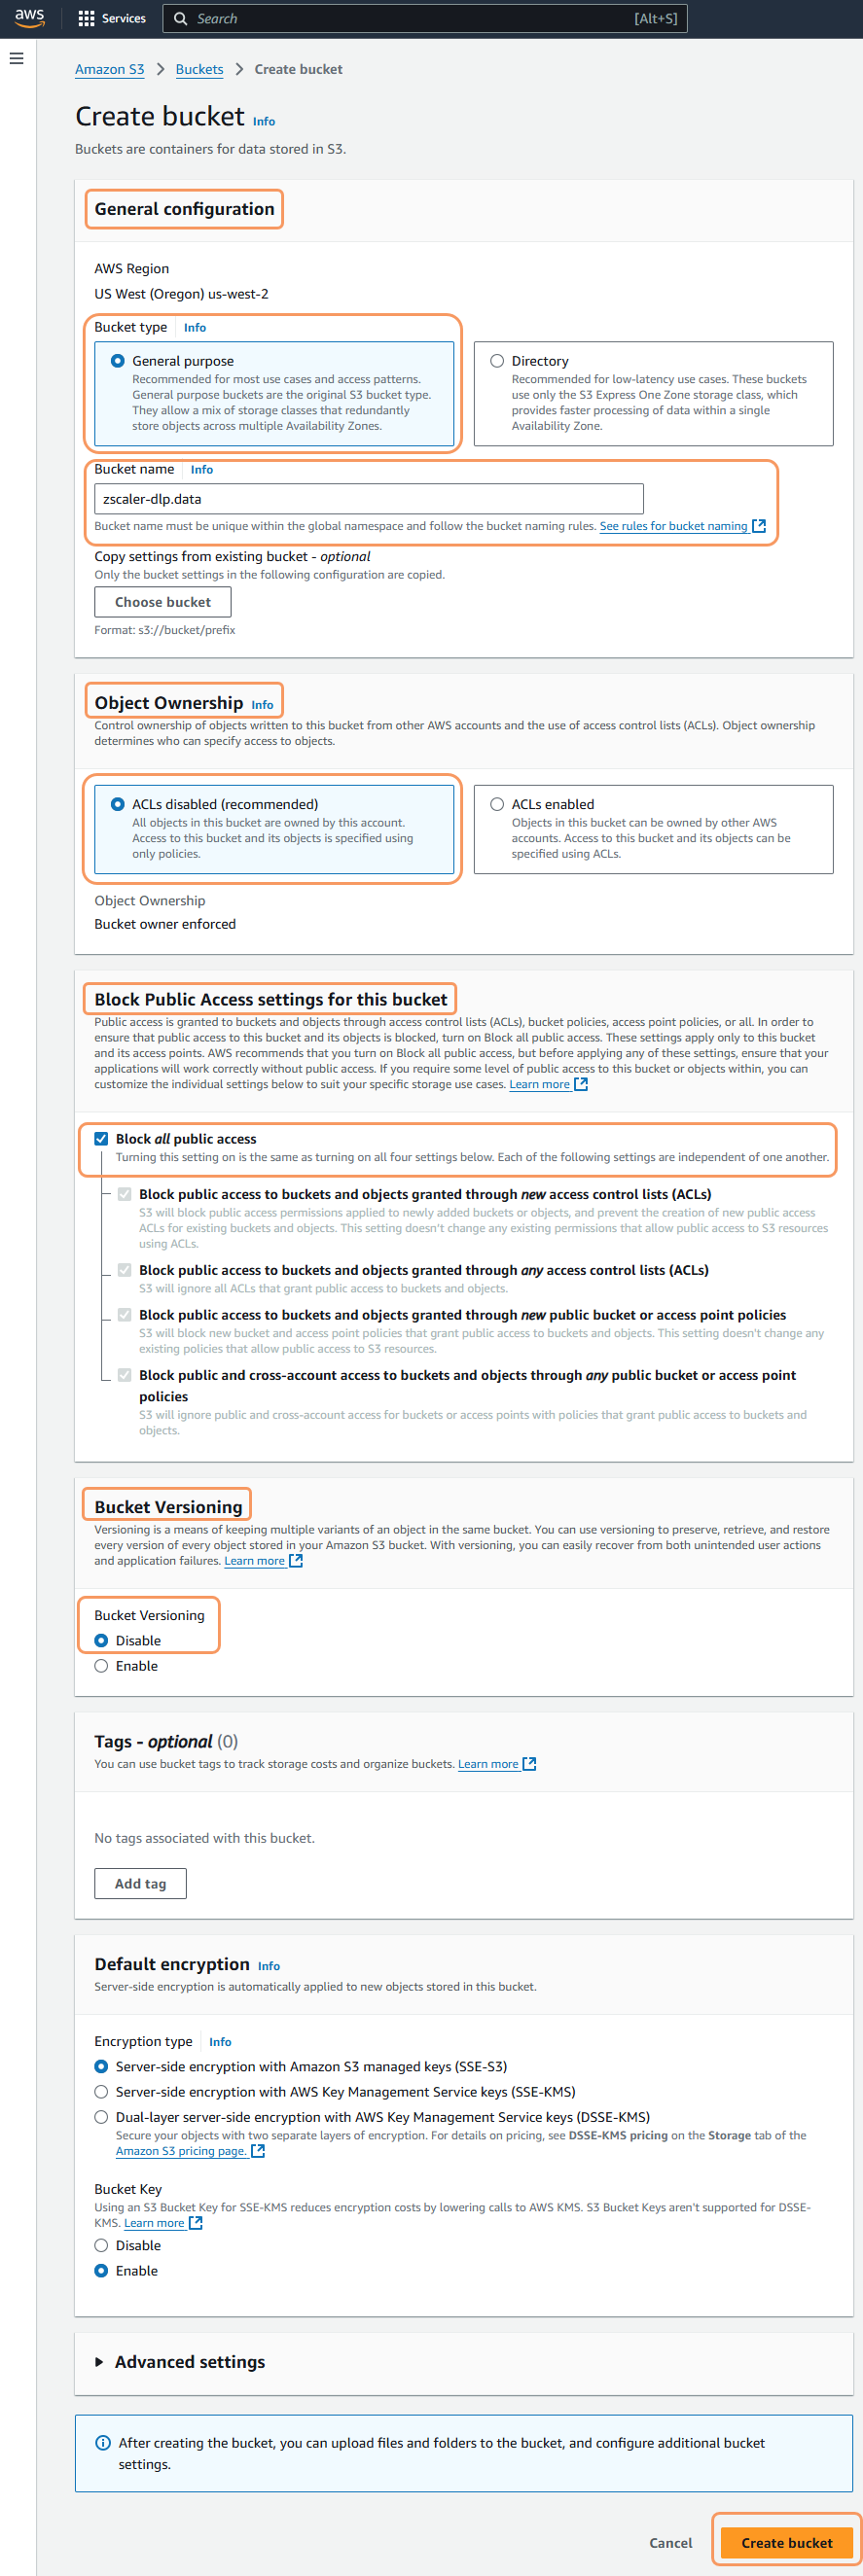
- On the Create bucket page:
- In the General configuration section:
- Bucket type: Select General Purpose.
- Bucket name: Enter the name of the bucket as
<bucketNamePrefix>.data—for example,zscaler-dlp.data.
- In the Object Ownership section, select ACLs disabled (recommended).
- In the Block Public Access settings for this bucket section, select the Block all public access checkbox.
- In the Bucket Versioning section, select Disable.
In the Default encryption section, leave the default settings.
- Click Create bucket. The Buckets page appears, listing the bucket you have just created.
- In the General configuration section:
- In the AWS console, search for
- On the Create bucket page in the AWS console, create an S3 bucket for the metadata bucket.
- On the Buckets page, click Create bucket. The Create bucket page appears.
- On the Create bucket page:
- In the General configuration section:
- Bucket type: Select General Purpose.
- Bucket name: Enter the name of the bucket as
<bucketNamePrefix>.metadata—for example,zscaler-dlp.metadata.
- In the Object Ownership section, select ACLs disabled (recommended).
- In the Block Public Access settings for this bucket section, select Block all public access.
- In the Bucket Versioning section, select Disable.
- In the Default encryption section, leave the default settings.
- Click Create bucket. The Buckets page reappears, listing the bucket you have just created.
- In the General configuration section:
- Edit the properties for the metadata bucket by creating an event notification for the bucket:
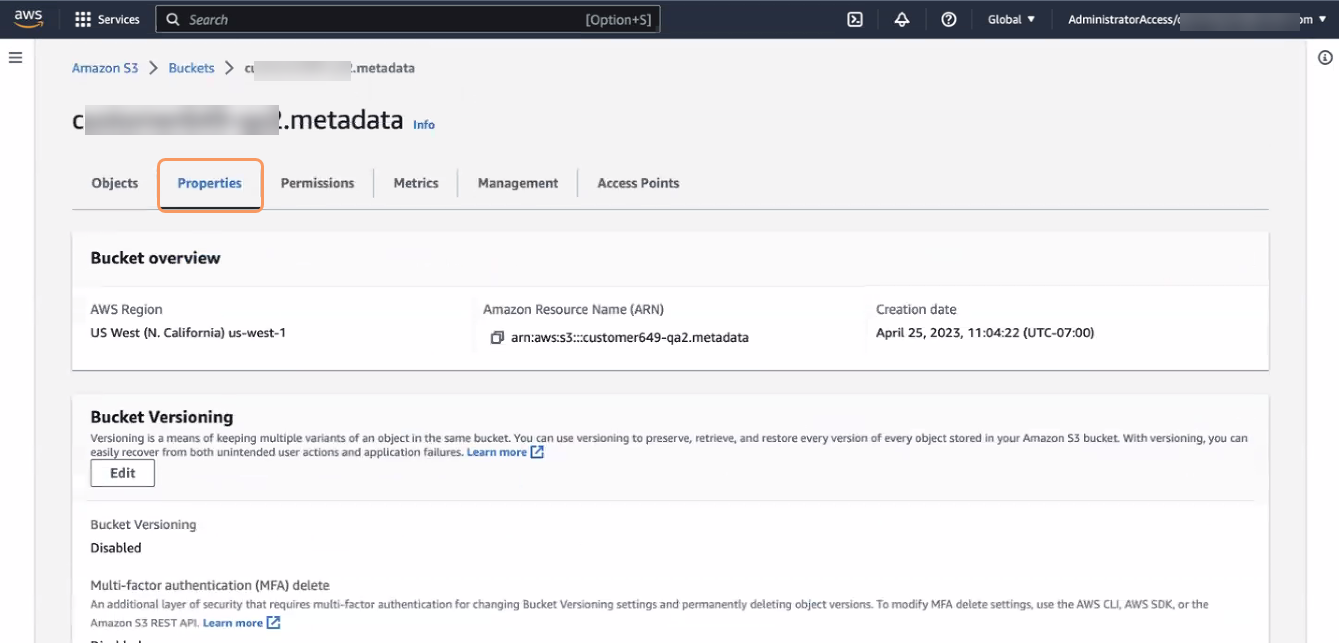
- On the Amazon S3 dashboard page, in the Buckets section, click the metadata bucket you just created. The bucket overview page appears.
On the bucket overview page, click the Properties tab for the metadata bucket.
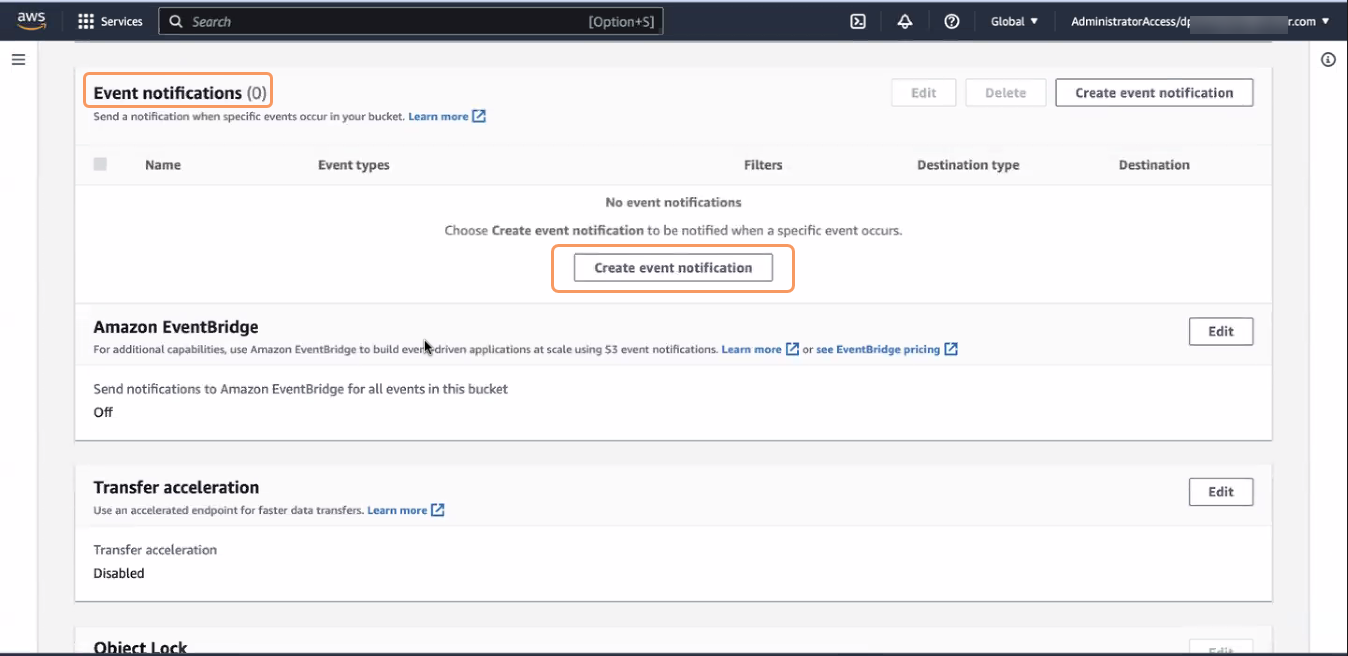
On the Properties tab, in the Event Notifications section, click Create event notification. The Create event notification page appears.
- On the Create event notification page, in the General configuration section:
- Event Name: Enter the name for the event.
- Prefix: Leave the default value.
- Suffix: Leave the default value.
- In the Event Types section, under Object creation, select the Put and Post checkboxes.
In the Destination section:
- Destination: Select SNS topic.
- Specify SNS topic: Select Choose from your SNS topics.
- SNS topic: From the drop-down menu, select the SNS topic that you created previously.
- Click Save changes.
- From the AWS console, create an IAM cross-account role with custom policies.
- In the AWS console, search for
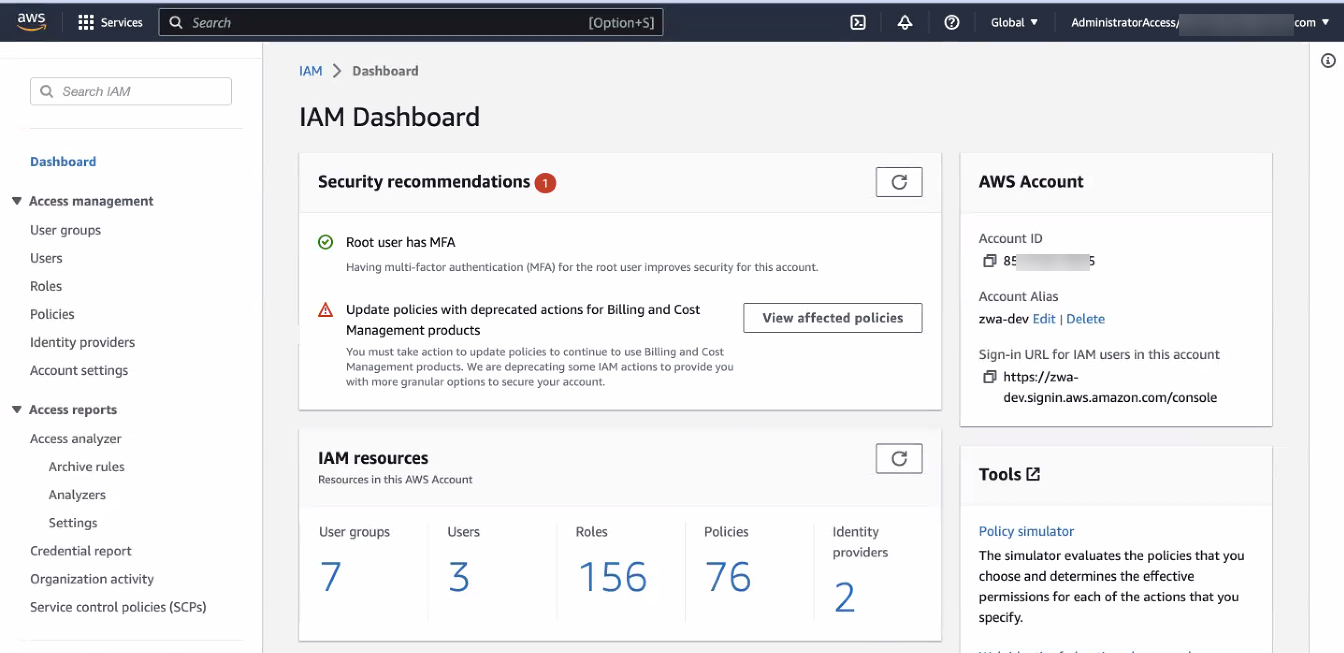
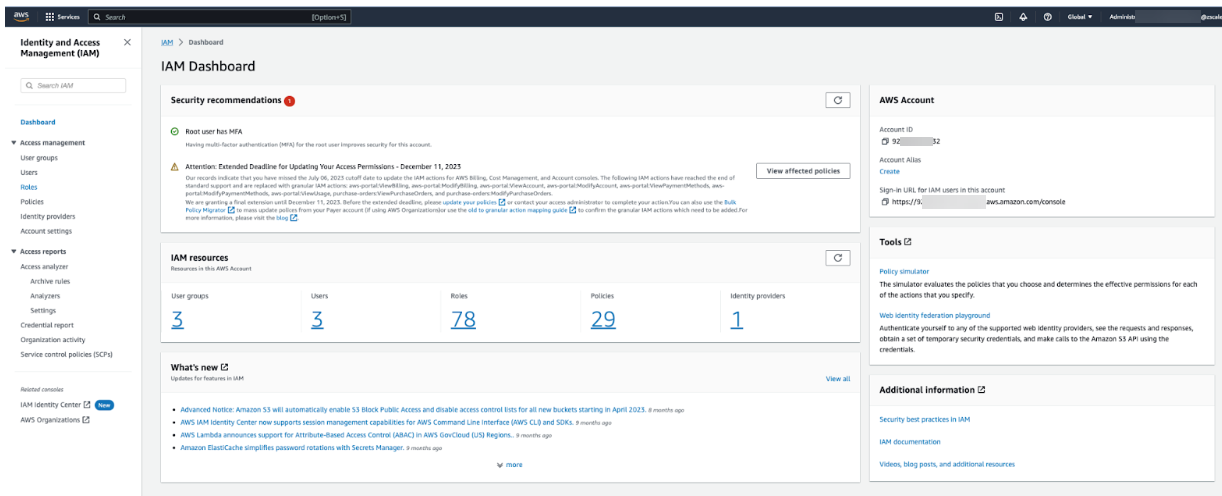
IAM. In the search results, select IAM. The IAM dashboard appears.
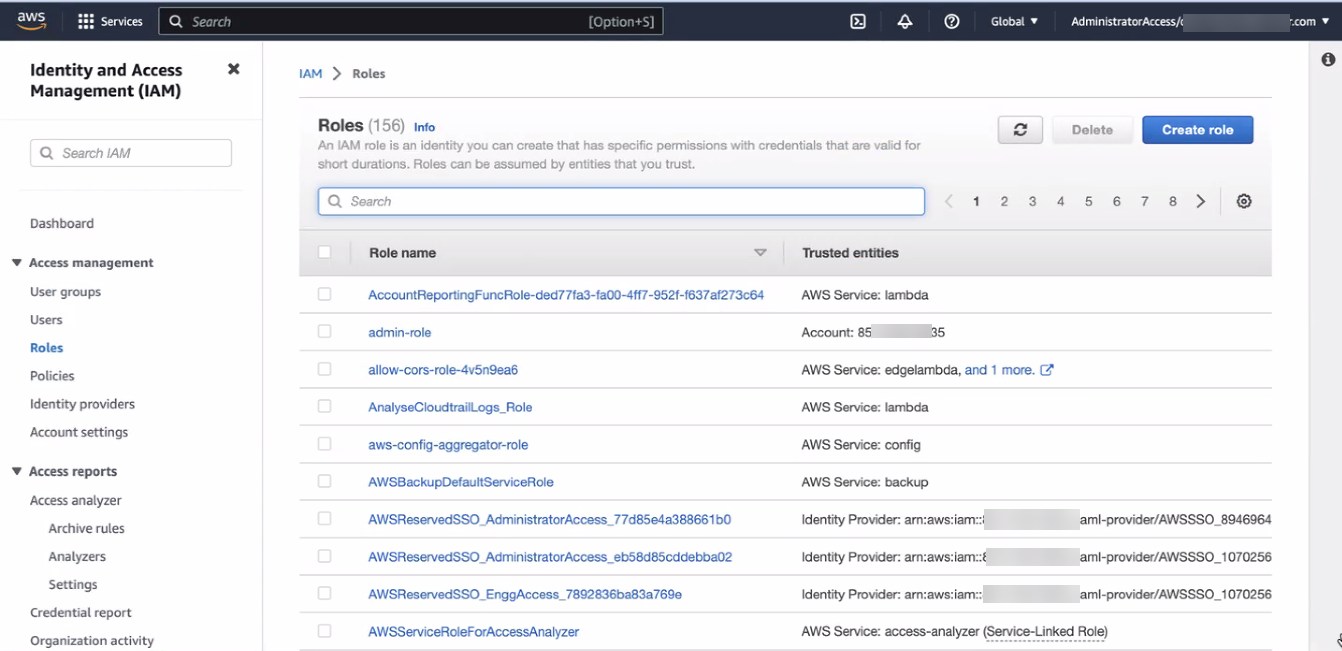
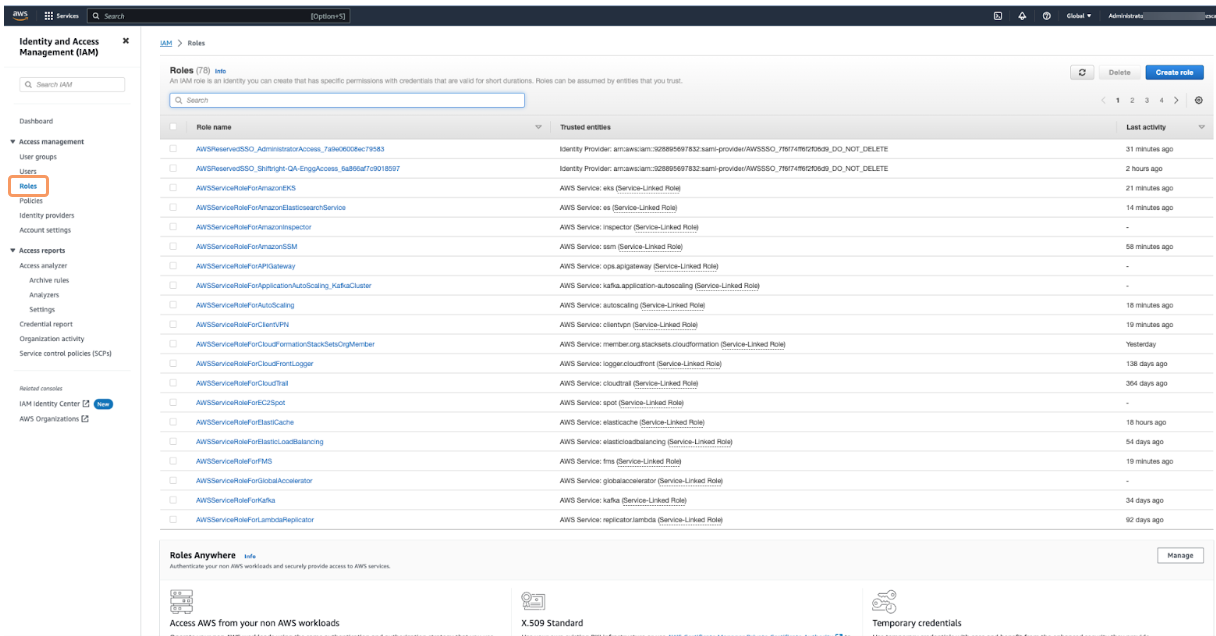
On the IAM dashboard, in the left-side navigation, click Roles. The Roles page appears, listing all the existing roles.
- On the Roles page, click Create role. The Create role page appears.
- Create an IAM role with a custom trust policy.
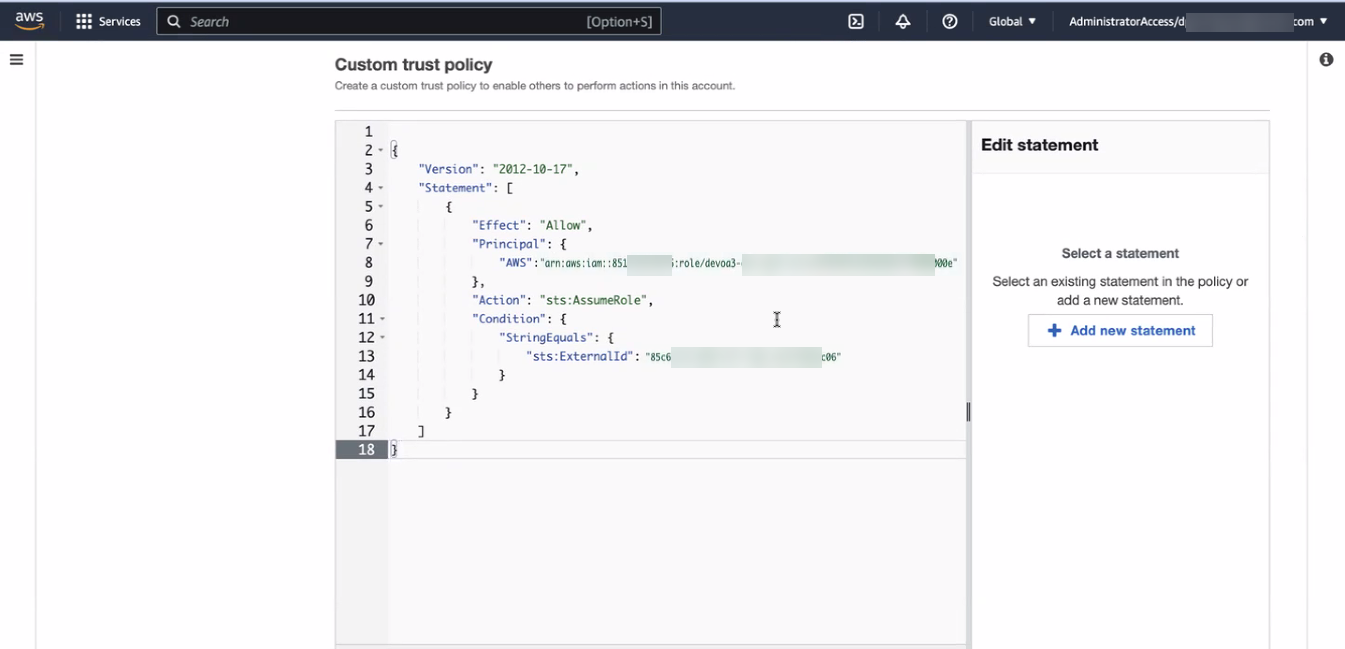
On the Create role page, in the Trusted entity type section, select Custom trust policy.
In the Custom trust policy section, add the following custom trust policy. This policy allows the Zscaler AWS account to assume the role.
{
    "Version": "2012-10-17",
    "Statement": [
        {
            "Effect": "Allow",
            "Principal": {
                "AWS": "arn:aws:iam::<zwaAccountID>:role/<zwaRole>"
            },
            "Action": "sts:AssumeRole",
            "Condition": {
                "StringEquals": {
                    "sts:ExternalId": "<GUID>"
                }
            }
        }
    ]
}
Replace the following variables in the policy with the values for your organization displayed on the Account Settings page in the Workflow Automation Admin Portal:
<zwaAccountID>: Workflow Automation AWS Account ID. Copy the AWS Account displayed on the Account Settings page.<zwaRole>: Workflow Automation role name. Copy the Role Name displayed on the Account Settings page.<GUID>: Customer GUID. Copy the Customer GUID displayed on the Account Settings page.
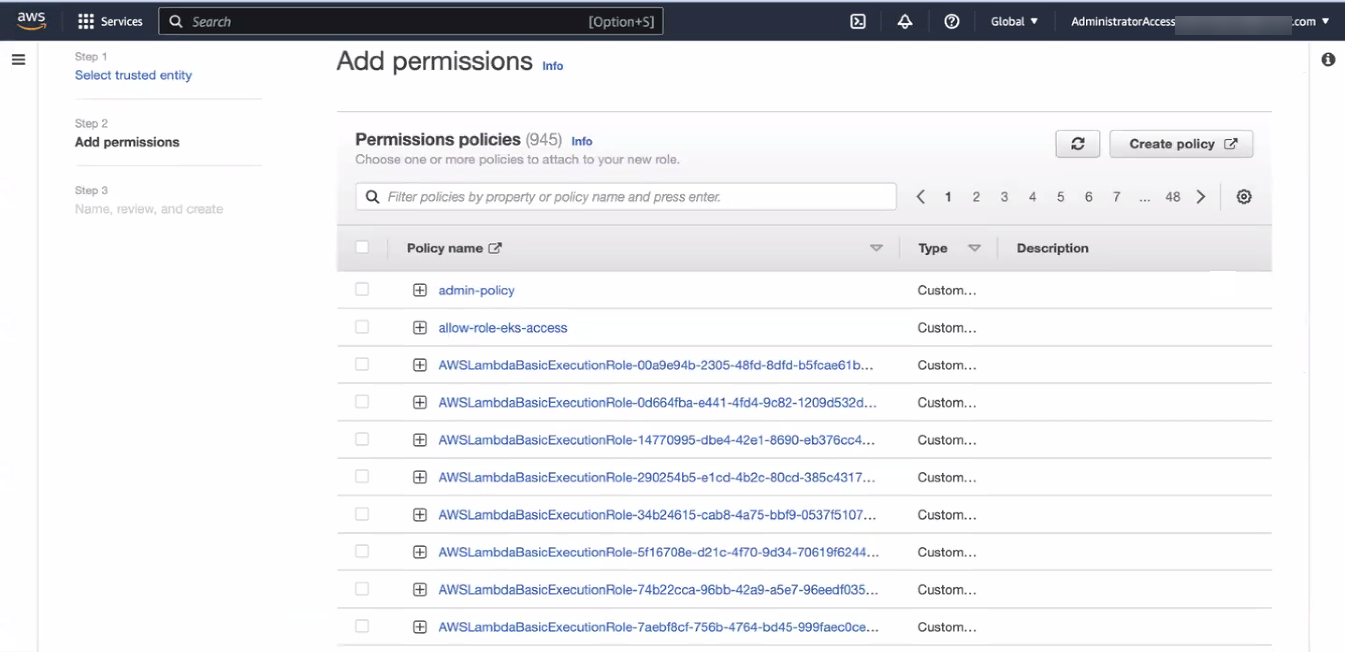
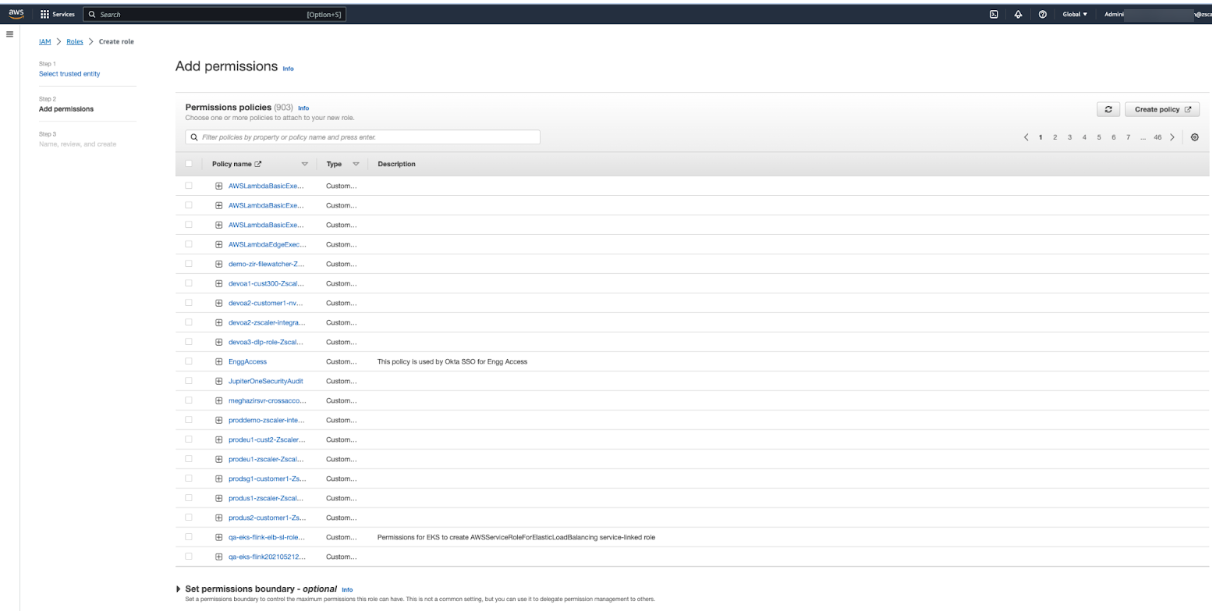
Click Next. The Add permissions page appears.
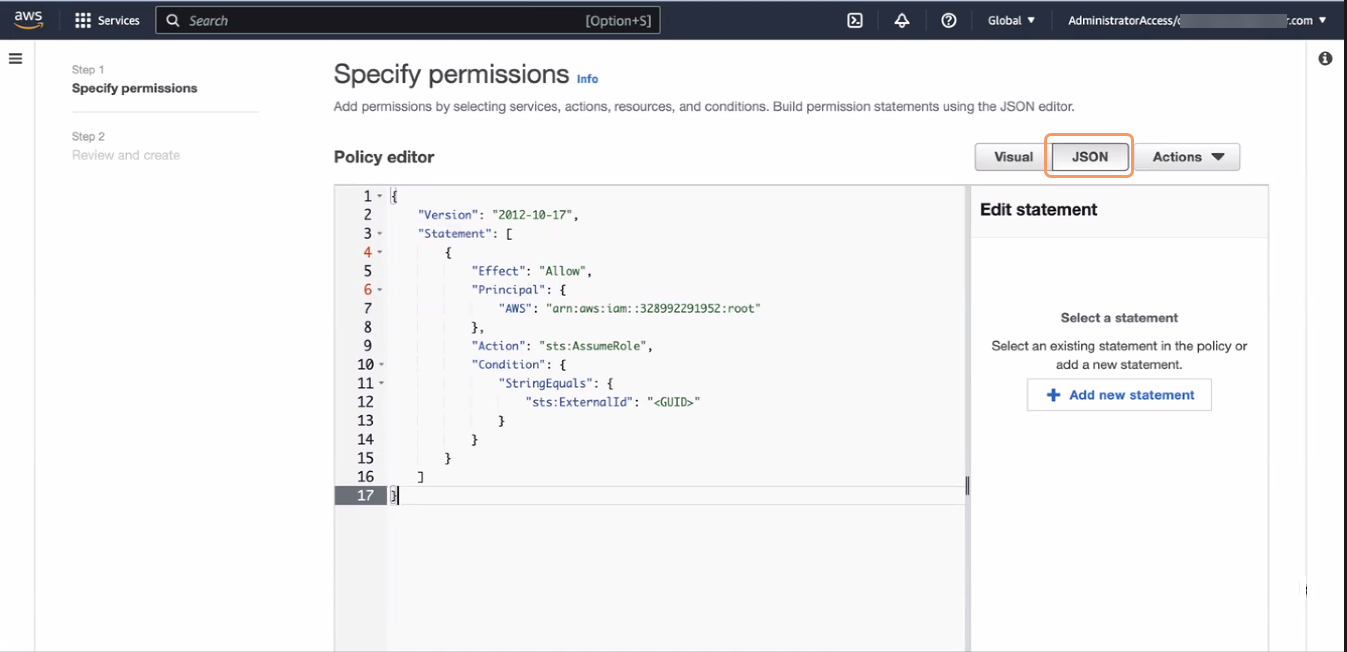
On the Add permissions page, click Create policy. The Specify permissions page appears.
- On the Specify permissions page, in the Policy editor section, add the following policies:
(Required) Metadata S3 bucket read access policy. This policy allows Workflow Automation to read the metadata JSON in the S3 bucket.
{
         "Version": "2012-10-17",
         "Statement": [
                {
                      "Action": [
                      "s3:GetObject",
                      "s3:GetObjectAttributes",
                      "s3:GetBucketLocation"
                  ],
                  "Resource": [
                      "arn:aws:s3:::<bucketNamePrefix>.metadata",
                      "arn:aws:s3:::<bucketNamePrefix>.metadata/*"
                  ],
                  "Effect": "Allow"
              }
         ]
}
(Required) SNS topic subscribe or unsubscribe policy. This policy allows Workflow Automation to subscribe or unsubscribe on SNS via the cross-account role.
{
    "Version": "2012-10-17",
    "Statement": [
        {
            "Action": [
                "SNS:Subscribe",
                "SNS:Unsubscribe",
                "SNS:ConfirmSubscription"
            ],
            "Resource": "arn:aws:sns:<AWS::Region>:<AWS::AccountId>:<snsTopicName>",
            "Effect": "Allow",
            "Sid": "ZScalerSQSSubscribe"
        }
    ]
}
Replace the following variables in the policy with the values for your organization:
<AWS::Region>:AWS region used in your account<AWS::AccountId>:Your AWS Account ID<snsTopicName>:SNS topic name
(Optional) Data S3 bucket read access policy. This policy allows Workflow Automation to display the data files using a presigned URL. If you want to hide the data files in the Workflow Automation Admin Portal, you can skip this policy.
{
         "Version": "2012-10-17",
         "Statement": [
              {
                  "Action": [
                     "s3:GetObject",
                     "s3:GetObjectAttributes",
                     "s3:GetBucketLocation"
                  ],
                  "Resource": [
                     "arn:aws:s3:::<bucketNamePrefix>.data",
                     "arn:aws:s3:::<bucketNamePrefix>.data/*"
                  ],
                  "Effect": "Allow"
              }
         ]
}
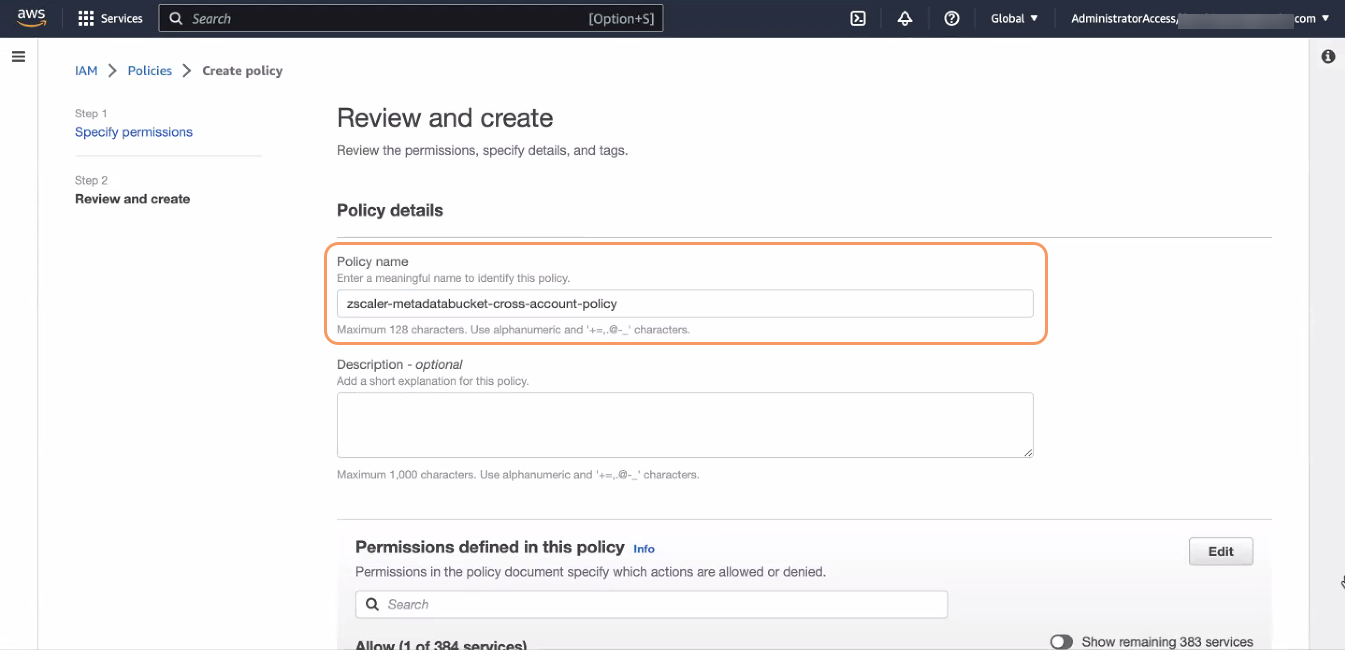
- Click Next. The Review and create page appears.
On the Review and create page, in the Policy details section, enter a name for the policy in the Policy Name field.
- At the bottom of the page, click Create Policy. The Policies page appears, listing all the policies.
- On the Policies page, in the left-side navigation, click Roles. The Roles page appears, listing all the roles.
- On the Roles page, in the list of roles, select the IAM role name you just created. The role overview page appears.
On the role overview page, in the Summary section, copy the ARN field value for the IAM role. This IAM cross-account role ARN is used as a property when adding a DLP Application Integration in Workflow Automation.
- In the AWS console, search for
- S3 Bucket: The S3 bucket names share a common prefix. The names of the data and metadata bucket are
- b. (Optional) Perform additional steps for customer managed keys on the S3 buckets and SNS topic.
- Update the KMS Key policy:
- On the AWS console, search for
Key. - In the search results, select Key Management Service. The Key Management Service (KMS) dashboard appears.
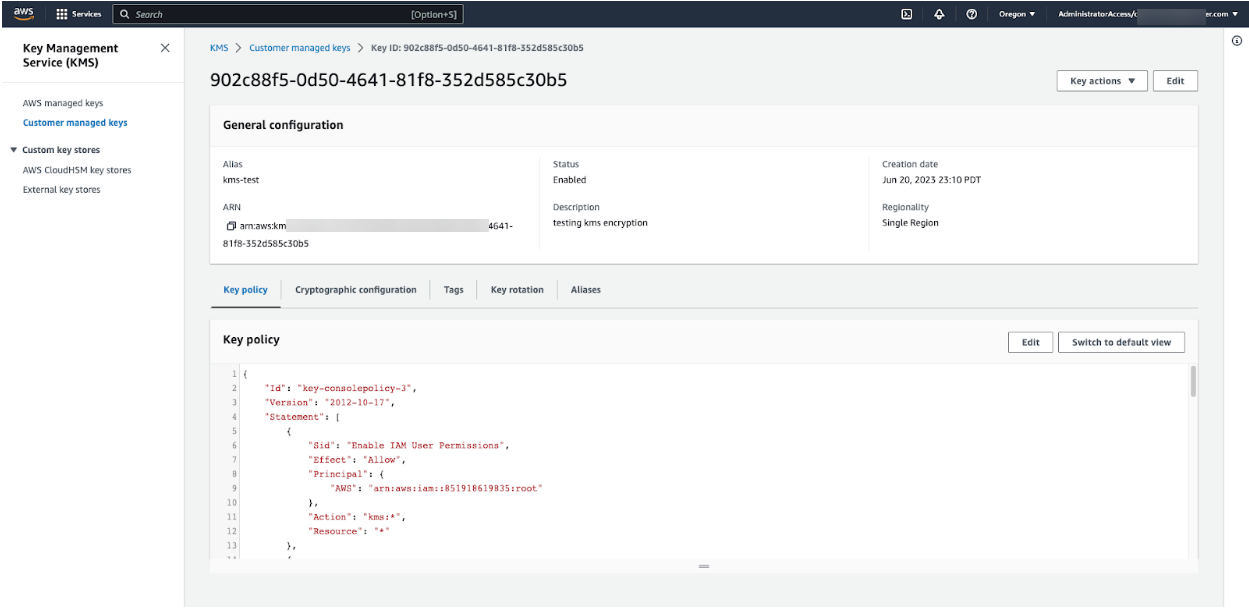
- On the Key Management Service (KMS) dashboard, in the left-side navigation, click Customer managed keys. The Customer managed keys page appears.
On the Customer managed keys page, in the list of keys, select your CMK key. The customer managed key overview page appears.
- On the customer managed key overview page, on the Key Policy tab, click Edit.
Update the key policy with the following policy:
{ "Sid": "SimpleKeyPolicyAllowAccountUsage", "Effect": "Allow", "Principal": { "AWS": "arn:aws:iam::<AWS Account Id>:role/<cross Account Role>" }, "Action": [ "kms:Decrypt", "kms:Encrypt", "kms:GenerateDataKey*", "kms:DescribeKey" ], "Resource": "*" } { "Sid": "SimpleKeyPolicyAllowS3Bucket", "Effect": "Allow", "Principal": { "Service": "s3.amazonaws.com" }, "Action": [ "kms:Decrypt", "kms:GenerateDataKey*" ], "Resource": "*" }- Click Save Changes.
- On the AWS console, search for
- Attach the key to both of the S3 buckets (data and metadata):
- On the AWS console, search for
S3. - In the search results, select S3. The Amazon S3 dashboard appears.
- On the Amazon S3 dashboard, in the left-side navigation, click Buckets. The Buckets page appears.
- On the Buckets page, click the name of your bucket. The bucket overview page appears.
- On the bucket overview page, click the Properties tab.
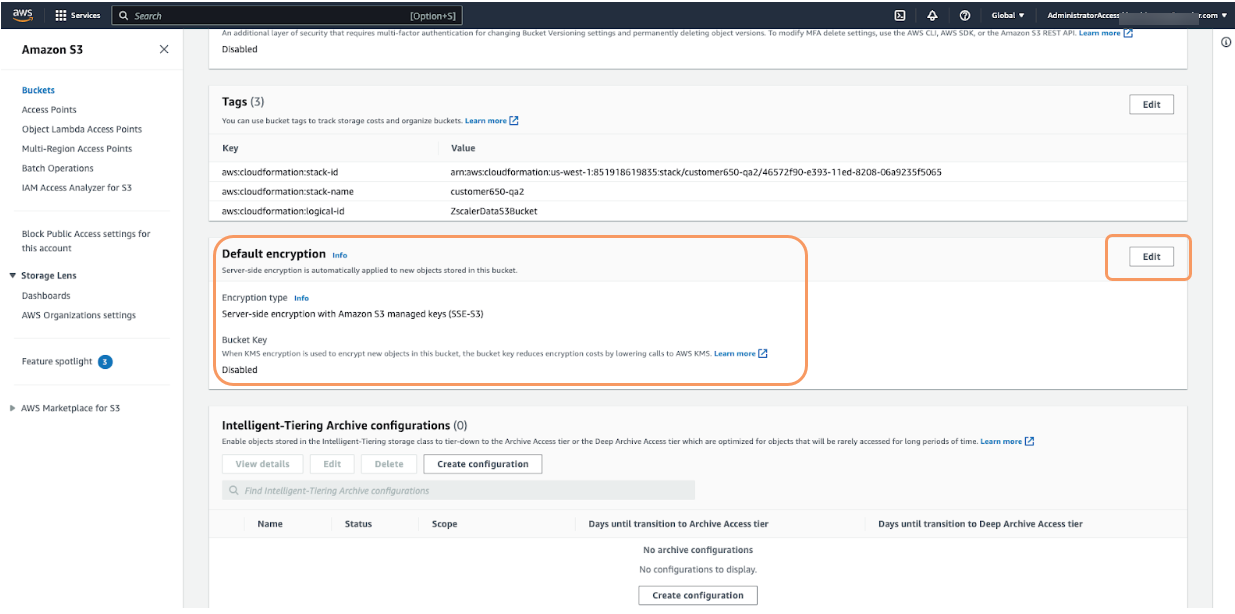
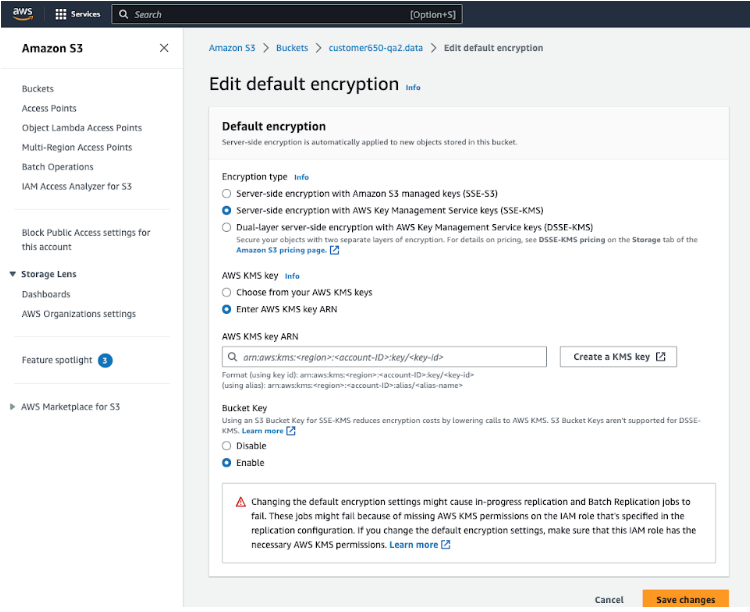
On the Properties tab, in the Default encryption section, click Edit. The Edit default encryption page appears.
On the Edit default encryption page:
- Encryption type: Select Server-side encryption with AWS Key Management Service keys (SSE-KMS).
- AWS KMS Key: Select Choose from your AWS KMS keys.
- Available AWS KMS Keys: From the drop-down menu, select your key.
- Click Save changes.
- On the AWS console, search for
- Attach the key to the SNS topic:
- On the AWS console, search for
sns. - In the search results, select Simple Notification Service. The Dashboard page appears.
- On the Dashboard page, in the left-side navigation, click Topics. The Topics page appears, listing all the topics.
On the Topics page, in the list of topics, select your topic name. The topic overview page appears.
- On the topic overview page, on the top right of the page, click Edit. The Edit topic page appears.
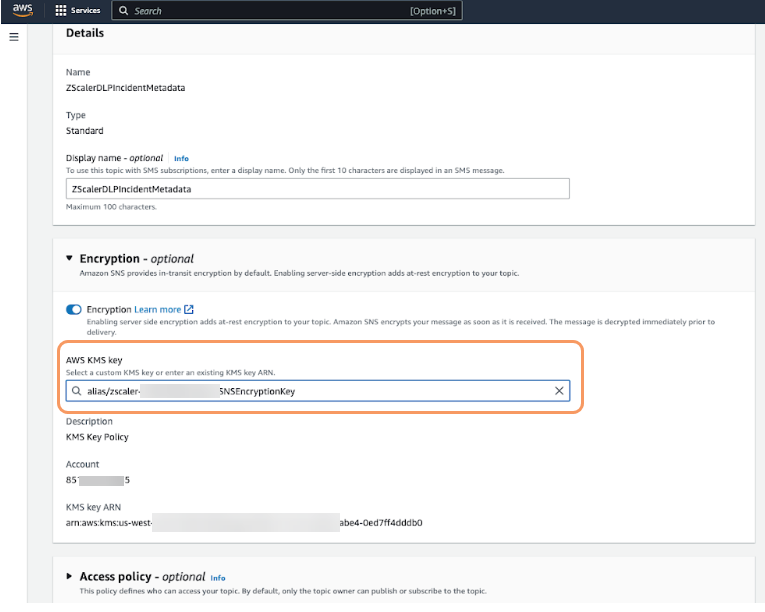
On the Edit topic page, in the Encryption section:
- Encryption: Enable encryption.
- AWS KMS Key: From the drop-down menu, select the AWS KMS key you created.
- Click Save changes.
- On the AWS console, search for
- Attach a policy to the IAM cross-account role to give access to the key attached to S3 and SNS:
- Copy the Customer Managed Key ARN:
- On the AWS console, search for
Key. - In the search results, select Key Management Service. The Key Management Service (KMS) dashboard appears.
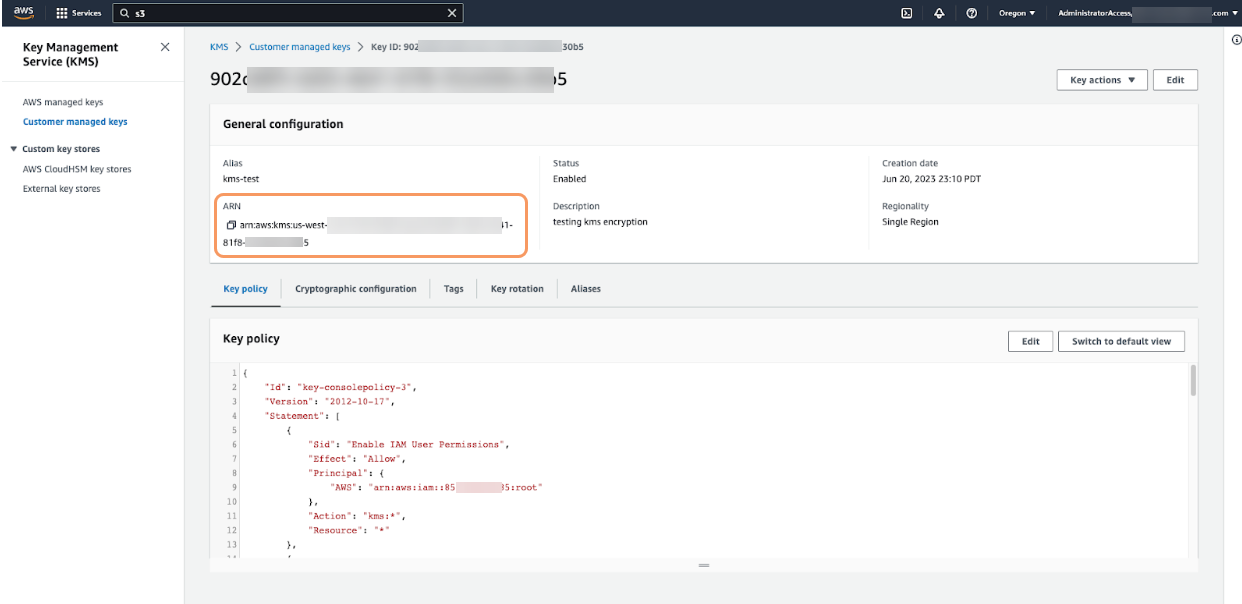
- On the Key Management Service (KMS) dashboard, in the left-side navigation, click Customer managed keys. The Customer managed keys page appears.
- On the Customer managed keys page, in the list of keys, select your CMK key. The customer managed key overview page appears.
On the customer managed key overview page, in the General configuration section, copy the ARN value that appears. The ARN value is required when attaching the policy to the IAM cross-account role in the next step.
- On the AWS console, search for
- Create a policy on the IAM dashboard:
- On the AWS console, search for
IAM. - In the search results, select IAM. The IAM dashboard appears.
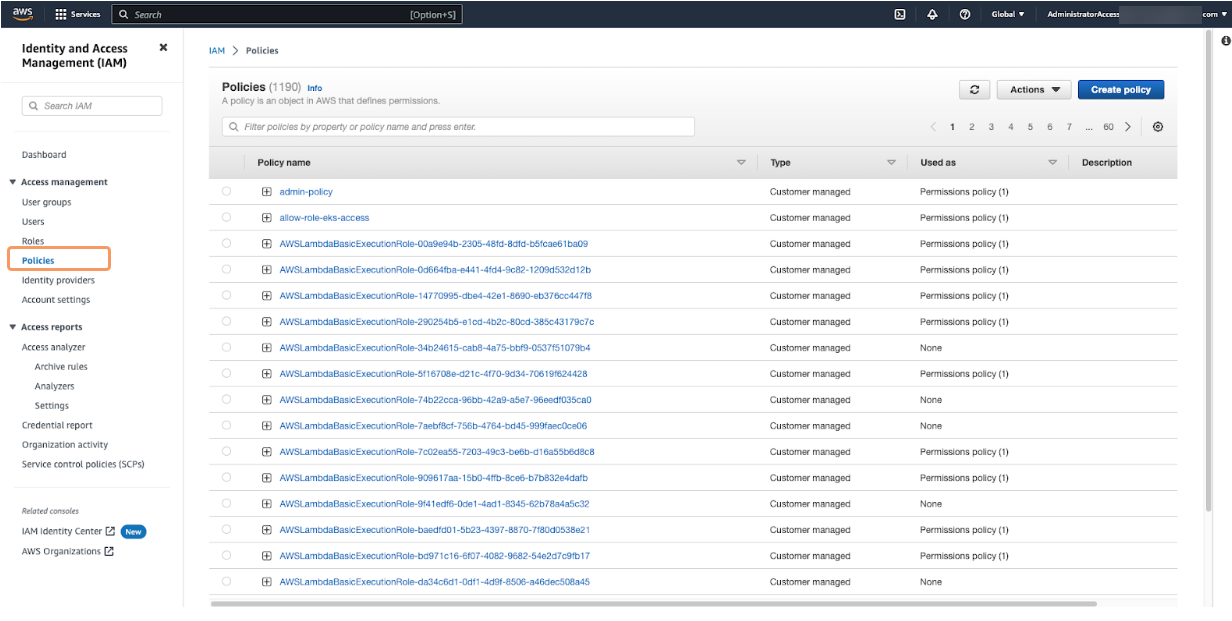
On the IAM dashboard, in the left-side navigation, click Policies. The Policies page appears, listing all the existing policies.
- On the Policies page, click Create Policy. The Specify permissions page appears.
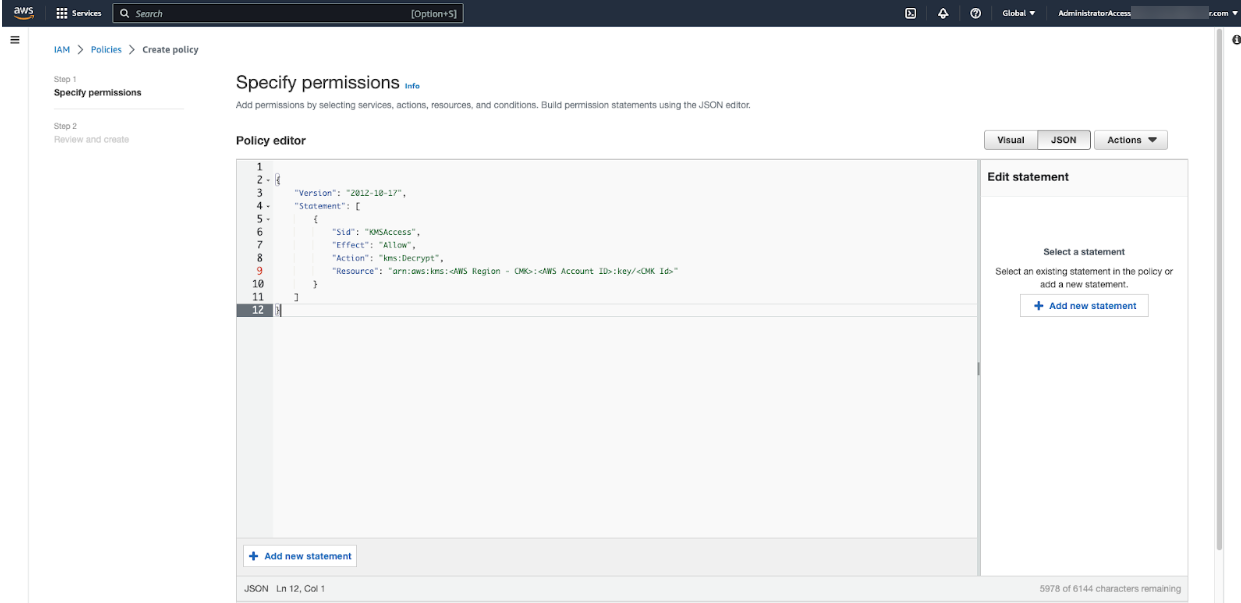
On the Specify permissions page, in the Policy editor, add the following JSON file. In the policy JSON, update the Resource value with the Customer Managed Key ARN.
{ "Version": "2012-10-17", "Statement": [ { "Sid": "KMSAccess", "Effect": "Allow", "Action": "kms:Decrypt", "Resource": "arn:aws:kms:<AWS Region - CMK>:<AWS Account ID>:key/<CMK Id>" } ] }- Click Next. The Review and create page appears.
On the Review and create page, in the Policy Details section, enter a name for the policy in the Policy name field.
- Click Create Policy.
- On the AWS console, search for
- Attach the policy to the IAM cross-account role:
- On the IAM dashboard, in the left-side navigation, click Roles. The Roles page appears, listing all the existing roles.
- On the Roles page, in the list of roles, select the IAM cross-account role. The IAM cross-account role overview page appears.
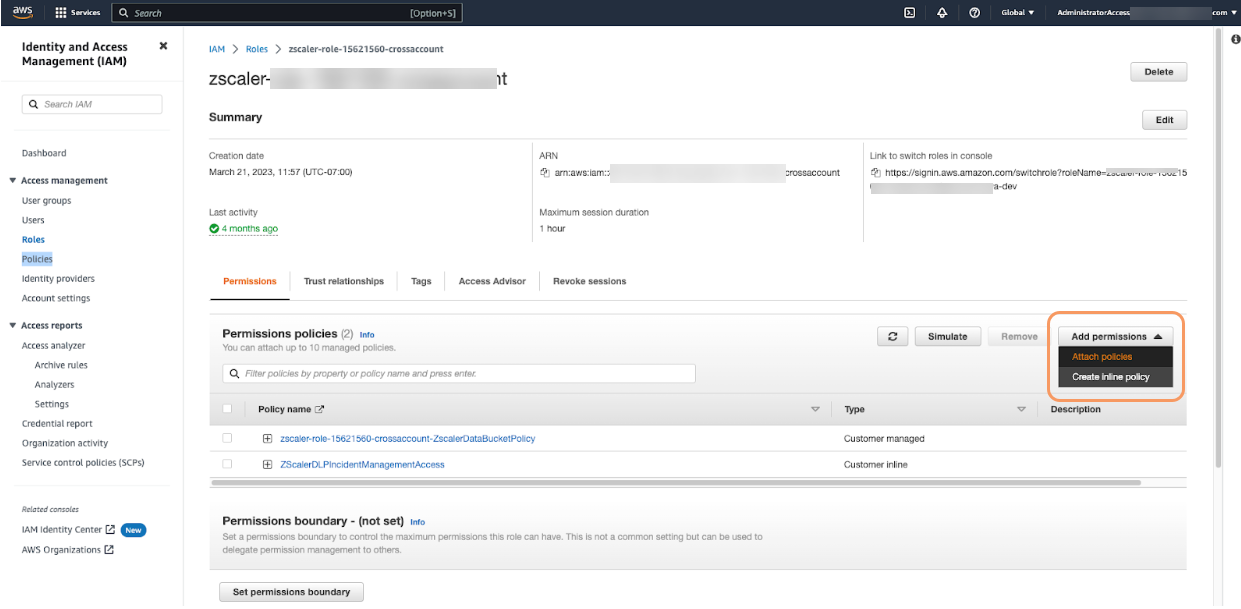
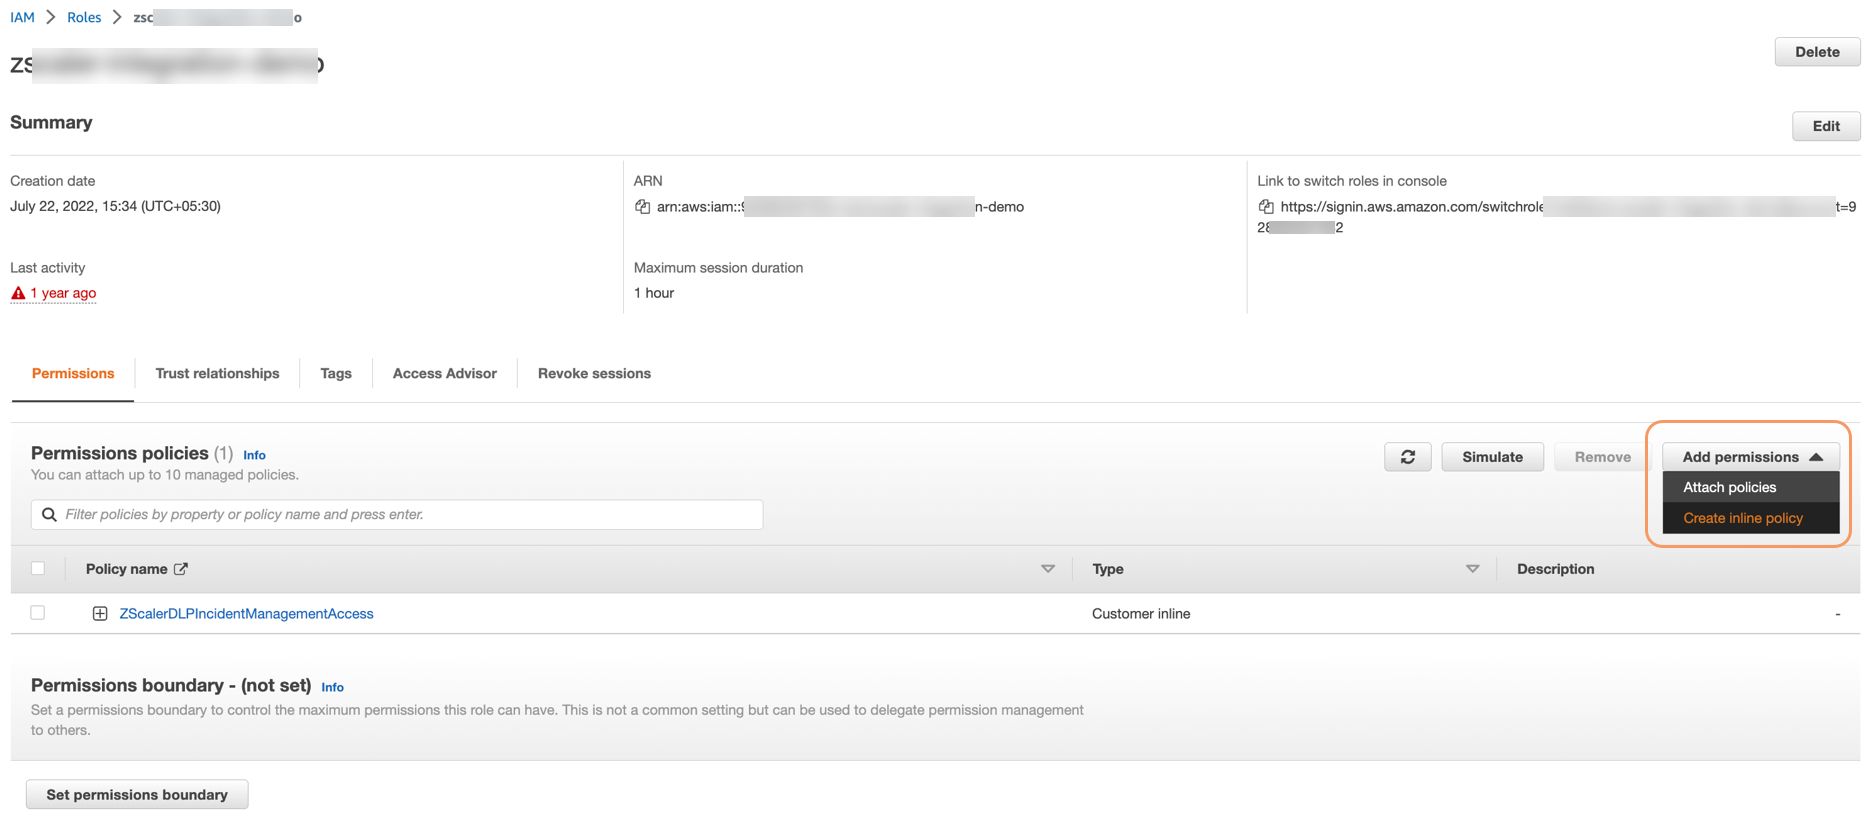
On the IAM cross-account role overview page, in the Permissions policies section, from the Add permissions drop-down menu, select Attach policies. The Add Permissions page appears, listing all the permission policies.
- On the Add Permissions page, select the KMS policy that you just created.
- Click Add Permissions.
- Attach the following policy to the ZIR role for uploading data to S3 buckets:
- Create a policy on the IAM dashboard:
- On the AWS console, search for
IAM. - In the search results, select IAM. The IAM dashboard appears.
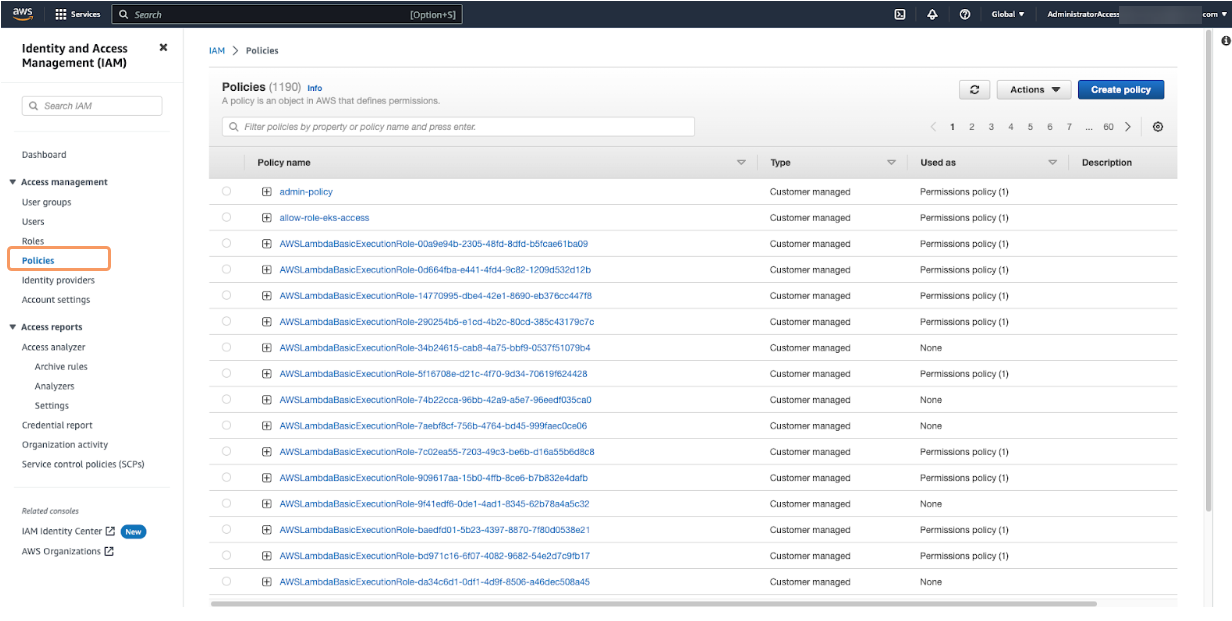
On the IAM dashboard, in the left-side navigation, click Policies. The Policies page appears, listing all the existing policies.
- On the Policies page, click Create Policy. The Specify permissions page appears.
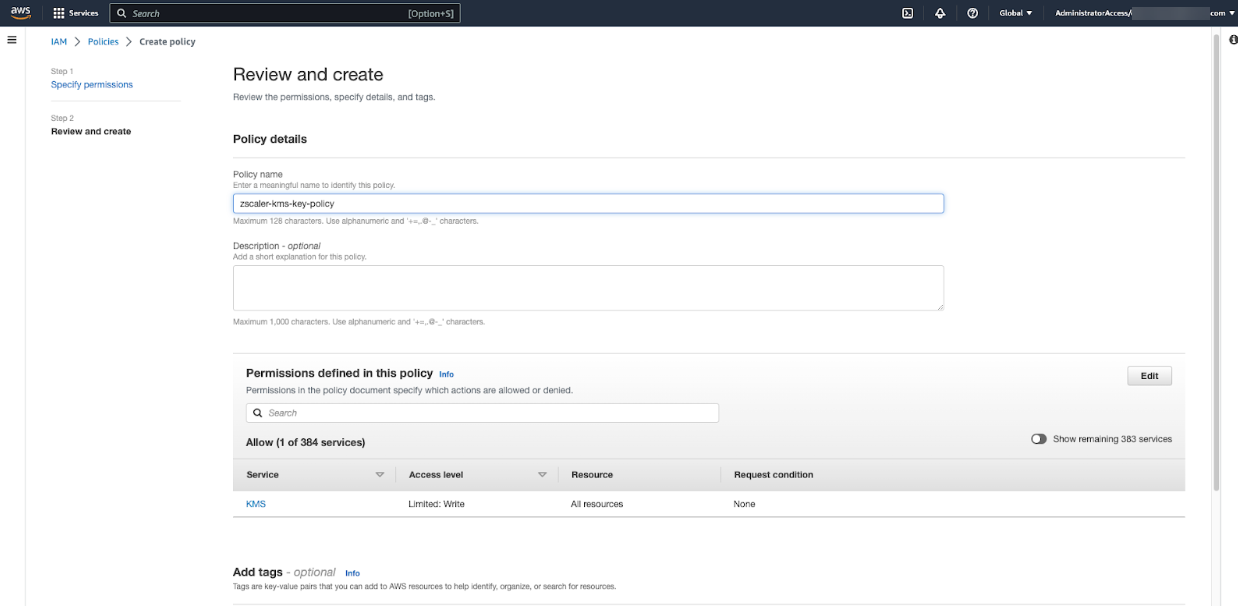
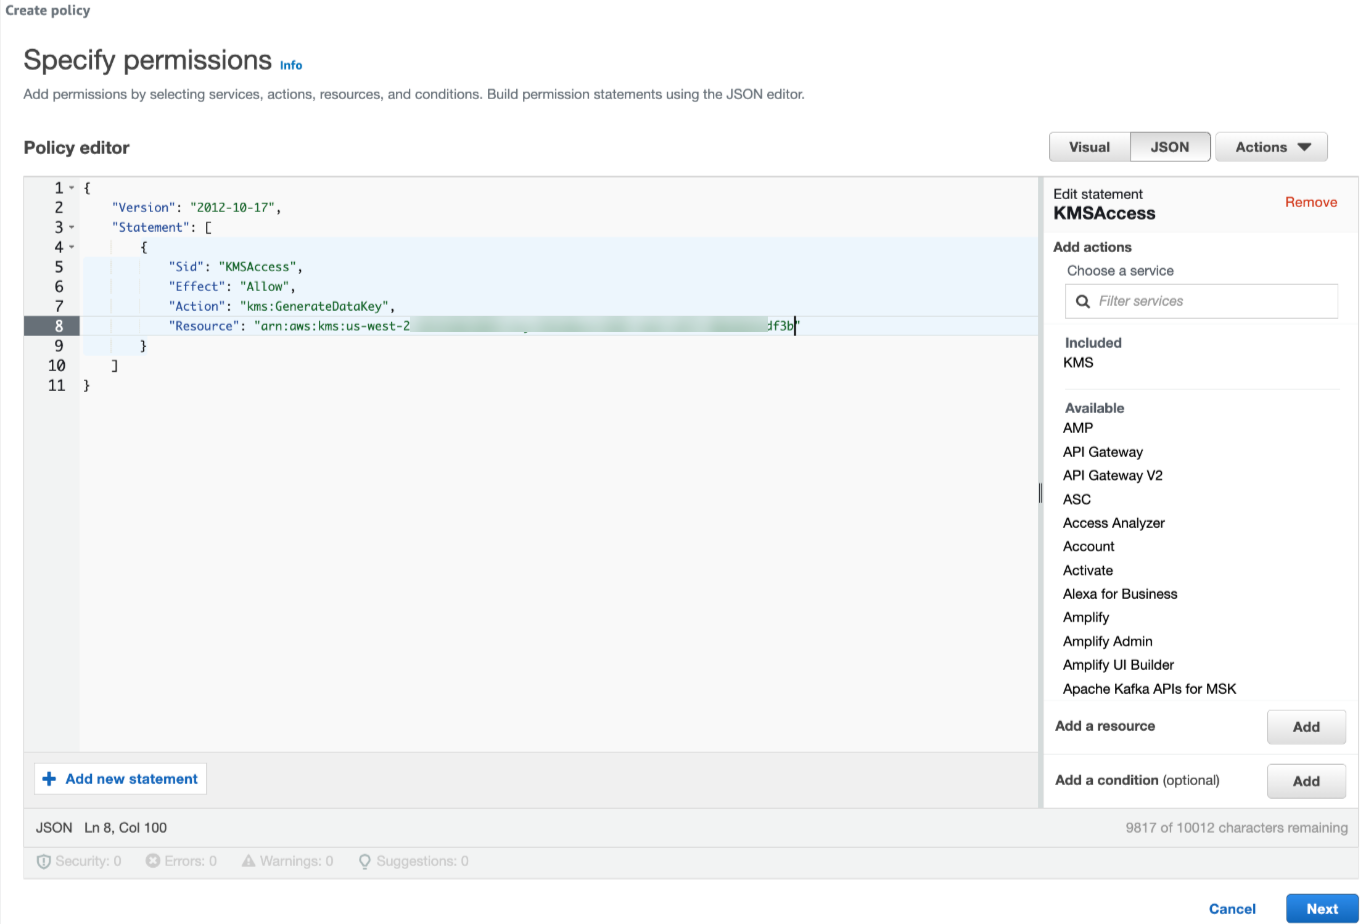
On the Specify permissions page, in the Policy editor, add the following JSON file. In the policy JSON, update the Resource value to be the Customer Managed Key ARN. You copied the Customer Managed Key ARN in a previous step.
{ "Version": "2012-10-17", "Statement": [ { "Sid": "KMSAccess", "Effect": "Allow", "Action": "kms:GenerateDataKey", "Resource": "arn:aws:kms:<AWS Region - CMK>:<AWS Account ID>:key/<CMK Id>" } ] }- Click Next. The Review and create page appears.
- On the Review and create page, in the Policy Details section, enter a name for the policy in the Policy name field.
- Click Create Policy.
- On the AWS console, search for
- Attach the policy to the ZIR role:
- On the IAM dashboard, in the left-side navigation, click Roles. The Roles page appears, listing all the existing roles.
- On the Roles page, in the list of roles, select the ZIR role. The ZIR role overview page appears.
On the ZIR role overview page, in the Permissions policies section, from the Add permissions drop-down menu, select Attach policies. The Add Permissions page appears, listing all the permission policies.
- On the Add Permissions page, select the KMS policy that you just created.
- Click Add Permissions.
- Create a policy on the IAM dashboard:
- Copy the Customer Managed Key ARN:
- Update the KMS Key policy:
- c. (Optional) Create a support role manually.
You can use the following resource creation template to manually create the support role and policies that Zscaler Support can assume. Zscaler Support can then use this role to assist you with troubleshooting configuration integration issues with your AWS integration account.
- On the AWS console, search for
IAM. In the search results, select IAM. The IAM dashboard appears.
On the IAM dashboard, in the left-side navigation, click Roles. The Roles page appears, listing all the existing roles.
- On the Roles page, click Create role. The Create role page appears.
On the Create role page, in the Trusted entity type section, select AWS account.
Click Next. The Add permissions page appears.
- On the Add permissions page, click Create policy. The Specify permissions page appears.
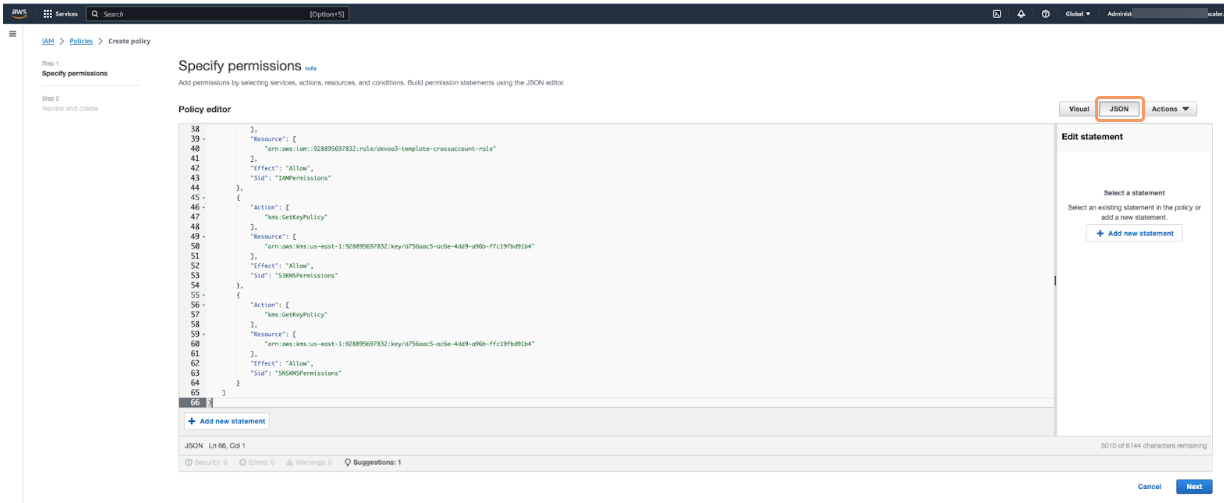
- On the Specify permissions page, click the JSON tab.
In the Policy editor section, add the following policy:
{
"Version": "2012-10-17",
"Statement": [
{
"Action": [
"s3:GetBucketPolicyStatus",
"s3:GetBucketOwnershipControls",
"s3:GetBucketAcl",
"s3:GetBucketNotification",
"s3:GetBucketLocation",
"s3:GetBucketPolicy"
],
"Resource": [
"arn:aws:s3:::{S3MetadataBucketName}",
"arn:aws:s3:::{S3DataBucketName}"
],
"Effect": "Allow",
"Sid": "S3Permissions"
},
{
"Action": [
"sns:ListSubscriptionsByTopic",
"sns:GetTopicAttributes",
"sns:GetSubscriptionAttributes"
],
"Resource": [
"{SNSTopicARN}"
],
"Effect": "Allow",
"Sid": "SNSPermissions"
},
{
"Action": [
"iam:GetRole",
"iam:GetRolePolicy",
"iam:ListRolePolicies",
"iam:ListAttachedRolePolicies"
],
"Resource": [
"{CrossAccountRoleARN}"
],
"Effect": "Allow",
"Sid": "IAMPermissions"
}
]
Replace the following variables in the policy with the values for your organization:
CrossAccountRoleARN: ARN of the cross-account role created for the integrationSNSTopicARN: ARN of the SNS topic that was createdS3MetadataBucketName: Name of the S3 metadata bucketS3DataBucketName: Name of the S3 data bucket
(Optional) If the DLP integration has SNS and S3 encryption with customer managed keys, add the following additional policy:
{
"Version": "2012-10-17",
"Statement": [
{
"Action": [
"kms:GetKeyPolicy"
],
"Resource": [
"{S3KmsKeyArn}"
],
"Effect": "Allow",
"Sid": "S3KMSPermissions"
}
]
}
{
"Version": "2012-10-17",>
"Statement": [
{
"Action": [
"kms:GetKeyPolicy"
],
"Resource": [
"{snskmsKeyArn}"
],
"Effect": "Allow",
"Sid": "SNSKMSPermissions"
}
]
}
Replace the following variables in the policy with the values for your organization:
snskmsKeyArn: ARN of the KMS key used for encrypting the SNS topics3kmsKeyArn: ARN of the KMS key used for encrypting the S3 buckets
- After the policy is updated, click Next. The Review and create page appears.
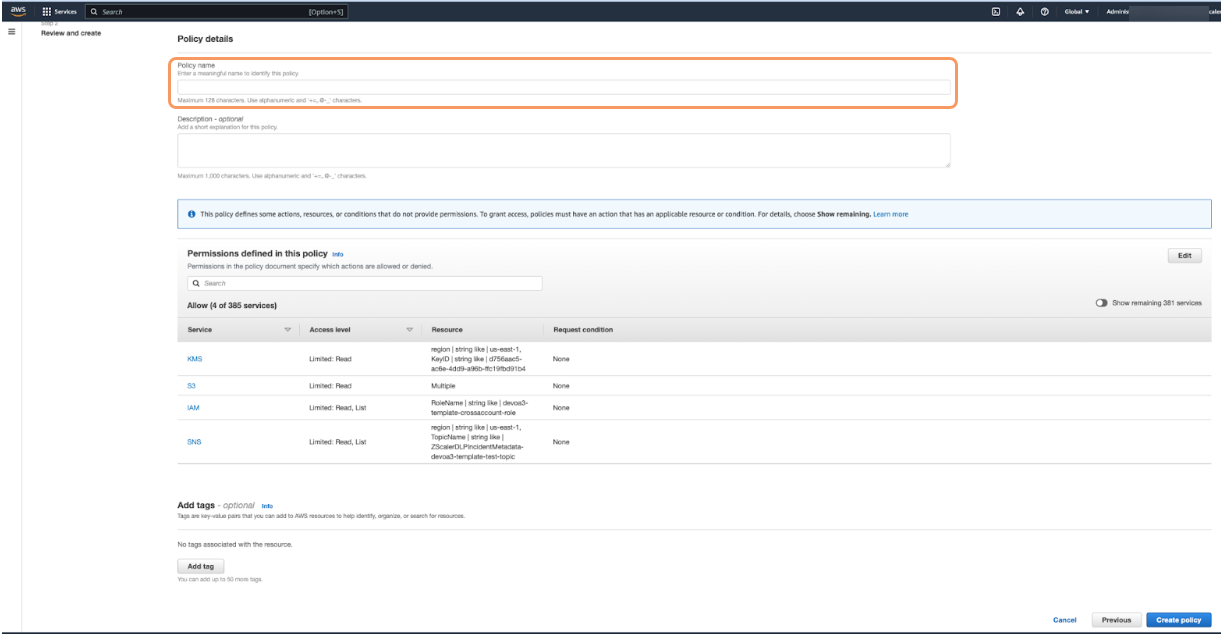
On the Review and create page, in the Policy details section, enter the name for the policy in the Policy Name field.
- At the bottom of the page, click Create Policy. The Policies page appears, listing all the policies.
- On the Policies page, in the left-side navigation, click Roles. The Roles page appears, listing all the roles.
- On the Roles page, click Create role. The Create role page appears.
- On the Create role page, at the top right of the page, click the Refresh icon to load the newly created policy. The Add permissions page appears.
- On the Add permissions page, in the search field, enter the name of the newly created policy.
In the search results, select the policy name.
- Click Next. The Name, review, and create page appears.
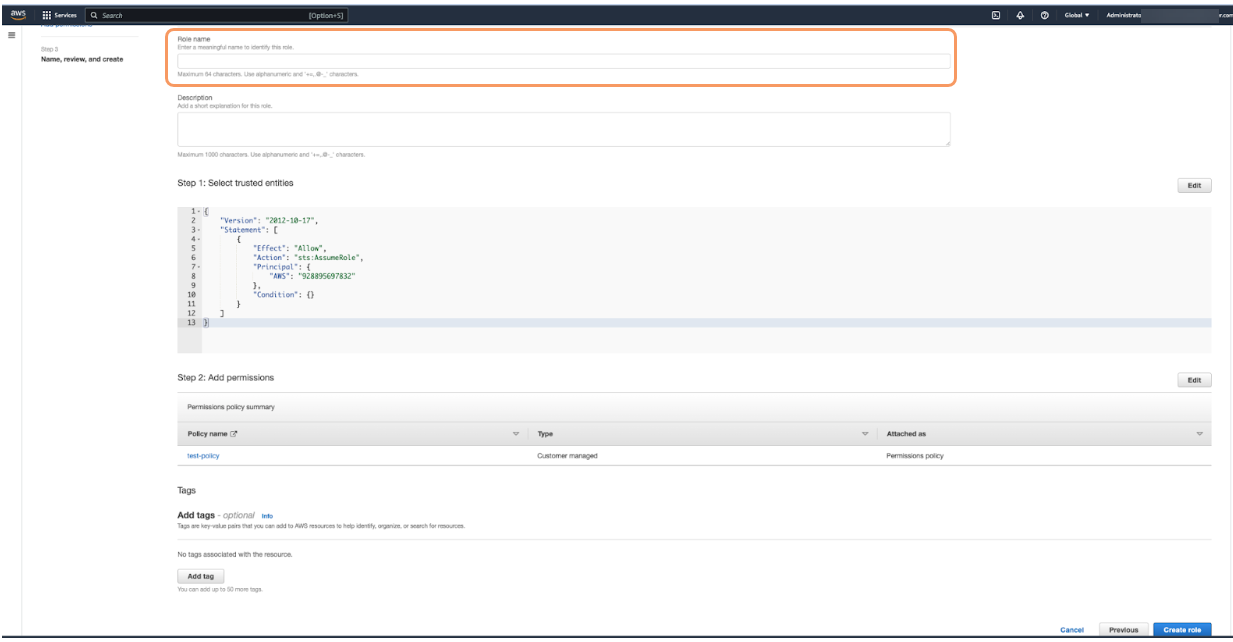
On the Name, review, and create page, enter the name for the role in the Role name field.
- At the bottom right of the page, click Create role. A new support role is created.
- On the AWS console, search for
- a. Create the AWS resources manually.
- Creating AWS Resources Using a CloudFormation Stack in AWS
- 2. Add a DLP AWS application integration in Workflow Automation using the output from the CloudFormation stack or the manually created resources.
Go to Setup > Integrations. The Integrations dashboard appears, displaying a DLP AWS application tile. The Tile View icon is selected by default.
(Optional) On the Integrations dashboard, change the format for the dashboard. Click the List View icon to view the integrations in a list.
- After you select a view option, perform one of the following procedures:
In the tile view:
In the DLP AWS application tile, click the Add icon. The add Zscaler DLP Integration page appears.
- In the list view:
Click Connect next to the DLP AWS application integration. The Zscaler DLP Integration details page appears, displaying a Configuration Steps tab and a Configuration tab.
The Configuration Steps tab provides the instructions for configuring a DLP AWS application integration and a link to download the Zscaler template file.
- On the Configuration tab, click Add New. The add Zscaler DLP integration page appears.
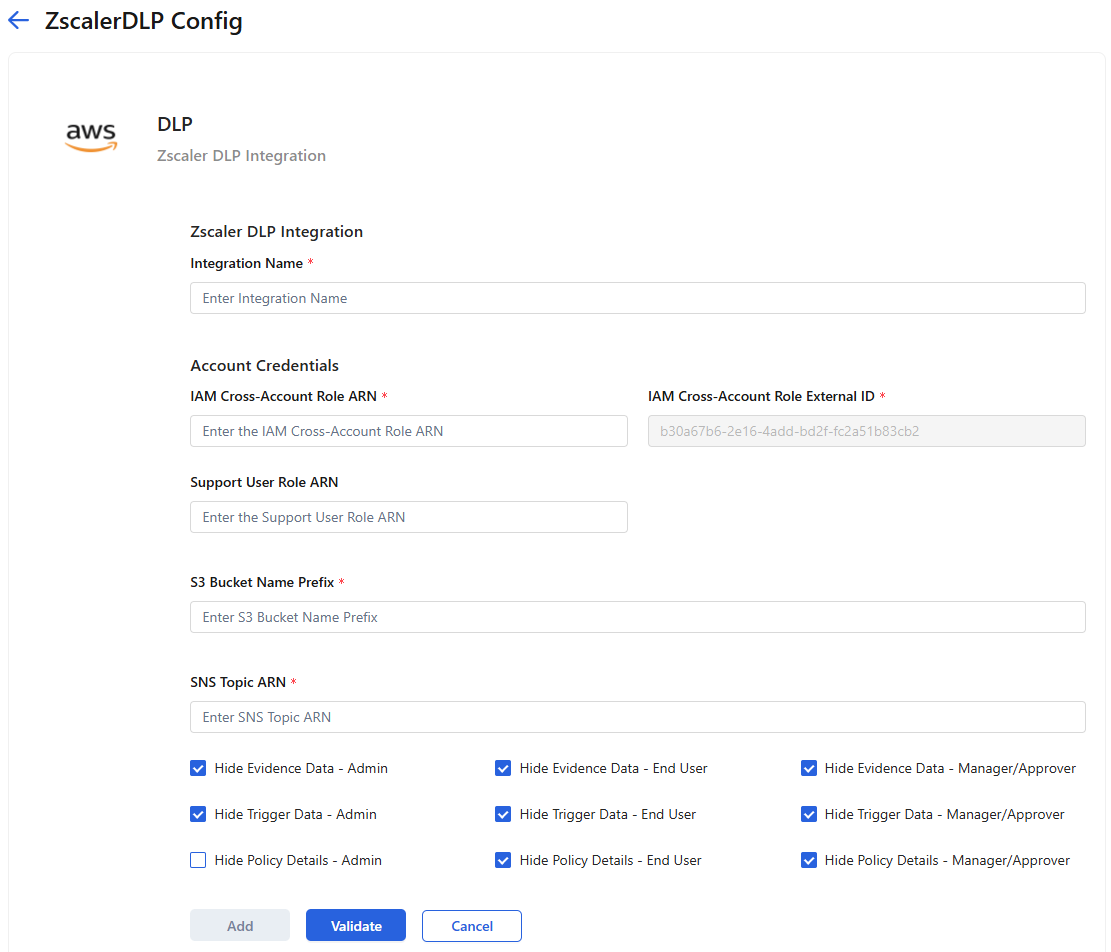
- On the add Zscaler DLP integration page, in the Zscaler DLP Integration section, enter an Integration Name.
- In the Account Credentials section:
- IAM Cross-Account Role ARN: Copy the IAM cross-account role ARN output of the CloudFormation stack and enter it here or enter the IAM cross-account role ARN that you manually created.
IAM Cross-Account Role External ID: The IAM cross-account role external ID is automatically populated for you, and you cannot change it.
This same ID also appears as the Customer GUID on the Account Settings page in the Workflow Automation Admin Portal. To learn more, see Managing Account Settings.
- Support User Role ARN: (Optional) If you created the support role using the CloudFormation stack or you manually created the support role, copy the support role ARN output of the CloudFormation stack and enter it here or enter the support role ARN that you manually created. Zscaler Support can assume this role and assist you with troubleshooting any integration configuration issues that you might have in your AWS account. This role is restricted and cannot access any of the incidents or the data associated with those incidents in your account.
- In the Zscaler DLP Integration section:
- S3 Bucket Name Prefix: Copy the S3 Bucket Name Prefix output of the CloudFormation stack and enter it here or enter the S3 Bucket Name Prefix that you manually created.
- SNS Topic ARN: Copy the SNS Topic ARN output of the CloudFormation stack and enter it here or enter the SNS Topic ARN that you manually created.
In the Privacy Settings section:
- Hide Evidence Data - Admin: Select if you do not want admins to be able to generate presigned evidence links for an incident on the Incident Details page. Otherwise, they can generate evidence links.
- Hide Trigger Data - Admin: Select if you do not want admins to be able to see the trigger data for an incident on the Incident Details page. Otherwise, they can see the trigger data.
- Hide Policy Details - Admin: Select if you do not want the admins to be able to view the policy details for the incident on the Incident Details page. Otherwise, they can view the policy details for the incident.
- Hide Evidence Data - End User: Select if you do not want end users to be able to generate presigned evidence links for an incident. Otherwise, they can generate evidence links.
- Hide Trigger Data - End User: Select if you do not want end users to be able to see the trigger data for an incident. Otherwise, they can see the trigger data.
- Hide Policy Details - End User: Select if you do not want the end users responding to an incident notification to be able to view the policy details for the incident. Otherwise, they can view the policy details for the incident.
- Hide Evidence Data - Manager/Approver: Select if you do not want the approvers or managers responding to an incident escalation notification to be able to generate presigned evidence links for the incident. Otherwise, they can generate evidence links.
- Hide Trigger Data - Manager/Approver: Select if you do not want the approvers or managers responding to an incident escalation notification to be able to see the trigger data for the incident. Otherwise, they can see the trigger data.
- Hide Policy Details - Manager/Approver: Select if you do not want the approvers or managers responding to an incident escalation notification to be able to view the policy details for the incident. Otherwise, they can view the policy details for the incident.
If you disable Hide Evidence Data or Hide Trigger Data in the integration, but you did not enable read access to the S3 bucket when creating the CloudFormation stack, no one can generate evidence links or view trigger data in the Workflow Automation Admin Portal.
Click Validate. The system validates the account credentials that are entered with the AWS integration. It verifies that the IAM cross-account role ARN entry is valid, and it also checks whether the format is correct for the SNS topic ARN. You can only add the integration if it passes validation.
If the validation fails for any reason, or if the configuration has been created or updated with the wrong values, you must disable and enable the integration after you correct the values for the integration.
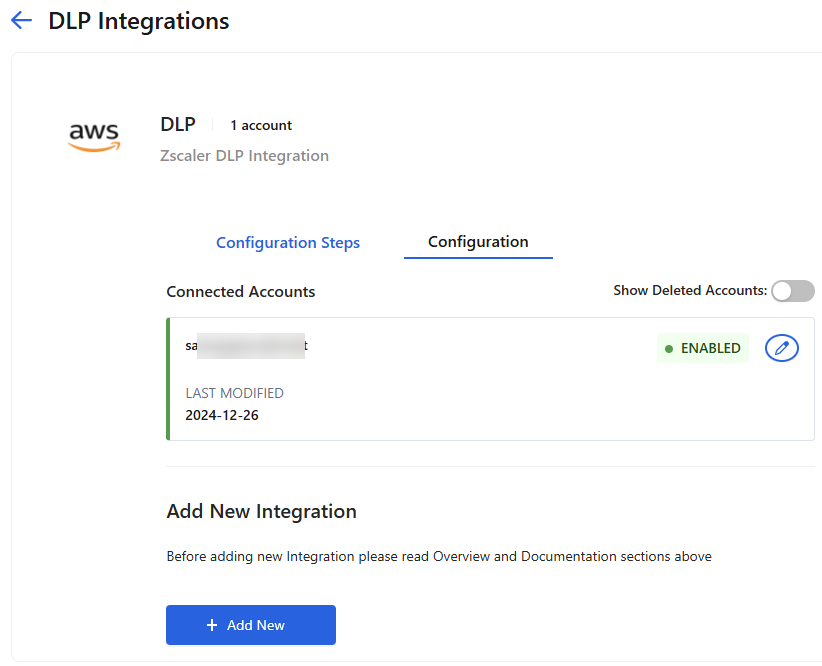
Click Add. The Zscaler DLP Integration details page appears, displaying the DLP AWS integration under Connected Accounts with an Enabled status.
To learn more, see Managing DLP AWS Application Integrations in Workflow Automation.
Close - 3. Set Up the Zscaler Incident Receiver.
Configure the ZIR VM on an AWS EC2 instance. Zscaler recommends that you use the AWS S3 storage bucket when configuring the ZIR for Workflow Automation.
To learn more about configuring the ZIR in AWS, see Configuring the Zscaler Incident Receiver for Amazon Web Services EC2 VMs.
Close
After you complete the DLP application integration configuration, the DLP incidents that occur for your organization are displayed in the Workflow Automation Admin Portal on the Incidents page. To learn more, see About Incidents.
