Experience Center
Uploading Enrollment (CA) Certificates and the Certificate Chain
A CA certificate is required for enrolling Zscaler Client Connector and when configuring an App Connector for enrollment. You can upload up to 1,000 enrollment (CA) certificates. For a complete list of ranges and limits per feature, see Ranges & Limitations.
The uploaded signed certificate must include the private key.
To upload the certificate chain and CA certificates for enrolling Zscaler Client Connector and App Connectors:
- Step 1: Create CA Certificate Chain File
You only need to upload the certificate chain once for your CA certificates. If you have already uploaded the certificate chain, skip to Step 3: Upload Signed CA Certificates to upload your CA certificates.
- Download all of your intermediate certificates and the root certificate as Base64 encoded ASCII PEM formatted files.
- Using a text editor, create a new certificate file, e.g., certificate_chain.pem.
- Within the new file, include all of the certificate information up to and including the root certificate. Also, make sure that the certificate order within the file starts from the intermediate certificate.
- Intermediate certificate 1
- Intermediate certificate 2 above that, etc.
- Root certificate
For example, your certificate chain file should appear as follows:
-----BEGIN CERTIFICATE-----
MIICujCCAaICAQAwdTEQMA4GA1UEChMHWnNjYWxlcjEXMBUGA1UECxMOUHJpdmF0
ZSBBY2Nlc3MxSDBGBgNVBAMTP21vY2tjb21wYW55LmNvbS9Nb2NrIENvbXBhbnkg
wMFowgYcxCzAJBgNVBAYTAlVTMREwDwYDVQQIEwhNYXJ5bGFuZDESMBAwMFowgYc
MDEyMDAwMFowgYcxCzAJBgNVBAYTAlVTMREwDwYDVQQIEwhNYXJ5bGFuZDESMBAG
v+PMGxmcJcqnBrJT3yOyzxIZow==
-----END CERTIFICATE-----
-----BEGIN CERTIFICATE-----
MIIClDCCAXwCAQAwTzEQMA4GA1UEChMHWnNjYWxlcjEXMBUGA1UECxMOUHJpdmF0
ZSBBY2Nlc3MxIjAgBgNVBAMTGW15LW1vY2tjb21wYW55LmNvbS9hZHNkc2QwggEi
MA0GCSqGSIb3DQEBAQUAA4IBDwAwggEKAoIBAQC2meeeh24wzQQ48o2lcbhBFYhi
slXkLGtB8L5cRspKKaBIXiDSRf8F3jSvcEuBOeLKB1d8tjHcISnivpcOd5AUUUDh
v+PMGxmcJcqnBrJT3yOyzxIZow==
-----END CERTIFICATE-----
-----BEGIN CERTIFICATE-----
MIICtzCCAZ8CAQAwcjEQMA4GA1UEChMHWnNjYWxlcjEXMBUGA1UECxMOUHJpdmF0
ZSBBY2Nlc3MxRTBDBgNVBAMTPG1vY2tjb21wYW55LmNvbS9Nb2NrIENvbXBhbnkg
Q2xpZW50IFByb3Zpc2lvbmluZyBDZXJ0aWZpY2F0ZTCCASIwDQYJKoZIhvcNAQEB
BQADggEPADCCAQoCggEBAK0vUQx3UYZ1Krlxk2uPfntu8HSDnn+Jwnj7WLkanyvJ
YHIHKHFYNs9mHRL2JsMgV3FxOuVMde7y0cdEXOovDsIVF9y/DHNh4cDVN4fKqfcy
CAUw7C29C79Fv1C5qfPrmAESrciIxpg0X40KPMbp1ZWVbd4=
-----END CERTIFICATE-----
Close - Step 2: Upload CA Certificate Chain File
- Make sure that you have completed Step 1.
- Go to the Enrollment Certificates page (Infrastructure > Private Access > Component > Enrollment Certificates).
- In the Enrollment Certificates page, upload the root certificate:
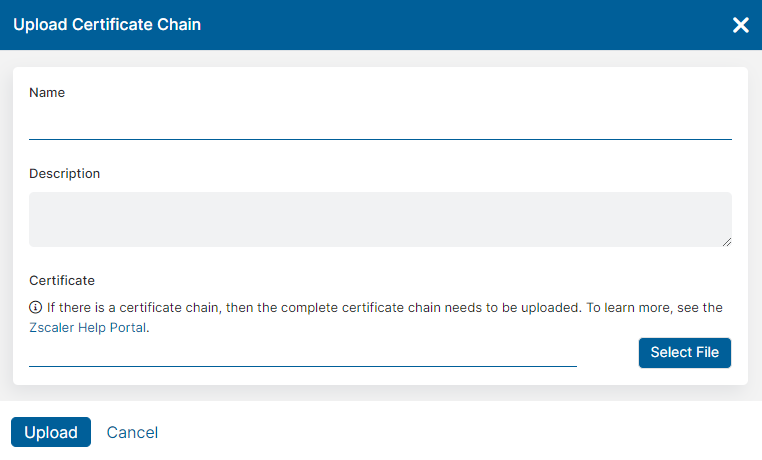
- Click Upload Certificate Chain. The Upload Certificate Chain window appears.
- In the Upload Certificate Chain window:
- Name: Enter a name for the root certificate. The name cannot contain special characters, with the exception of periods (.), hyphens (-), and underscores ( _ ).
- Description: (Optional) Enter a description.
- Certificate: Click Select File and navigate to the root certificate.
- Click Upload

- In the Enrollment Certificates page, upload the PEM formatted file:
Prior to uploading the PEM file, you must upload the root file. If the root file is not uploaded first, then the PEM file will not upload.
- Click Upload Certificate Chain. The Upload Certificate Chain window appears.
- In the Upload Certificate Chain window:
- Name: Enter a name for the certificate chain. The name cannot contain special characters, with the exception of periods (.), hyphens (-), and underscores ( _ ).
- Description: (Optional) Enter a description.
- Certificate: Click Select File and navigate to a Base64 encoded ASCII PEM formatted file that includes the certificate chain of trust for your signed CA certificates.
- Click Upload.
- Step 3: Upload Signed CA Certificates
Make sure that you have uploaded the certificate chain associated to your CA certificates. If you have not done so, complete Steps 1 and 2.
- Within the table, locate the Certificate Pending icon (
 ) next to the certificate name and click the Edit icon.
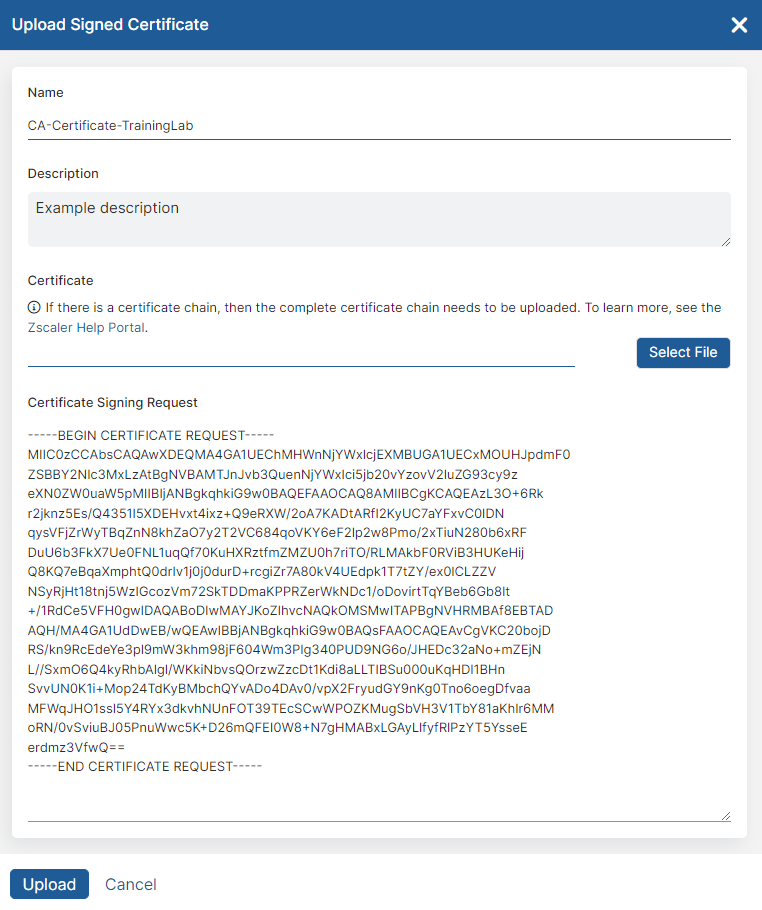
The Upload Signed Certificate window appears.
- In the Upload Signed Certificate window:
- Name: Enter a name for the signed certificate. The name cannot contain special characters, with the exception of periods (.), hyphens (-), and underscores ( _ ).
- Description: (Optional) Enter a description.
- Certificate Signing Request: The CSR text is displayed here.
- Certificate: Click Select File and navigate to the signed CA certificate (i.e., the .pem file).

- Click Upload.
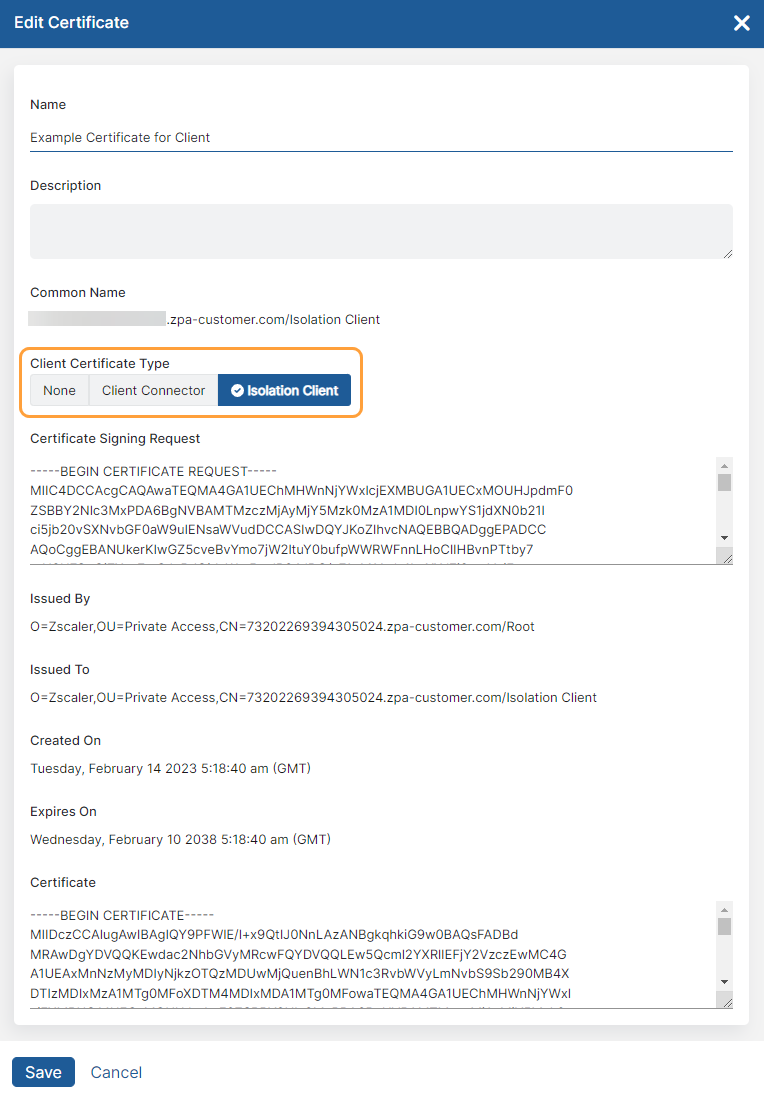
After uploading the signed CA certificate, click the Edit icon within the table again and make sure that the Client Certificate Type option is set correctly. This option specifies whether the signed CA certificate is used to enroll Zscaler Client Connector, App Connectors and Private Service Edges, or Isolation Clients:
- If you are using the enrollment (CA) certificate for Zscaler Client Connector, select Client Connector.
- If you are using the enrollment (CA) certificate for Isolation Clients, select Isolation Client.
- If you are using the enrollment (CA) certificate for App Connectors and Private Service Edges, select None.
Close
- Within the table, locate the Certificate Pending icon (