Experience Center
Managing a Service Provider Certificate Rotation
When a single sign-on (SSO) certificate is retired, you need to rotate the service provider certificate used by your identity provider (IdP) to ensure admins and end users maintain successful access to applications.
To make these changes, you need the relevant service provider metadata and certificate for your IdP. The service provider metadata and certificate information is specific to your IdP and the Single Sign-On selection made when configuring your IdP within the Admin Portal. You can access this information from the IdP Configuration page in the Admin Portal.
If the original IdP you configured is Azure or Okta, your IdP will download the latest certificate from Private Applications and rotate your account configuration automatically. No further action is required.
Use one of the following options to rotate a certificate:
- Automatically update the certificate using a metadata URL
- Go to Administration > Identity > Private Access > IDP Configuration.
- Locate the IdP configuration you want to modify within the table, and click the Edit icon.
- In the Edit IdP Configuration window, select a different service provider certificate for User SP Certificate Rotation or Admin SP Certificate Rotation.
- Click Save. The IdP automatically updates to use the new service provider certificate.
- Manually update the certificate using a metadata URL
- Go to Administration > Identity > Private Access > IDP Configuration.
- Locate the IdP configuration you want to modify within the table, and click the Edit icon.
- In the Edit IdP Configuration window, select a different service provider certificate for User SP Certificate Rotation or Admin SP Certificate Rotation.
- Click Save.
- Locate the IdP you updated within the table, and expand the row to view the IdP details.
- Find the Service Provider URL, and click the Copy icon to copy the URL to your clipboard.

- Go to your IdP and complete the following based on the IdP:
- Microsoft Active Directory Federation Services (ADFS) 2.0 and 3.0
- Log in to your ADFS server.
- In the Windows server, go to Administrative Tools > ADFS Management to launch the ADFS management application.
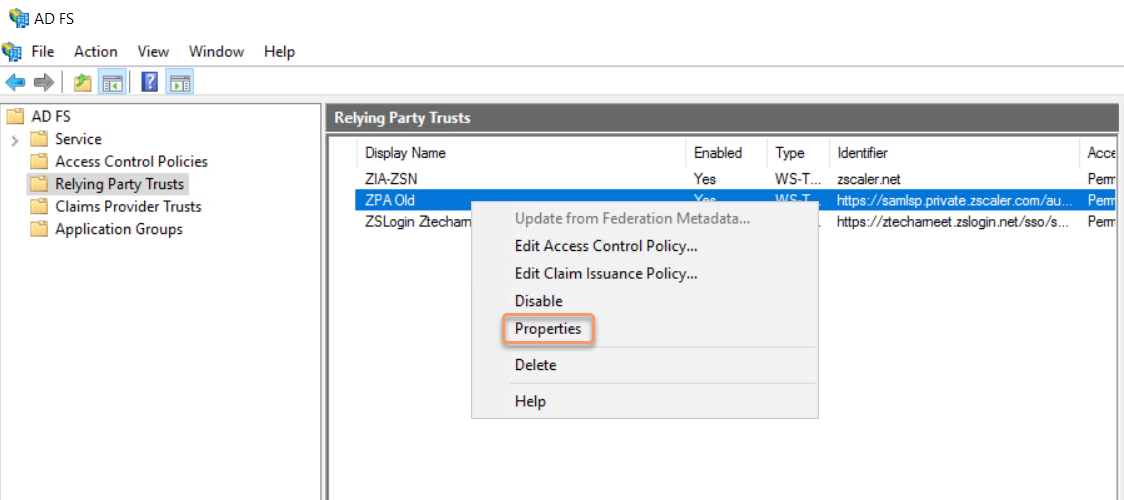
In the left-side navigation of the AD FS window, click the Relying Party Trusts folder.

In the Relying Party Trusts panel, right-click the relying party trust for Private Applications (e.g., Private Applications or Private Applications Admin SSO), and click Properties. The Properties window appears.

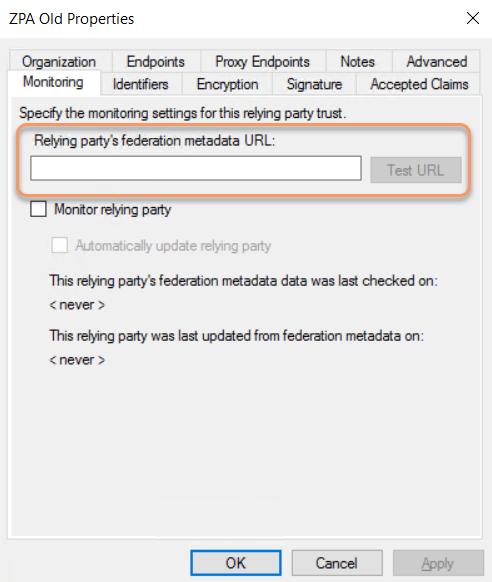
On the Monitoring tab, enter the URL you copied in step 6 above in the Relying party’s federation metadata URL: field.

- Click Test URL and wait for a successful validation.
- Click OK, click Apply, and then close the Properties window.
In certain scenarios, AD FS caches the expired certificate. Zscaler recommends deleting any expired certificates from the Relying Party Trusts panel after a new certificate is successfully updated.
Close - Other IdPs
- Microsoft Active Directory Federation Services (ADFS) 2.0 and 3.0
- Test your logins to ensure SSO is working correctly.
- Manually update the certificate using metadata and certificate files
- Go to Administration > Identity > Private Access > IDP Configuration.
- Locate the IdP configuration you want to modify within the table, and click the Edit icon.
- In the Edit IdP Configuration window, select a different service provider certificate for User SP Certificate Rotation or Admin SP Certificate Rotation.
- Click Save.
- Locate the IdP you updated within the table, and expand the row to view the IdP details.
- Find Service Provider Certificate, and click Download Certificate to download the certificate file for this IdP.

- Go to your IdP and complete the following based on the IdP:
- Microsoft Active Directory Federation Services (ADFS) 2.0 and 3.0
- Log in to your ADFS server.
- In the Windows server, go to Administrative Tools > ADFS Management to launch the ADFS management application.
In the left-side navigation of the AD FS window, click the Relying Party Trusts folder.

In the Relying Party Trusts panel, right-click the relying party trust for Private Applications (e.g., Private Applications or Private Applications Admin SSO), and click Properties. The Properties window appears.

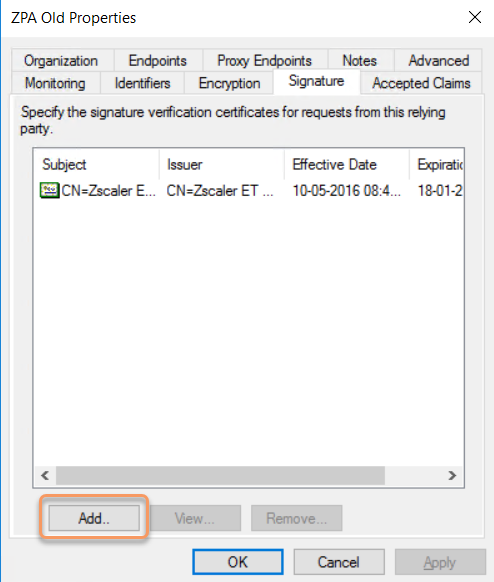
On the Signature tab, click Add.. and select the certificate downloaded in step 6 above.

- Click OK, click Apply, and then close the Properties window.
In certain scenarios, AD FS caches the expired certificate. Zscaler recommends deleting any expired certificates from the Relying Party Trusts panel after a new certificate is successfully updated.
Close - Other IdPs
- Microsoft Active Directory Federation Services (ADFS) 2.0 and 3.0
- Test your logins to ensure SSO is working correctly.