Workflow Automation
Managing DLP Azure Application Integrations in Workflow Automation
Application integration is the step required to connect the source of the DLP incidents (i.e., ZIA) to Workflow Automation. Super admins or admins with Full or Restricted access to Workflow Automation can configure the DLP Azure application integration. Before your organization's DLP incidents are available for review and remediation on the Incidents page in the Workflow Automation Admin Portal, the DLP Azure application integration must be configured. To learn more, see Configuring the DLP Application Integration Using Azure.
On the Integrations dashboard in the Workflow Automation Admin Portal, admins can:
- Add DLP Azure Application Integrations
Prerequisites
Ensure that you have successfully set up a resource manager stack in Azure. Various outputs (TenantId, applicationClientId, applicationClientSecret, storageAccountName, and systemTopicResource ID) from the stack creation are required to add a DLP Azure application integration on the Integrations dashboard in Workflow Automation.
Adding DLP Azure Application Integrations
To add a DLP Azure application integration in Workflow Automation:
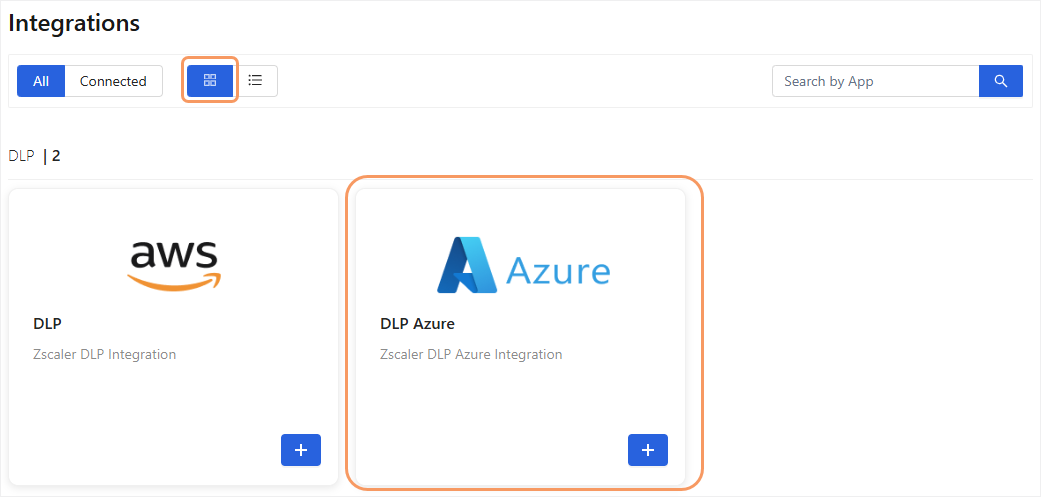
Go to Setup > Integrations. The Integrations dashboard appears, displaying a DLP Azure application tile. The Tile View icon is selected by default.
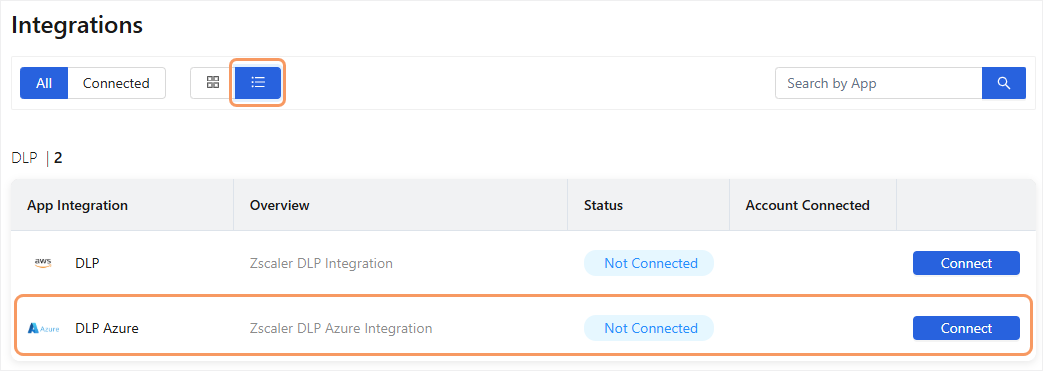
(Optional) On the Integrations dashboard, change the view format for the dashboard. Click the List View icon to view the integrations in a list.
- After you select a view option, perform one of the following procedures:
In the tile view:
In the DLP Azure application tile, click the Add icon. The add Zscaler DLP Azure Integration page appears.
- In the list view:
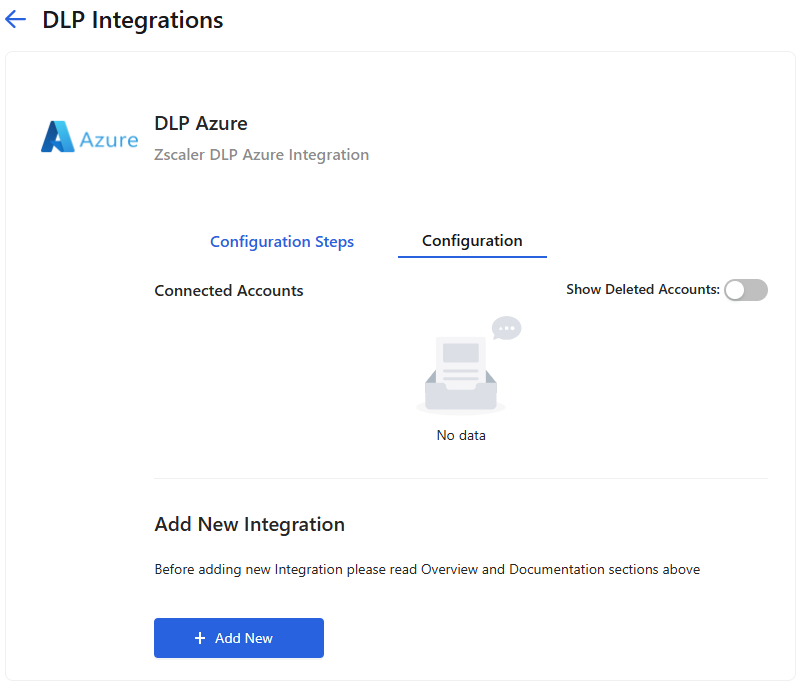
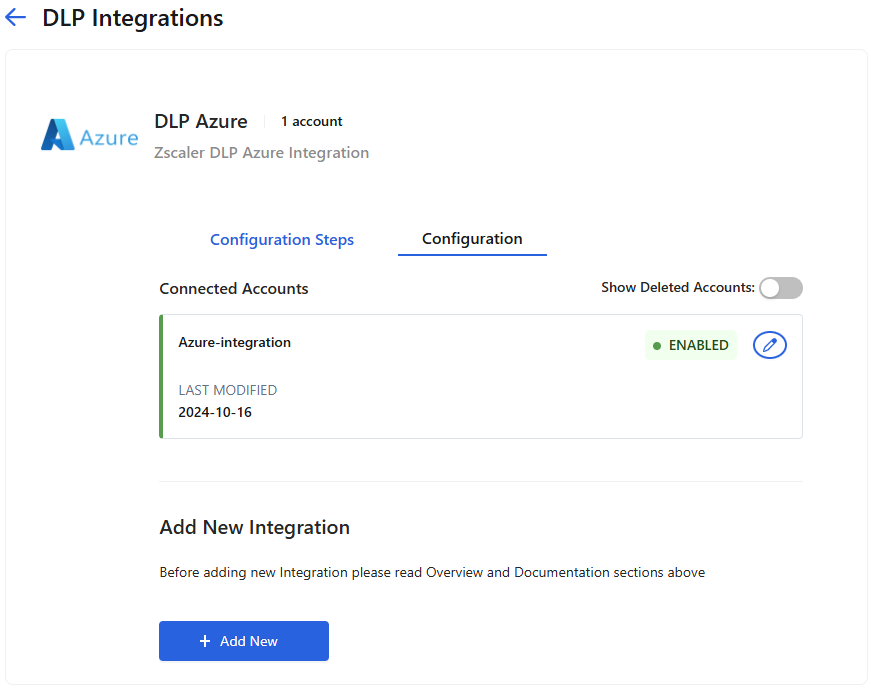
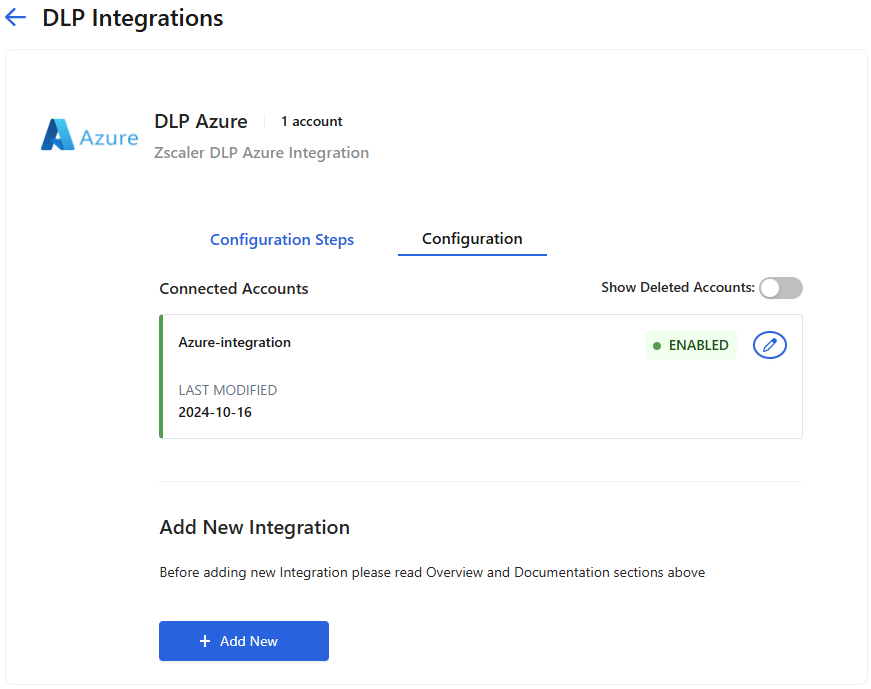
Click Connect next to the DLP Azure application integration. The Zscaler DLP Azure Integration details page appears, displaying a Configuration Steps tab and a Configuration tab.
The Configuration Steps tab provides the instructions for configuring a DLP Azure application integration and a link to download the Zscaler template file.
- On the Configuration tab, click Add New. The add Zscaler DLP Azure Integration page appears.
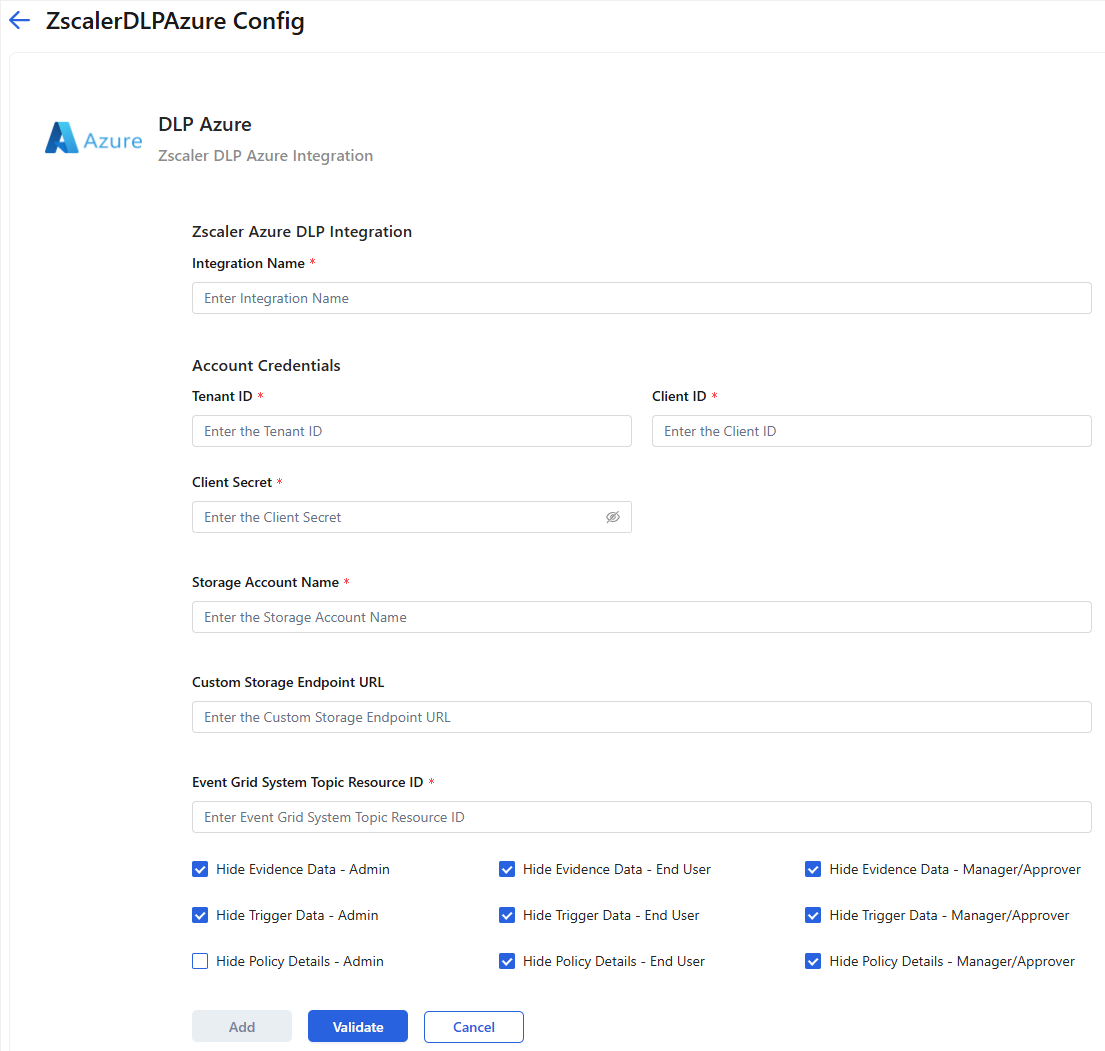
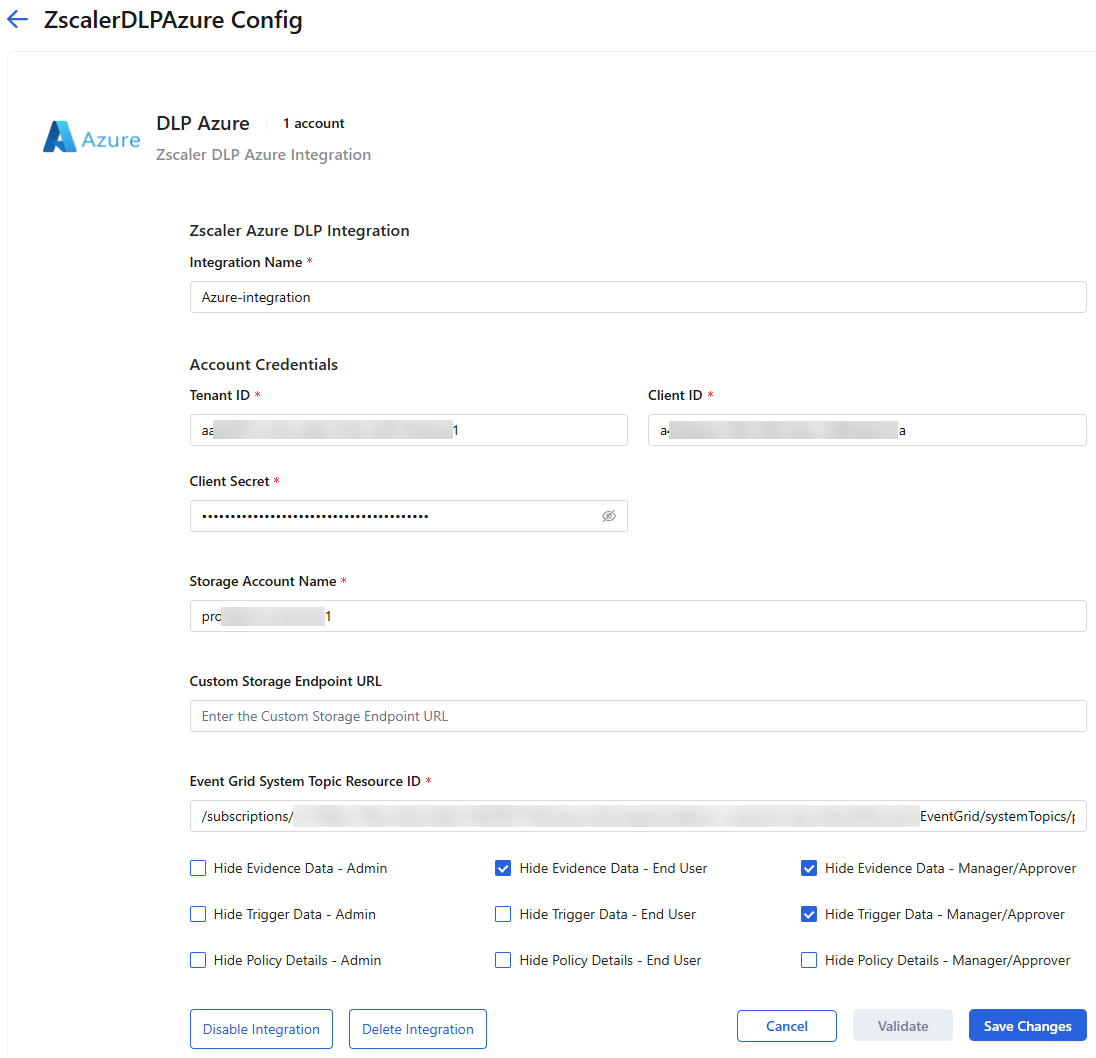
- On the add Zscaler DLP Azure Integration page, in the Zscaler Azure DLP Integration section, enter an Integration Name.
- In the Account Credentials section:
- Tenant ID: Copy the
TenantIdoutput from the bash script for the DLP integration and enter it here. - Client ID: Copy the
applicationClientIdoutput from the bash script for the DLP Integration and enter it here. - Client Secret: Copy the
applicationClientSecretoutput from the bash script for the DLP Integration and enter it here.
- In the Zscaler Azure DLP Integration section:
- Storage Account Name: Copy the
storageAccountNameoutput from the deployment of the resource manager template for DLP integration and enter it here. - Custom Storage Endpoint URL: (Optional) If you do not want Workflow Automation to access the storage account through a default public endpoint, enter a custom storage endpoint URL in the format
https://<custom endpoint>. Leave the field blank if you want to use a public endpoint. - Event Grid System Topic Resource Id: Copy the
systemTopicResourceIDoutput from the deployment of the resource manager template for DLP integration and enter it here.
- In the Privacy Settings section:
- Hide Evidence Data - Admin: Select if you do not want admins to be able to generate presigned evidence links for an incident on the Incident Details page. Otherwise, they can generate evidence links.
- Hide Trigger Data - Admin: Select if you do not want admins to be able to see the trigger data for an incident on the Incident Details page. Otherwise, they can see the trigger data.
- Hide Policy Details - Admin: Select if you do not want admins to be able to view the policy details for the incident on the Incident Details page. Otherwise, they are able to view the policy details for the incident.
- Hide Evidence Data - End User: Select if you do not want end users to be able to generate presigned evidence links for an incident. Otherwise, they can generate evidence links.
- Hide Trigger Data - End User: Select if you do not want end users to be able to see the trigger data for an incident. Otherwise, they can see the trigger data.
- Hide Policy Details - End User: Select if you do not want end users responding to an incident notification to be able to view the policy details for the incident. Otherwise, they are able to view the policy details for the incident.
- Hide Evidence Data - Manager/Approver: Select if you do not want approvers or managers responding to an incident escalation notification to be able to generate presigned evidence links for the incident. Otherwise, they are able to generate evidence links.
- Hide Trigger Data - Manager/Approver: Select if you do not want approvers or managers responding to an incident escalation notification to be able to see the trigger data for the incident. Otherwise, they are able to see the trigger data.
- Hide Policy Details - Manager/Approver: Select if you do not want approvers or managers responding to an incident escalation notification to be able to view the policy details for the incident. Otherwise, they are able to view the policy details for the incident.
If you disable Hide Evidence Data or Hide Trigger Data in the integration, but you did not enable read access to the data blob when creating the resource manager stack, no one can generate evidence links or view trigger data in the Workflow Automation Admin Portal.
Click Validate. The system validates the account credentials that are entered with the Azure integration. It also checks whether the format is correct for the Event Grid System Topic Resource Id. You can only add the integration if it passes validation.
If the validation fails for any reason, or if the configuration has been created or updated with the wrong values, you must disable and re-enable the integration after you correct the values for the integration.
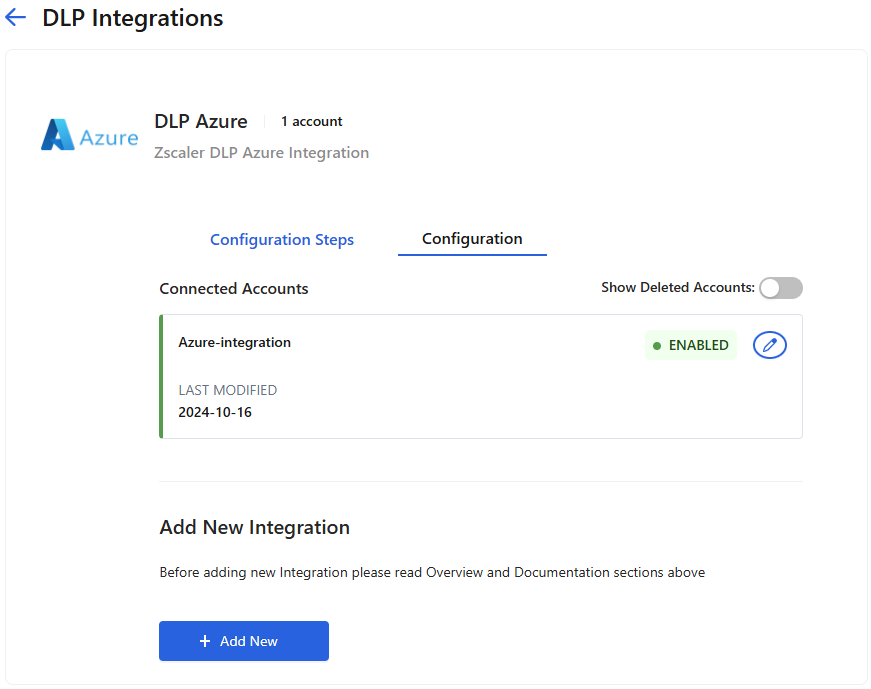
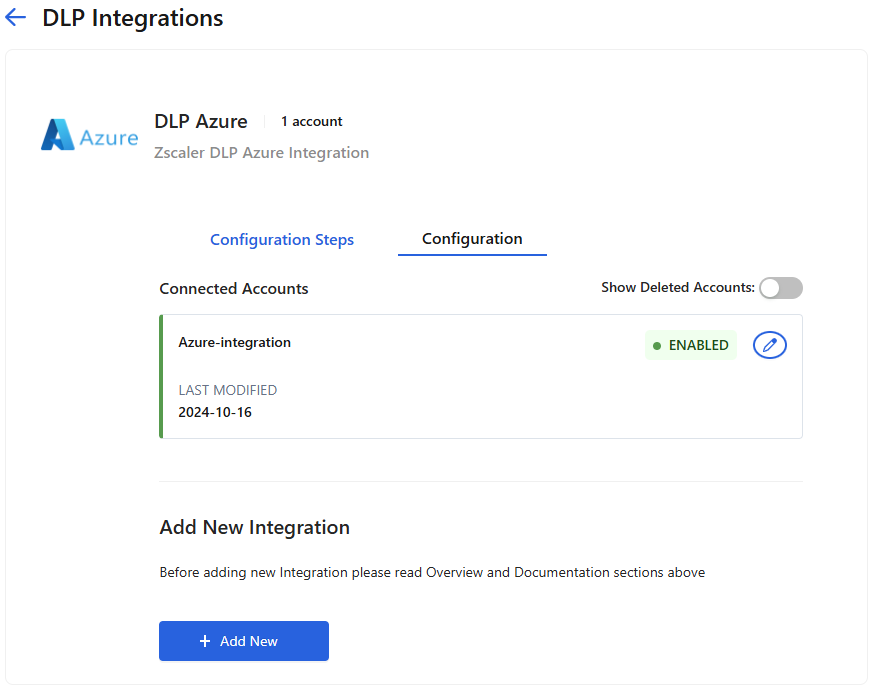
Click Add. The Zscaler DLP Azure Integration details page appears, displaying the DLP integration under Connected Accounts with an Enabled status.
- Edit or Delete DLP Azure Application Integrations
Editing DLP Azure Application Integrations
To edit a DLP Azure application integration in Workflow Automation:
- Go to Setup > Integrations. The Integrations dashboard appears.
- On the Integrations dashboard, select the view format for the dashboard. Click the Tile View icon to view the integrations displayed in tiles or click the List View icon to view the integrations in a list. The Tile View icon is selected by default.
- (Optional) On the Integrations dashboard, use the Search field to locate the DLP Azure application integration that you want to edit.
- Perform one of the following steps:
- In the tile view, click anywhere on the DLP Azure tile under Connected Apps.
- In the list view, click View Details next to the DLP Azure app integration in the Connected Apps section.
The Zscaler DLP Azure Integration details page appears, displaying all the DLP Azure app integrations along with their specific statuses (Enabled, Disabled, and Failed) under the Connected Accounts section. To display the deleted application integrations, select Show Deleted Accounts at the top-right of the Connected Accounts section.
In the Zscaler DLP Azure Integration details page, click the Edit icon next to the connected account you want to edit. The edit Zscaler DLP Azure Integration page appears.
- On the edit Zscaler DLP Azure Integration page, edit any of the fields that are displayed. For integrations with a Deleted status, you can only edit the data privacy field settings.
Click Validate. The system validates the account credentials that are entered with the Azure integration. It also checks whether the format is correct for the Event Grid System Topic Resource Id. You can only add the integration if it passes validation.
If the validation fails for any reason, or if the configuration has been created or updated with the wrong values, you must disable and re-enable the integration after you correct the values for the integration.
- Click Save Changes.
Deleting DLP Azure Application Integrations
To delete a DLP Azure application integration in Workflow Automation:
- Go to Setup > Integrations. The Integrations dashboard appears.
- On the Integrations dashboard, select the view format for the dashboard. Click the Tile View icon to view the integrations displayed in tiles or click the List View icon to view the integrations in a list. The Tile View icon is selected by default.
- (Optional) On the Integrations dashboard, use the Search field to locate the DLP Azure application integration that you want to delete.
- Perform one of the following steps:
- In the tile view, click anywhere on the DLP Azure tile under Connected Apps.
- In the list view, click View Details next to the DLP Azure app integration in the Connected Apps section.
The Zscaler DLP Azure Integration details page appears, displaying all the DLP Azure app integrations along with their specific statuses (Enabled, Disabled, and Failed) under the Connected Accounts section. To display the deleted application integrations, select Show Deleted Accounts at the top-right of the Connected Accounts section.
- On the Zscaler DLP Azure Integration details page, click the Edit icon next to the connected account you want to delete. Only connected accounts with a status of Enabled, Disabled, or Failed can be deleted. The edit Zscaler DLP Azure Integration page appears.
- On the edit Zscaler DLP Azure Integration page, click Delete Integration. The status of the integration changes to Deleted.
- Disable or Enable DLP Azure Application Integrations
To disable or enable a DLP Azure application integration in Workflow Automation:
- Go to Setup > Integrations. The Integrations dashboard appears.
- On the Integrations dashboard, select the view format for the dashboard. Click the Tile View icon to view the integrations displayed in tiles or click the List View icon to view the integrations in a list. The Tile View icon is selected by default.
- (Optional) On the Integrations dashboard, use the Search field to locate the DLP Azure application integration that you want to disable or enable.
- Perform one of the following steps:
- In the tile view, click anywhere on the DLP Azure tile under Connected Apps.
- In the list view, click View Details next to the DLP Azure app integration in the Connected Apps section.
The Zscaler DLP Azure Integration details page appears, displaying all the DLP Azure app integrations along with their specific statuses (Enabled, Disabled, and Failed) under the Connected Accounts section. To display the deleted application integrations, select Show Deleted Accounts at the top-right of the Connected Accounts section.
- On the Zscaler DLP Azure Integration details page, click the Edit icon next to a connected account with an Enabled status that you want to disable or an account with a Disabled status that you want to enable. The edit Zscaler DLP Azure Integration page appears.
- On the edit Zscaler DLP Azure Integration page, click Disable Integration or Enable Integration. The status of the integration changes to Disabled or Enabled.
- View DLP Azure Application Integrations
To view DLP Azure application integrations in Workflow Automation:
- Go to Setup > Integrations. The Integrations dashboard appears.
- On the Integrations dashboard:
Filter the integrations that are displayed on the dashboard. Select All to display all the integrations or select Connected to display only those integrations that are connected. By default, all integrations are displayed.
Change the layout of the dashboard. Click the Tile View icon to view the integrations in a tile format or click the List View icon to view the integrations in a list format. By default, the dashboard is displayed in the tile view.
- View the list of all DLP Azure connected application integrations that have been added to your organization:
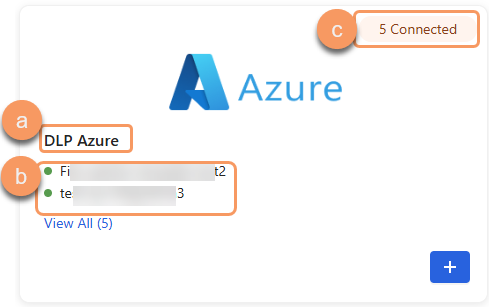
In the tile view, under the Connected Apps section, you can view the following information:
- App: The application that is associated with the integration. For example, Data Loss Prevention (DLP) Azure.
- Account Details: The integration name for each account associated with the integration.
- Status: The status of the accounts for the integration. A green oval is displayed at the top of the tile listing the number of accounts that are enabled and the status of Connected. This number does not include accounts with a Failed or Deleted status.
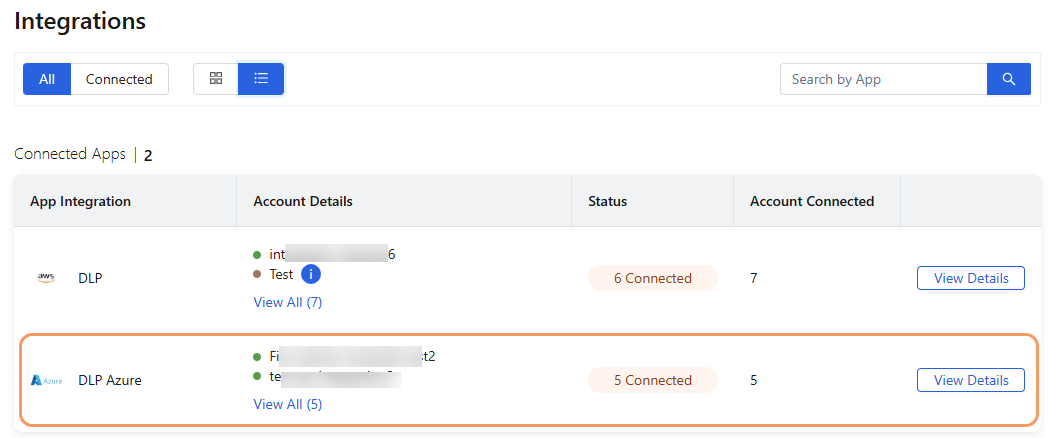
In the list view, under the Connected Apps section, you can view the following information:
- App Integration: The application that is associated with the integration. For example, DLP Azure.
- Account Details: The integration name for each account associated with the integration.
- Status: The status of the accounts for the integration. A green oval is displayed in the field listing the number of accounts that are enabled and the status of Connected. This number does not include accounts with a Failed or Deleted status.
- Account Connected: The number of accounts that are connected.
- View additional details for the DLP Azure application integrations by performing one of the following steps:
- In the tile view, click anywhere on the DLP Azure tile under Connected Apps.
- In the list view, click View Details next to the DLP Azure application integration in the Connected Apps section.
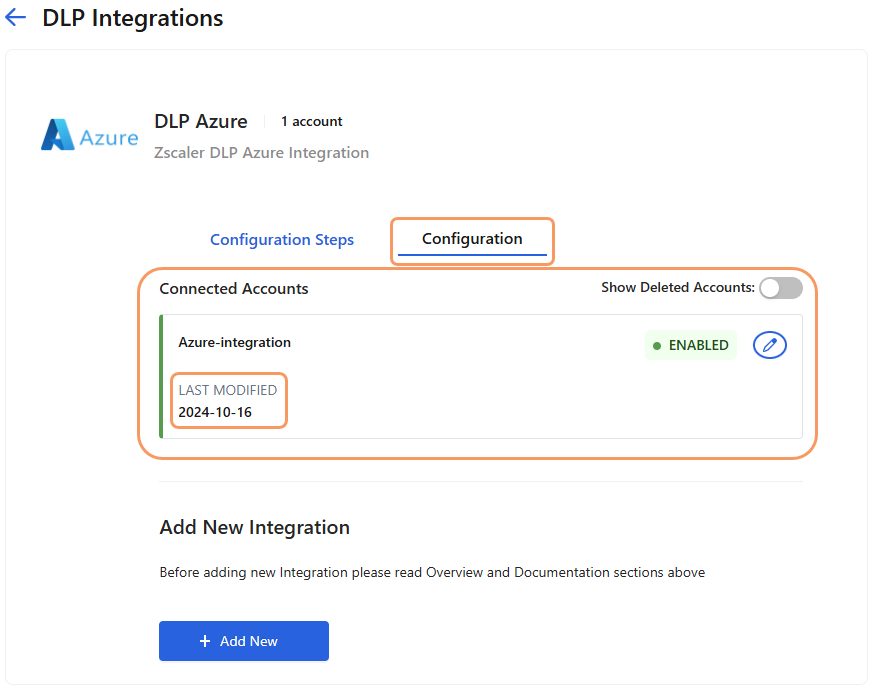
The Zscaler DLP Azure Integration details page appears, displaying a Configuration Steps tab and a Configuration tab. On the Configuration tab, you can view the list of DLP Azure application integration accounts along with the status of each account, and the date when each integration account was last modified. To display the deleted application integrations, select Show Deleted Accounts at the top-right of the Connected Accounts section.
- On the Configuration tab, click the Edit icon next to a DLP Azure application integration account to view the specific details for that integration.
