Experience Center
Configuring Privileged Credentials
To add a privileged credential:
- Go to Policies > Clientless > Privileged Credentials.
- Click Add Privileged Credential.
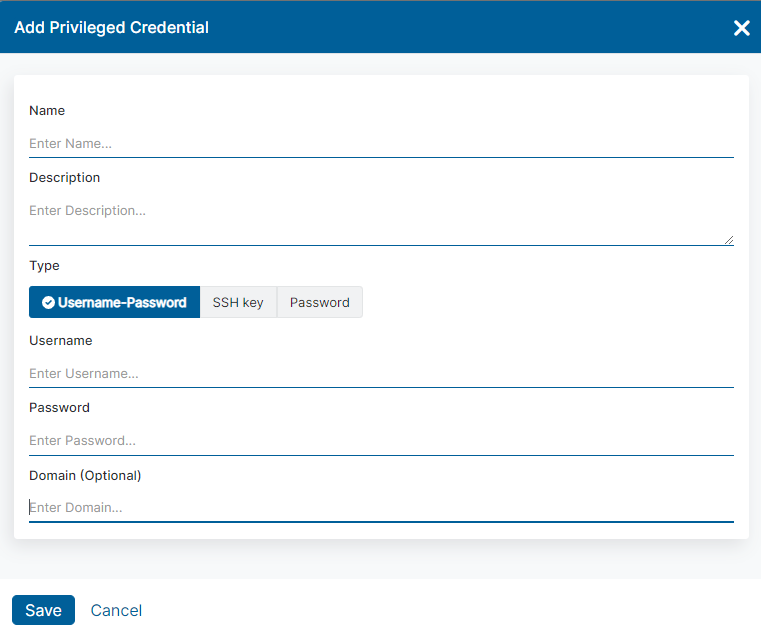
The Add Privileged Credential window appears.
- In the Add Privileged Credential window:
- Name: Enter a name for the privileged credential. The name cannot contain special characters, with the exception of periods (.), hyphens (-), and underscores ( _ ).
- Description: The description for the privileged credential, if available.
- Type:
- Username-Password: Select this option if you are using an RDP protocol.
- Username: Enter the username for the login you want to use for this privileged credential.
- Password: Enter the password associated with the username for the login you want to use for this privileged credential.
- Domain: (Optional) Enter the domain name associated with the username. You can also include the domain name as part of the username. The domain name only needs to be specified when logging into an RDP console that is connected to an Active Directory Domain.
- SSH Key: Select this option if you are using an SSH protocol.
- Username: Enter the username for the login you want to use for this privileged credential.
- Private Key: Enter the SSH private key associated with the username for the login you want to use for this privileged credential.
- Username-Password: Select this option if you are using an RDP protocol.
You can only use SSH private keys that are 2048-bit length or smaller.
- Passphrase: (Optional) Enter the password that is used to protect the SSH private key.
- Password: Select this option if you are using a VNC option.
- Password: Enter the password for the login you want to use for this privileged credential.
You cannot change the protocol type after it’s been created and saved.

- Click Save.