Experience Center
Configuring a Log Receiver
A log receiver is a storage location that can receive information about App Connectors and users. Your App Connectors must be deployed prior to configuring a log receiver. To learn more, see the App Connector Deployment Guides for Supported Platforms.
Logs go to the App Connector group that is geographically closest to the instance of the Log Streaming Service (LSS) for Private Applications. In the event that the App Connectors in a previously selected App Connector group are not available, then log transmission switches to App Connectors in the other location. If each App Connector group points to a different log receiver and is configured for the exact same LSS, then the same log is sent to an App Connector in each App Connector group. The LSS attempts to resend a log if it determines that a log has not been received by the SIEM system.
To add a log receiver:
- Go to Logs > Log Streaming > Log Receivers.
- Click Add Log Receiver.
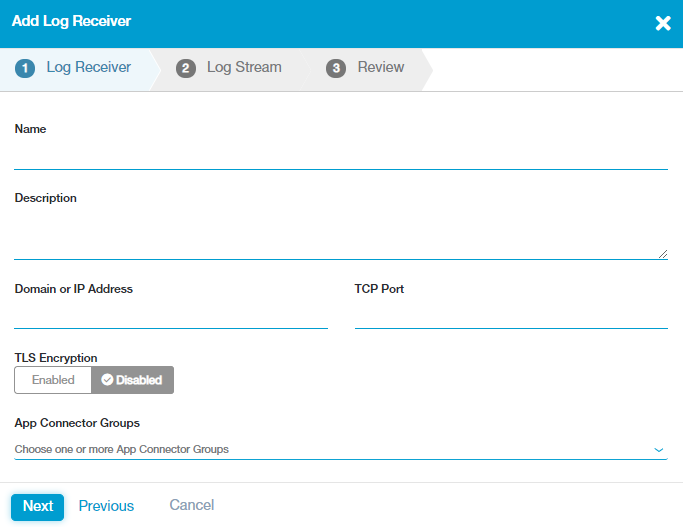
The Add Log Receiver window appears.
- In the Add Log Receiver window, configure the following tabs:
- 1. Log Receiver
- On the Log Receiver tab:
- Name: Enter a name for the log receiver. The name cannot contain special characters, with the exception of periods (.), hyphens (-), and underscores ( _ ).
- Description: (Optional) Enter a description.
- Domain or IP Address: Enter the fully qualified domain name (FQDN) or IP address for the log receiver.
If the FQDN or IP address of the log receiver overlaps with or is the same as the wildcard domain or IP subnet defined in an application segment, the Bypass setting configured for the application segment takes precedence. As a result, if the FQDN or IP address is bypassed for a user on a trusted network, the user's device cannot communicate with the log receiver.
- TCP Port: Enter the TCP port number used by the log receiver.
- TLS Encryption: Enable to encrypt traffic between the App Connector and the log receiver using mutually authenticated TLS communication. To use this setting, the log receiver must support TLS communication. To learn more, see About the Log Streaming Service. By default, this setting is disabled.
- App Connector Groups: Choose the App Connector groups that can forward logs to the receiver, and click Done. You can search for a specific group, click Select All to apply all groups, or click Clear Selection to remove all selections.
If you have a use case where the user's device needs to send logs to the log receiver using Private Applications, configure an application segment with the log receiver domain or IP address and the port that the log receiver is listening on.
- Click Next.
- On the Log Receiver tab:
- 2. Log Stream
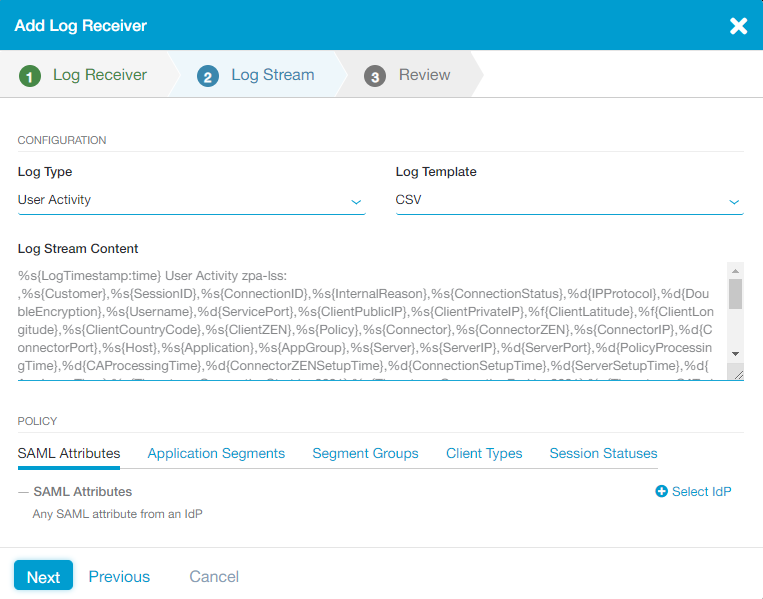
- On the Log Stream tab, select a Log Type from the drop-down menu:
- User Activity: Information on end user requests to applications. To learn more, see User Activity Log Fields.
- User Status: Information related to an end user's availability and connection to Private Applications. To learn more, see User Status Log Fields.
- App Connector Metrics: Information related to an App Connector's metrics. To learn more, see About App Connector Metrics Log Fields.
- App Connector Status: Information related to an App Connector's availability and connection to Private Applications. To learn more, see About App Connector Status Log Fields.
- Private Service Edge Metrics: Information related to a Private Service Edge's metrics. To learn more, see About Private Service Edge Metrics.
- Private Service Edge Status: Information related to a Private Service Edge's availability and connection to Private Applications. To learn more, see About Private Service Edge Status Log Fields.
- Browser Access: HTTP log information related to Browser Access. To learn more, see Browser Access Log Fields and About Browser Access.
- Audit Logs: Session information for all admins accessing the Admin Portal. To learn more, see About Audit Log Fields and About Audit Logs.
- AppProtection: Information related to AppProtection policy activity in your organization. To learn more, see About AppProtection Log Fields.
- Select a Log Template from the drop-down menu.
- CSV: The template uses a comma-separated values format.
- TSV: The template uses a tab-separated values format.
- JSON: The template uses a JavaScript Object Notation format.
- The default Log Stream Content that is displayed changes based on the Log Type and Log Template you selected in previous steps.
You can also edit the log stream content within the text field in order to capture specific fields and create a Custom log template. To learn more, see Understanding the Log Stream Content Format.
If you made changes to the log stream content, the Restore Default Content option appears, allowing you to revert to the default.
- You can define a streaming Policy for the log receiver. For example, you can create a policy where the receiver only captures logs for a specific segment group or a specific set of session status error codes. The criteria you can use is dependent upon the Log Type you select.
- Under SAML and SCIM Attributes or User and Group Attributes, click Select IdP and choose the IdP configuration you want to include in the policy. The IdP must be configured for User SSO. To learn more, see Configuring an IdP for Single Sign-On. If you need to include multiple IdPs in the policy, click Select IdP again. Click Select SAML and SCIM Attributes to add the the following attributes to the policy:
- SAML Attributes or Session Attributes: Click Any SAML Attribute if you want to allow logs for any user to be streamed (i.e., the policy applies to any users, groups, departments, etc.). By default, the policy is set to Any SAML attribute from an IdP. Click a specific SAML attribute if you want to allow logs for only specific users, groups, departments, etc. to be streamed. You can search for a specific attribute, click Select All to apply all attributes, or click Clear Selection to remove all selections. After you make a selection, enter the SAML attribute value (i.e., the users to whom the policy applies) in the text field that appears. Click Add More to add multiple attributes, if necessary.
- SCIM Attributes or User Attributes: Click Select a SCIM attribute name and select the SCIM attribute you want to be streamed. You can also search for a specific SCIM attribute. Click Choose SCIM User and select the SCIM User. Click Add More to add multiple SCIM attributes, if necessary.
- SCIM Groups Attributes or Group Attributes: Click Select a SCIM group name and select the SCIM group you want to be streamed. You can also search for a specific SCIM group. Click Add More to add multiple SCIM groups, if necessary.
If you are subscribed to ZIdentity and have this feature enabled for your tenant, the SAML and SCIM Attributes option is replaced with User and Group Attributes. To learn more, see What Is ZIdentity?
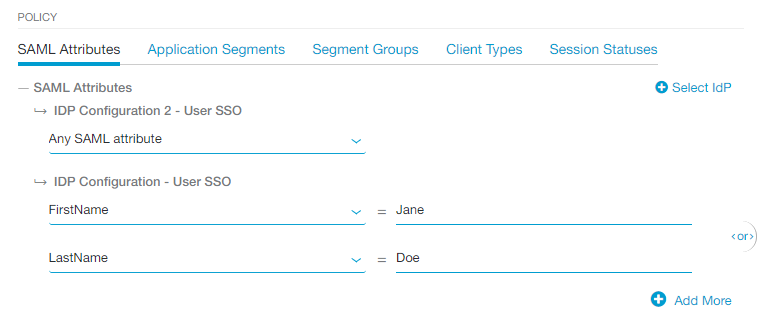
If you added multiple SAML attributes to the policy, an OR Boolean operator is used between them by default. For example, if you selected FirstName and LastName, the policy is only applied to users with the specified FirstName OR LastName for that IdP. However, you can toggle this to an AND operator by clicking on it. See image.
If you selected multiple IdPs for the policy, an OR Boolean operator is used between them by default. For example, you can select one IdP that includes FirstName OR LastName and another IdP that includes Any SAML Attribute. In this case, the policy applies to a user authenticating from the first IdP if they have the specified FirstName OR LastName, or it applies to any user authenticating from the second IdP. See image.
If your IdP configuration for SSO includes SAML attributes from multiple IdPs, Zscaler recommends that you do not use the AND Boolean operator.
- Application Segments: Choose the application segments you want to include from the drop-down menu, and click Done. You can search for a specific application segment, click Select All to apply all application segments, or click Clear Selection to remove all selections. If you don't make any selections, then the policy applies to any application segment.
There are limits to the number of application segments applied to a rule. For a complete list of ranges and limitations for Log Receiver Policy rules, see Ranges & Limitations.
- Segment Groups: Choose the segment groups you want to include from the drop-down menu, and click Done. You can search for a specific segment group, click Select All to apply all segment groups, or click Clear Selection to remove all selections. If you don't make any selections, then the policy applies to any segment group.
- Client Types: Choose the client types (i.e., Zscaler Client Connector, Web Browser, and ZPA LSS) you want to include from the drop-down menu, and click Done. You can search for a specific client type, click Select All to apply all client types, or click Clear Selection to remove all selections. To learn more, see About Browser Access, and the note below regarding the ZPA LSS client. If you don’t make any selections, then the policy applies to any client type.
- Session Statuses: Choose the session status codes you want to exclude from the drop-down menu, and click Done. You can search for a specific status code, click Select All to apply all status codes, or click Clear Selection to remove all selections. If you don't make any selections, then the policy includes any status code.
With the exception of Session Statuses, all of these fields require configuration to include the values. Session Statuses are configured to exclude values.
If you define multiple criteria for the streaming policy, an OR Boolean operation is assumed between Application Segments and Segment Groups, and an AND operation is assumed between SAML Attributes, Application Segments/Segment Groups, Client Types, and Session Statuses. So, "SAML Attributes AND (Application Segments OR Segment Groups) AND Client Types AND Session Statuses" logic is used for the policy.
For example, if you specifiy a SAML attribute, an application segment, and a session status code, then LSS only streams information whenever that attribute's value and application segment appear in the log, and the specific status code does not appear.
When streaming a log, a ZPA LSS client is seen by the service as a user who is authenticating and sending requests to the log receiver. This user represents the LSS service, not an actual user. However, a User Status and User Activity log is generated corresponding to the ZPA LSS client.
In the streaming policy when SAML Attributes is set to Any SAML Attribute, it is interpreted by Private Applications to include all users, including the ZPA LSS client. If you do not want logs from the ZPA LSS client to stream to your log receiver, you can modify the streaming policy to do one of the following:
- Specify the Application Segments that must have logs streamed.
- Specify the Segment Groups that must have logs streamed.
- Specify SAML attributes, instead of using the allow any attribute default.
- Click Next.
- On the Log Stream tab, select a Log Type from the drop-down menu:
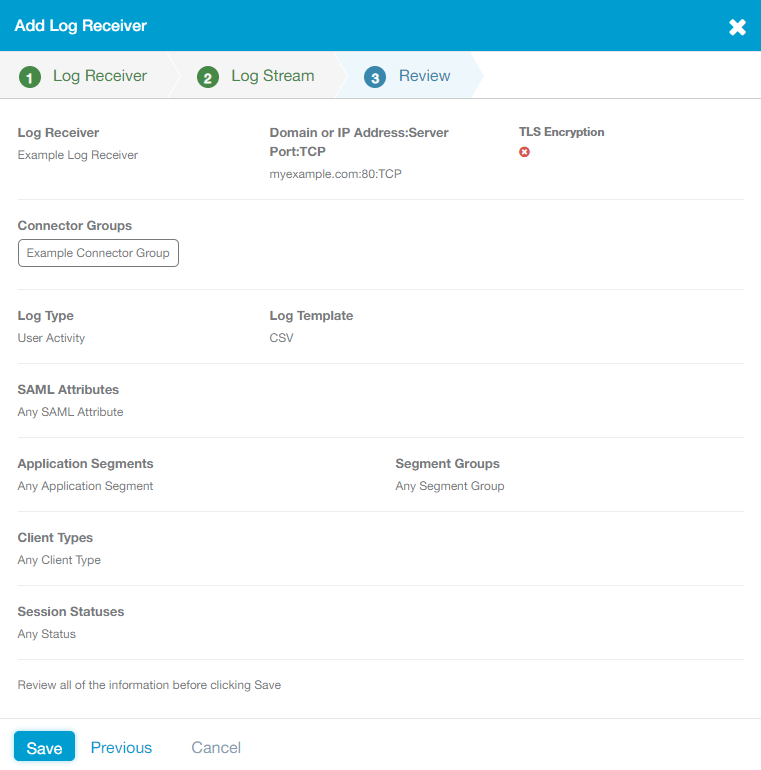
- 3. Review
- 1. Log Receiver
- Go to Logs > Log Streaming > Log Receivers.
- In the table, locate the log receiver you want to modify and click the Copy icon.
The Add Log Receiver window appears.
- In the Add Log Receiver window, modify fields as necessary. To learn more about each field, see the procedure above.
- Click Save.
- Go to Logs > Log Streaming > Log Receivers.
- In the table, locate the log receiver you want to modify and click the Edit icon.
The Edit Log Receiver window appears.
- In the Edit Log Receiver window, modify fields as necessary. To learn more about each field, see the procedure above.
- Click Save.
- Go to Logs > Log Streaming > Log Receivers.
- In the table, locate the log receiver you want to modify and click the Delete icon.
- In the confirmation window that appears, click Delete.


