Experience Center
Configuring Block Notifications
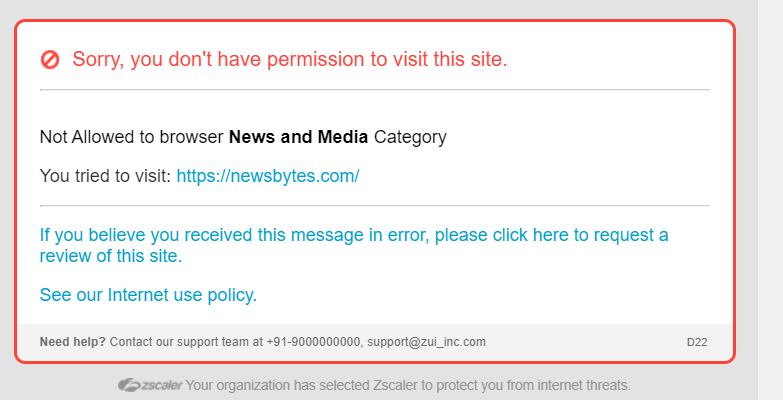
The Zscaler service displays a notification page to users whenever it blocks access to certain sites, files, or internet applications. Additionally, the service displays a notification when it blocks access to a site due to a bad certificate (that is, if the certificate issuer is unknown, if the certificate has expired, or if the Common Name in the certificate does not match). For example, if a user browses a site that is in a URL category that was blocked, the service blocks access to the site and displays a block notification.
The service displays the block notification any time there is a policy violation. For example, if a user attempts to upload or download an infected file attachment, the service blocks the file and displays a notification in the user’s browser stating that a virus-infected file was blocked. Similarly, if a user exceeds the daily quota for how much time they can browse social networking sites (as set by an admin), the attempt to log into one of their servers is blocked and the service displays a page in the user's browser stating that access was denied because the daily quota was reached.
The service also displays a block notification when users access malicious domains that are blocked via the Advanced Threat Protection policy. Depending on the protocol (HTTP or HTTPS) and the proxy mode (Transparent or Explicit) used, the service displays a block notification or an error message, as explained in the following table:
| Protocol | Proxy Mode | Block Notification Shown? |
|---|---|---|
| HTTP | Transparent | Always shown |
| HTTP | Explicit | Always shown |
| HTTPS | Transparent | Block notification is shown if SSL Inspection is enabled, otherwise a 403 error is displayed. |
| HTTPS | Explicit | Block notification is shown if SSL Inspection is enabled, otherwise a Connection Refused error is displayed. |
- In the case of malicious HTTPS access without SSL Inspection, an HTTP error message might not always be served as the connection might sometimes be terminated before the TLS handshake.
- For block notifications to be displayed, the client and the server must follow proper protocols. Malicious clients often do not follow proper protocols and an error message is displayed in such cases.
The service provides a default notification which you can customize, or you can redirect users to an external site that hosts the notification page.
To configure the block notifications:
- Go to Policies > Common Configuration > Resources > End User Notifications > Browser > Global Configuration.
- Under Configure Notifications, choose the Notification Type, and configure accordingly:
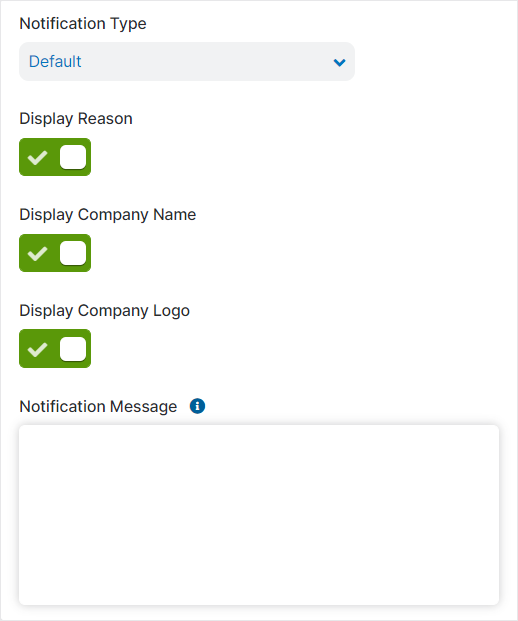
- Default
Choose Default to display the system-generated message.
- Display Reason: Enable to display why access to a site, file, or application was blocked or restricted in the end user notifications. This setting also applies to the caution notification and quarantine notification.
- Display Company Name: Enable to display the name of your organization in the end user notifications. This setting also applies to the caution notification and quarantine notification.
- Display Company Logo: Enable to display the logo of your organization in the end user notification. You can upload your company logo on the Company Profile page. This setting also affects the caution notification and quarantine notification.
Notification Message: Enter a message to display in the following end user notifications: URL Categorization, Security Violation, and Web DLP Violation. This message appears when the service blocks access due to your organization's policies.
You can also customize the appearance of this notification with CSS styles. For example, you can add a CSS style to change the color of a row's text to blue, and it would affect all block notifications. You can't change the other text in the block notifications because it is generated when users are blocked for policy violations. However, you can customize the appearance of the text or hide it with CSS styles.
- Custom
Choose Custom to redirect to an external site. The following option appears:
- Redirect URL: Enter the redirected URL that hosts the notification. When the user's browser is redirected, the URL includes query parameters, which administrators can use to customize the page that is served or for logging purposes. During the redirection, all query parameters are sent to the external site. For Web DLP Violation policy requests, the query parameters enable the administrator to find the Web Post DLP transaction. These query parameters are:
action: Specifies the action that triggered the redirect. The action can be block or caution.cat: Specifies the URL category of the URL, if available.kind: Specifies the policy that triggered the URL redirection.- See a table of possible kind values and their mapping to policiesClose1 to 10 of 19 Page 1 of 2
- See a table of possible kind values and their mapping to policies
reason: Specifies the string that contains additional information about the URL.- See a table of possible block notificationsClose1 to 10 of 82 Page 1 of 9
- See a table of possible block notifications
reasoncode: Specifies the reason that this notification or redirect triggered.referer: Specifies the referer URL in URL-encoded format.rule: Specifies the internal rule-id that triggered the block, if available.timebound: Specifies whether this notification or redirect is triggered by a policy that includes time interval as a criterion.url: Specifies the original URL that caused this redirect or notification.user: Specifies the user-id (the login name) of the user, if available.locid: Specifies the internal name of the location configured in the Admin Portal from which the traffic is originating.lang: Specifies the language in which the site is displayed.zsq: Specifies the parameter used by the Zscaler service.
The following is an example of the redirect URL:
https://redirectpage.com/?url=https://www.gambling.com/&referer=&reason=Not+allowed+to+browse+Gambling+category&reasoncode=CATEGORY_DENIED&timebound=1&action=deny&kind=category&rule=322760&cat=Gambling&user=user@domain.tld&locid=00000000&lang=fr_FR&zsq=JDspV0Ft81ZLq0j55Z0FsFsL6n0VSDV0F86pDD6zsq
To create a custom AUP or EUN for specific websites:
- Customize the following sample code:
<?php
$url = $_GET['<url>'];
$referer = $_GET['<referer>'];
$reason = $_GET['<reason>'];
$reason_code = $_GET['<reasoncode>'];
$timebound = $_GET['<timebound>'];
$action = $_GET['<action>'];
$kind = $_GET['<kind>'];
$rule = $_GET['<rule>'];
$cat = $_GET['<cat>'];
$user = $_GET['<user>'];
$lang = $_GET['<lang>'];
$zsq = explode("<zsq>", $_GET['<zsq>']);
?>
For example:
<?php

$url = $_GET['https://www.gambling.com'];

$referer = $_GET[''];

$reason = $_GET['Not+allowed+to+browse+Gambling+category'];

$reason_code = $_GET['CATEGORY_DENIED'];

$timebound = $_GET['1'];

$action = $_GET['deny'];

$kind = $_GET['category'];

$rule = $_GET['322760'];

$cat = $_GET['Gambling'];

$user = $_GET['user@domain.tld'];

$lang = $_GET['fr_FR'];

$zsq = explode("JDspV0Ft81ZLq0j55Z0FsFsL6n0VSDV0F86pDD6zsq", $_GET['JDspV0Ft81ZLq0j55Z0FsFsL6n0VSDV0F86pDD6zsq']);

?>- Customize the form action URL to that of the appropriate cloud.
- Upload the file to a web server.
- Configure your policy with a custom category containing the website or categories in question, and set the action to Block with a Redirect URL set to the page you uploaded.
If users try to access a website that is set to block and use a custom URL, the service redirects the users to your hosted custom block notification.
Close - Redirect URL: Enter the redirected URL that hosts the notification. When the user's browser is redirected, the URL includes query parameters, which administrators can use to customize the page that is served or for logging purposes. During the redirection, all query parameters are sent to the external site. For Web DLP Violation policy requests, the query parameters enable the administrator to find the Web Post DLP transaction. These query parameters are:
- Default
- You can configure up to four types of block notifications:
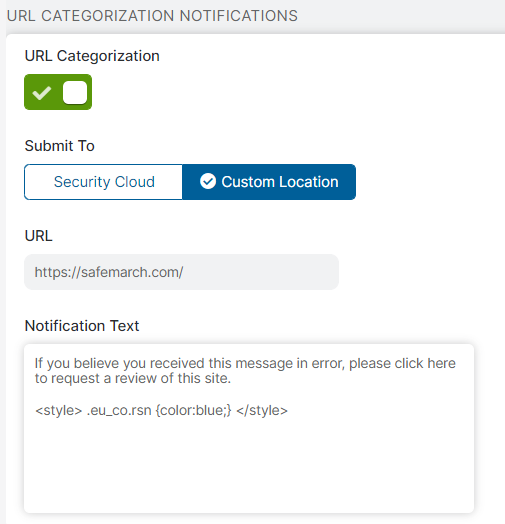
- URL Categorization Notifications
URL Categorization notifications display when users are blocked from accessing URLs that may have been misclassified.
- URL Categorization: Enable the URL Categorization notification. If disabled, the notification uses its default appearance or shows changes made in the Notification Message field. If you entered custom text and CSS styles and this notification is disabled, you can still see the modifications in the previews; however, your users won't see these changes even if you save.
- Submit To: Users can request reviews when they are blocked from accessing URLs that may have been misclassified. Choose whether users send their requests to the Zscaler service (Security Cloud) or to a site that you specify (Custom Location). If you choose Custom Location, the following option appears.
- URL: Enter the URL of the site to which the policy review requests are sent.
Notification Text: Enter the policy request message that appears in the URL Categorization notification. Any text you entered in the Notification Message field also appears in this notification.
You can customize the appearance of this notification with CSS styles. Any changes made to this field only affects the URL Categorization notification alone. For example, if you add a CSS style to change a row's text color, only the Deny URL Category notification template shows the change. Note that you cannot change the other text in the block notification because it's generated when users are blocked for policy violations. However, you can customize the appearance of the text or hide it with CSS styles.
If there are CSS styles modifying the same properties in the Notification Message field and the Notification Text field, the CSS style in Notification Text takes precedence over the Notification Message.
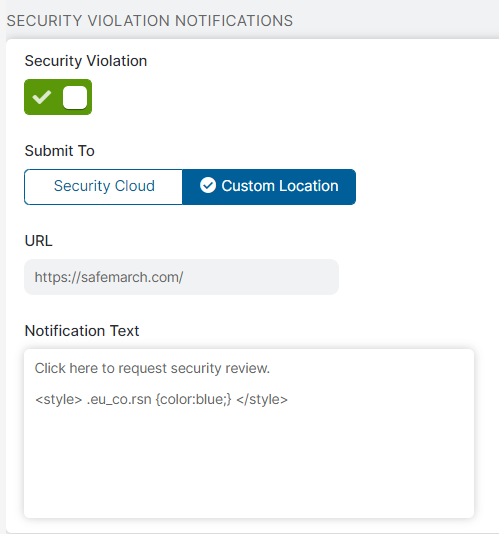
- Security Violation Notifications
Security Violation notifications display when users are blocked from accessing URLs that were identified as being infected with malware.
- Security Violation: Enable the Security Violation notification. If disabled, the notification uses its default appearance or shows changes made in the Notification Message field. If you entered custom text and CSS styles and this notification is disabled, you can still see the modifications in the previews; however, your users won't see these changes even if you save.
- Submit To: Users can request policy reviews when they are blocked from accessing URLs that were identified as being infected with malware. Choose whether users send their requests to the Zscaler service (Security Cloud) or to a site that you specify (Custom Location). If you choose Custom Location, the following option appears.
- URL: Enter the URL of the site to which the policy review requests are sent.
Notification Text: Enter the policy review request message that appears in the Security Violation notification. Any text you entered in the Notification Message field also appears in this notification.
You can customize the appearance of this notification with CSS styles. Any changes made to this field only affects the Security Violation notification alone. For example, if you add a CSS style to change a row's text color, only the Deny Security notification template shows the change. Note that you cannot change the other text in the block notification because it's generated when users are blocked for policy violations. However, you can customize the appearance of the text or hide it with CSS styles.
If there are CSS styles modifying the same properties in the Notification Message field and the Notification Text field, the CSS style in Notification Text takes precedence over the Notification Message.
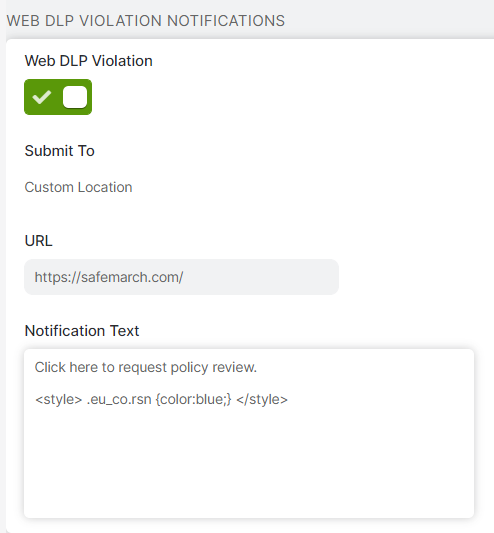
- Web DLP Violation Notifications
This notification is displayed when users are blocked from posting to certain sites due to a Web DLP policy violation.
- Web DLP Violation: Enable the Web DLP Violation notification. If disabled, the notification uses its default appearance or shows changes made in the Notification Message field. If you entered custom text and CSS styles and this notification is disabled, you can still see the modifications in the previews; however, your users won't see these changes even if you save.
- Submit To: Users can request policy reviews when they are blocked from accessing or posting to certain sites due to a Web DLP policy violation. Users can send their requests to a site that you specify. This field cannot be modified.
- URL: Enter the URL of the site to which the policy review requests are sent.
Notification Text: Enter the policy request message that appears in the Web DLP Violation notification. Any text you entered in the Notification Message field also appears in this notification.
You can customize the appearance of this notification with CSS styles. Any changes made to this field only affects the Web DLP Violation notification alone. For example, if you add a CSS style to change a row's text color, only the Deny DLP notification template shows the change. Note that you cannot change the other text in the block notification because it's generated when users are blocked for policy violations. However, you can customize the appearance of the text or hide it with CSS styles.
If there are CSS styles modifying the same properties in the Notification Message field and the Notification Text field, the CSS style in Notification Text takes precedence over the Notification Message.
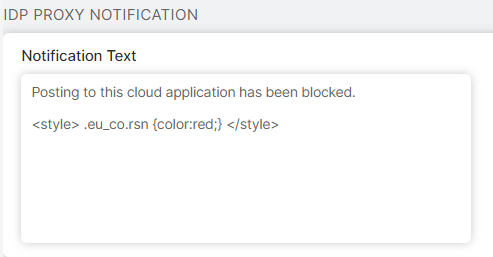
- IdP Proxy Notifications
This notification is displayed when users are blocked from posting to certain cloud apps due to an IdP Proxy settings violation.
Notification Text: Enter the policy review request message that appears in the IdP Proxy notification. Any text you entered in the Notification Message field also appears in this notification.
You can customize the appearance of this notification with CSS styles. Any changes made to this field only affects the IdP Proxy notification alone. For example, if you add a CSS style to change a row's text color, only the Deny IdP Proxy notification template shows the change. Note that you cannot change the other text in the block notification because it's generated when users are blocked for policy violations. However, you can customize the appearance of the text or hide it with CSS styles.
If there are CSS styles modifying the same properties in the Notification Message field and the Notification Text field, the CSS style in Notification Text takes precedence over the Notification Message.
Close
- URL Categorization Notifications
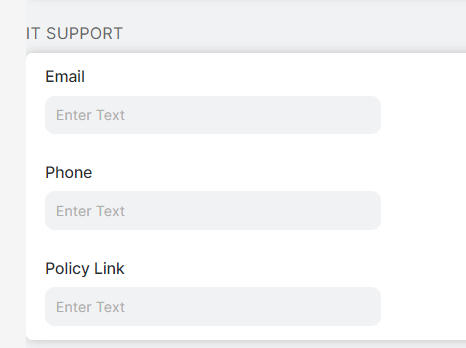
Under IT Support, enter one or more of the following contact information fields so users can seek additional information about why access to pages, files, or web applications is restricted.
- Email: You can provide an email address for a contact who can explain your company's use of the Zscaler service to protect your network.
- Phone: You can provide a phone number for a contact who can explain your company's use of the Zscaler service to protect your network. Following are examples of valid formats: 123-456-7890, +91-1234567890, 1234567890, and +911234567890.
- Policy Link: You can provide a URL pointing to a page you created on your company intranet that describes your current policy about using corporate network and Internet resource.
This information also appears on the Acceptable Use Policy, caution notification, and quarantine notification.
Click Preview Template(s) to preview the block notifications you configured. Use the Next and Previous buttons to navigate through the following notification previews.
- Deny Security: The Security Violation notification.
- Deny DLP: The Web DLP Violation notification.
- Deny URL Category: The URL Categorization notification.
- Deny IdP Proxy: The IdP Proxy notification.
CSS style and JavaScript don't render when previewing EUN templates.
- Click Save and activate the change.
