Experience Center
Accessing Privileged Remote Access Files
You can view and filter data for files uploaded as part of the Privileged Remote Access (PRA) File Transfer System. To view file data, go to Analytics > Privileged Remote Access > Files.
Uploaded files from a default PRA Portal can only be viewed on the Files page in the Global tenant. Files uploaded to a Microtenant PRA Portal can only be viewed on the Files page for that Microtenant.
Files Tools
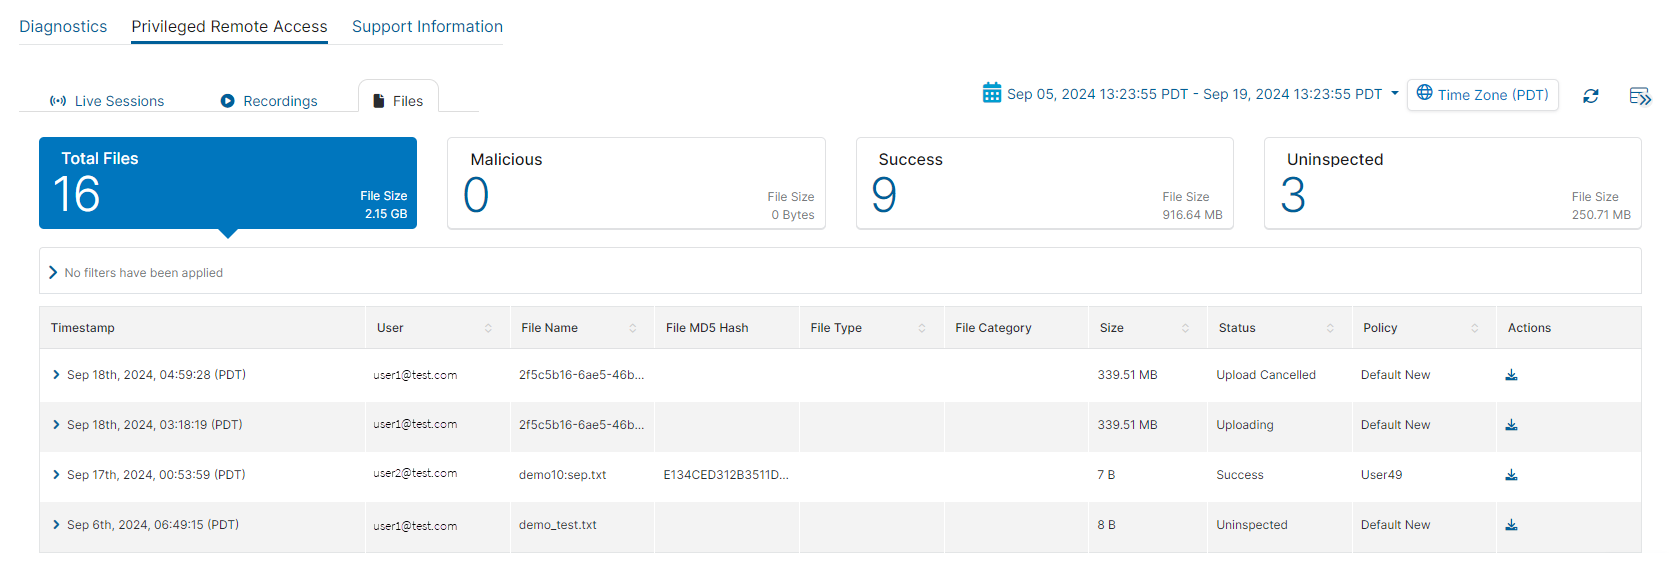
The Files page displays the following information and functionality:
- Time Range Filter: View PRA File Transfer System data over a period between 1 Hour to 365 Days. To change the time range, click the Calendar menu and select a preset range or select Custom Range. If you use Custom Range, the start date must be within the last 365 days. The end date automatically sets to the system's current time. To change the time zone, click the current Time Zone button. This filter applies to all widgets on the Files page. By default, the detailed activity for all files is displayed for PRA File Transfer Systems that occurred in the last 24 hours.
- Refresh Icon: Refresh the dashboard to reflect the most current information.
- Expand Icon: Expand all rows in the table to see more information about each file.

Viewing Files
By default, the table displays the Total Files uploaded to a privileged portal. You can change this by choosing one of the following filters:
- Malicious: The total number of malicious files that have been identified for the PRA File Transfer System.
- Success: The total number of files that have been successfully inspected for the PRA File Transfer System.
- Uninspected: The total number of files that have been uninspected for the PRA File Transfer System.

Filtering Files
You can apply filters or drill down further into the files data using the Query Builder. By default, no filters are applied.
To configure filters using the Query Builder:
- File ID: See requests for a file ID.
- File Name: See requests for a particular file name.
- Policy Name: See requests for a particular policy name.
- Portal Name: See requests for a particular privileged portal name.
- Status: See requests for a particular file status.
- User Email: See requests for a particular user email address.
- Click Add Filters and select a filter from the drop-down menu. The character & cannot be used in the Add Filters field.
- Select an operator from the drop-down menu (e.g., Contains). The operators available are determined by the filter you are configuring.
- Select the fields from the drop-down menu or enter the values required for the filter. The field or value required is determined by the filter you are configuring.
Filters using the Contains operator allow a maximum of 7 entries. All filters using operators that require text input must use a semicolon (;) to separate multiple entries (e.g., 137; 138; 139). When configuring multiple text entries and using the Less Than operator, the results show transactions starting from the largest entry provided. When configuring multiple text entries and using the Greater Than operator, the results show transactions starting from the smallest entry provided.

- Click Apply.
To apply more filters, click Add Filters again. The filter query section within the page updates automatically to include the proper filter for the field name you selected, along with the applicable operator configuration for that field. The character & cannot be used in the Add Filters field.
To remove an added filter, click the Close icon then click Apply. To remove all filters, click Clear All.
The table displays the following data for files:
- Timestamp: The time that the files were uploaded. When you expand the row for an application segment, you can see more information.
- Portal Name: The name of the privileged portal that the file was uploaded into.
- Country Code: The country selected for the portal policy assigned to the privileged portal that the file was uploaded to.
- IP Address: The IP address the file was uploaded from.
- File Deleted: The status of the deletion of the file.
- File ID: The file identification number. When you upload a file it is assigned an ID number.
- Inspection Type: The inspection format that was used to inspect the file.
- User: The user who uploaded the file.
- File Name: The name of the file that was uploaded.
- File MD5 Hash: The MD5 hash value for that specific file.
- File Type: The format of the file.
- File Category: The category that the file is from.
- Size: The size of the file. The maximum file size you can upload is 1 GB.
- Status: The status of the file's upload.
- Policy: The name of the portal policy assigned to the privileged portal that the file was uploaded to.
- Actions: Click the Download icon to export a file (.csv) containing information on the PRA File Transfer System file for the selected time frame.
