Experience Center
NSS Collector Deployment Guide for VMware vSphere
The NSS Collector functionality and the data collected using this functionality are exclusive to Shadow IT Report. To enable this feature for your organization, contact Zscaler Support.
This guide describes the tasks required to deploy Nanolog Streaming Service (NSS) Collector to collect logs in real time from third-party security devices inside your network perimeter and stream them to the Zscaler cloud. Each step in the guide links you to the appropriate article for that configuration task on vSphere.
- Step 1: Ensure All NSS Collector Deployment Prerequisites Are Met
You need the following to deploy the NSS Collector on your virtual machine (VM):
- A subscription to NSS Collector
- VM Specs:
- 2 CPU cores: NSS Collector uses one core for the control plane and another core for the data plane.
- Instance memory:
- 8 GB for up to 15K users
- 16 GB for up to 40K users
- 32 GB for up to 100K users
- Data disk size: 500 GB
- Host Specs:
- Hypervisor: VMware ESX/ESXi v5.0 and later
- Host CPU: 64-bit Xeon or equivalent
- Host CPU Speed: Greater than or equal to 2.40GHz
- VMware vSphere Client or vCenter
- Network Adapter: E1000
- Network Specs:
- VM Network: 2 Virtual NICs. Optionally, you might need two additional virtual NICs.
- Bandwidth for log streaming: 11 Mbps for 10K users is an example average value.
- IP Addresses: The following table lists the IP addresses and the interfaces on which they're configured. Internal IP addresses are allowed. The management IP address and service IP address can be on different subnets, as long as the DNS server can be reached on both subnets.
Virtual Interface IP Address Description em0 (First network adapter) Management IP Address This is used for control connections to the Zscaler cloud and to make an SSH connection to the NSS Collector VM for configuration and management.
You can customize the deployment and define a separate IP address for the SSH connection to the NSS Collector VM.
em1 (Second network adapter) Service IP Address This is used for data connections to the Zscaler cloud. Firewall Requirements
It is mandatory to deploy the NSS Collector instance behind a VM network security group. The NSS Collector instance requires only outbound connections to the Zscaler cloud. It doesn't require any inbound connections to your network from the Zscaler cloud. To view the firewall requirements for your specific account, refer to the Zscaler Cloud Configuration Requirements for your Zscaler cloud: https://config.zscaler.com/<Zscaler Cloud Name>/nss.
You can find the name of your Zscaler cloud in the URL you use to log in to the Zscaler service. For example, if you log in to admin.zscaler.net, then go to https://config.zscaler.com/zscaler.net/nss.
The IP ranges are necessary to ensure that the service isn't affected by future Zscaler cloud expansion.
Communication from the NSS Collector to the Zscaler cloud must be excluded from SSL inspection to ensure that the NSS Collector can authenticate to the Nanolog cluster using mutual TLS.
User Provisioning
To leverage complete Shadow IT Report functionality, users whose traffic traversed through third-party vendor devices need to be provisioned through one of the mechanisms supported by Zscaler. To learn about user provisioning, see About Provisioning and Authenticating Users.
Close - Step 2: Add an NSS Collector Server and Download the SSL Certificate in the Admin Portal
You can configure the NSS Collector server in the Admin Portal to obtain the packaged software (VM image) that must be installed in your organization’s network perimeter. To learn more about NSS Collectors and their use in third-party log integration with Zscaler, see Understanding Nanolog Streaming Service (NSS).
An organization can have up to 4 NSS Collector servers.
To add an NSS Collector server:
- Go to Logs > Log Streaming > Nanolog Streaming Service.
- From the NSS Collector Servers tab, click Add NSS Collector Server.
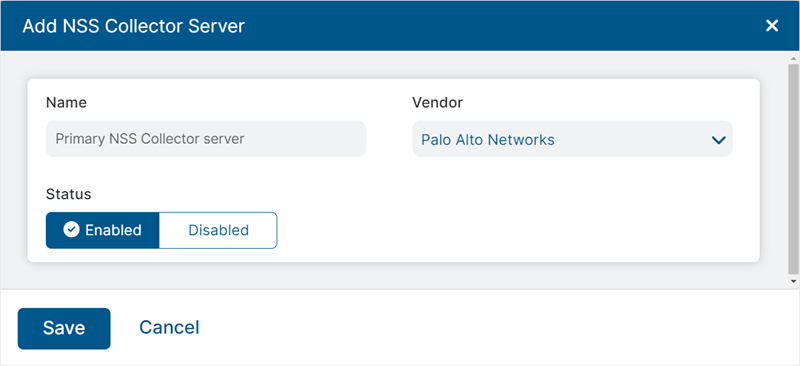
- In the Add NSS Collector Server window:
- Name: Enter a name for the NSS Collector server.
- Vendor: Select the vendor of the third-party firewall or web proxy service used by your organization for which the logs must be integrated with Zscaler.
- Status: Select Enabled to allow the NSS Collector to process and stream logs from the third-party firewalls or web proxies to the Zscaler service. When disabled, the NSS Collector does not process or stream logs from third-party security solutions.
- Click Save.
When the NSS Collector server is added to the Admin Portal, Zscaler generates the packaged software for installation and issues an SSL certificate to the server.
To download the packaged software and the SSL certificate for the server:
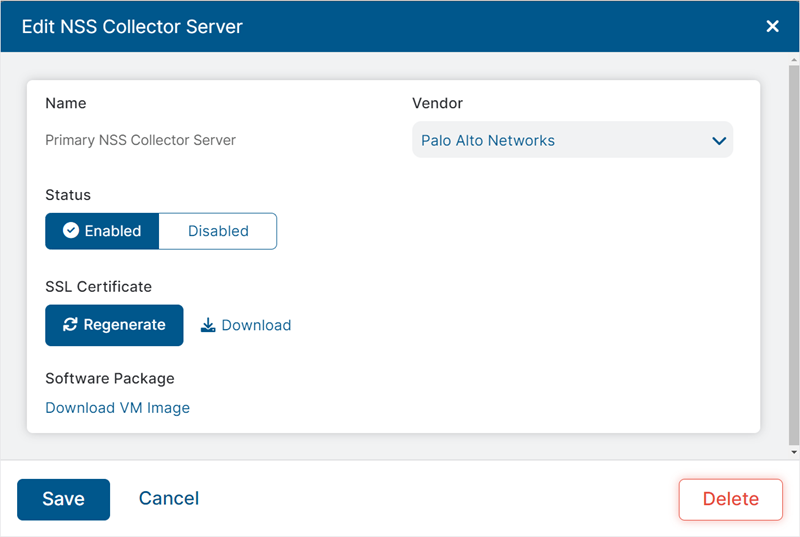
- Click the Edit icon displayed against the NSS Collector server.
- In the Edit NSS Server window:
- Under the SSL Certificate field, you can download the SSL certificate issued for the NSS Collector server. You can also generate a new certificate for the server as required. The SSL certificate must be installed on the NSS Collector VM so that the NSS Collector can authenticate as a client with the Zscaler service.
- Under the Software field, you can download the packaged software generated for the server for installation.
You can also download the SSL certificate directly from the NSS Collector Servers table by clicking the Download button against the required NSS Collector server under the SSL Certificate column.
Close - Step 3: Use the ESX/ESXi Server to Configure and Start the NSS Collector on the VM Instance
Before you configure and start the NSS Collector on the vSphere client, ensure that you have downloaded the NSS Collector OVA file and SSL certificate from the Admin Portal, as explained in Step 2 in the guide.
To configure the NSS Collector virtual appliance on the VM, log in to the vSphere client and perform the following actions:
- a. Import the NSS Collector OVA file.
Go to File > Deploy OVF Template and use the Deploy OVF Template wizard to deploy the NSS Collector VM.
Close - b. Configure the network.
Complete the following steps to configure the network:
- Select the NSS Collector VM and either click the Power On button or power on the virtual machine.
- On the Console tab, log in to the ZscalerOS command prompt with the following credentials:
- Username:
zsroot - Password:
zsroot
- Username:
By default, root login is not permitted. Administrators must use the utility sudo to run a command with higher privileges.
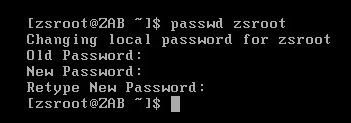
Zscaler strongly recommends that you change this default password by running the command
passwd. For more details about running this command, click here.- To change the password, enter
passwdand your username. For example, if you are using the default username, the command is:
passwd zsroot
- When prompted, specify the following:
- Your current password
- Your new password
Close
- Enter the command
sudo nss configureand complete the following:- Enter the DNS server IP address (e.g.,
192.168.1.1). - Enter the management interface IP with CIDR netmask. Use the management IP address for SSH or FTP (e.g.,
192.168.3.1/16). - Enter the default gateway for the management IP address (e.g.,
192.168.1.1). - Enter the service IP address with CIDR netmask (e.g.,
192.168.3.2/16). NSS Collector uses the service IP address to communicate with the Zscaler cloud and with the SIEM. - Enter the default gateway for the service IP address (e.g.,
192.168.1.1).
- Enter the DNS server IP address (e.g.,
The management IP address and service IP address can be on different subnets, as long as the DNS server can be reached on both subnets.
- Check the applied network configuration by running the following command:
sudo nss dump-config
Close - c. Configure the NSS Collector.
Enter the command
Closesudo nss collector-configureand then enter the third-party log vendor name (PANFW,FORTIFW, orBLUECOAT). - d. Install the SSL certificate.
The NSS Collector uses this certificate to authenticate itself to the Zscaler service. Ensure that the SSL certificate is installed on only one active NSS Collector VM at a time. Having multiple NSS Collector VMs that use the same certificate causes cloud connection flapping, which would disrupt the streaming of logs to the Zscaler cloud.
- Navigate to the SSL certificate that you saved.
- Use FTP, SCP, or SFTP to upload it to the management IP address of the NSS Collector.
- On the vSphere client, click the Console tab, and log in with the following credentials:
- Username:
zsroot - Password:
zsroot
- Username:
- Go to the Console tab or use SSH to connect to the management IP address.
- Run the following command:
sudo nss install-cert
Specify the path to the uploaded certificate bundle.
- Check the configuration by running the following command:
sudo nss dump-config
Close - e. Download the NSS Collector binaries.
Before starting the NSS Collector:
- On the vSphere client, click the Console tab or use SSH to connect to the management IP address.
- Run the following command to download and install the NSS Collector binaries:
sudo nss update-now
After the first NSS Collector software deployment, the software is automatically updated with new versions.
Close - f. Start the NSS Collector.
Complete the following steps to start the NSS Collector:
- On the vSphere client, click the Console tab or use SSH to connect to the management IP address.
- Run the following command:
sudo nss start
Ensure that the command shows that the NSS Collector started successfully. It can take a few minutes for the NSS Collector to start collecting logs and sending them to the Zscaler cloud.
After starting the NSS Collector for the first time, you can run the following command to check that the latest NSS Collector software version is installed:
sudo nss checkversion
To enable the NSS Collector to start automatically after a restart, run the following command:
sudo nss enable-autostart
You can also explore other options by running the following command:
sudo nss help
Close
- a. Import the NSS Collector OVA file.
- Step 4: Configure Third-Party syslog Feed for NSS Collector
The following configuration steps apply only to Palo Alto Networks and they cover PAN-OS firewall log forwarding setup.
The NSS Collector accepts syslog feed in CEF format over TCP on port 51400. You need to configure these on the Palo Alto Networks software application.
To enable log forwarding of the traffic logs that correspond to your device's software version, refer to the Palo Alto Networks documentation.
- a. Creating Server Profile
On the Device/Syslog configuration, create a Syslog Server Profile with the following parameters on the main Servers tab:
- Syslog Server: Specify the NSS Collector's IP address.
- Transport: Select TCP as the protocol to forward logs.
- Port: Enter
51400as the port number. - Format: Specify IETF as the syslog format to be used.
- b. Configuring Log Type
On the Custom Log Format tab, configure Traffic Log Type to comply with the following data structure:
CEF:0|Palo Alto Networks|PAN-OS|$sender_sw_version|$subtype|$type|1|rt=$cef-formatted-receive_time deviceExternalId=$serial src=$src dst=$dst suser=$srcuser app=$app spt=$sport proto=$proto act=$action in=$bytes_sent out=$bytes_received start=$cef-formatted-time_generated reason=$session_end_reason
If the preceding fields and the fields required for Shadow IT report generation are not present in the logs, the NSS Collector discards those log records.
Close
To continue with configuring the Log Forwarding Object, setting up desired Policies, and then committing your changes, refer to the Palo Alto Networks documentation.
Close - a. Creating Server Profile


